
Earlier this year I released the initial version of the D365FO Admin Toolkit as an open source project on GitHub. One piece of (extremely fair) feedback I got was that I did not explain the process on how to clone the source code of that project to a local machine if you wanted to extend the solution or even if you wanted to help contribute to it by creating new features or functionalities. This blog post walks through the steps you need to take if you want to clone a D365FO solution from GitHub to a local development environment.

Prerequisites
Having an already created (free) GitHub account will make this process easier.
What is GitHub?
GitHub is a developer platform that allows developers to create, store, manage and share their code. It uses a technology called Git to provide the distributed version control of Git plus access control, bug tracking, software feature requests, task management, continuous integration, and wikis for every project.
You may use an internal source control platform at your organization like Azure DevOps, BitBucket, etc. GitHub is the public facing version of that.
It is the easiest way for projects like this to share source code with the community.
Steps to Connect to a GitHub Project
The first thing we need to do is to connect our local Visual Studio instance to a GitHub project.
Note: I am going to show the steps to connect to the D365FO Admin Toolkit project I host on GitHub but the steps below apply to all D365FO projects hosted on GitHub.
On GitHub, find the project you are wanting to clone and copy the URL (for our example, this would be https://github.com/ameyer505/D365FOAdminToolkit)

Launch Visual Studio and select ‘Clone a Repository’

Input the URL from GitHub in the ‘Repository Location’ textbox and click Clone

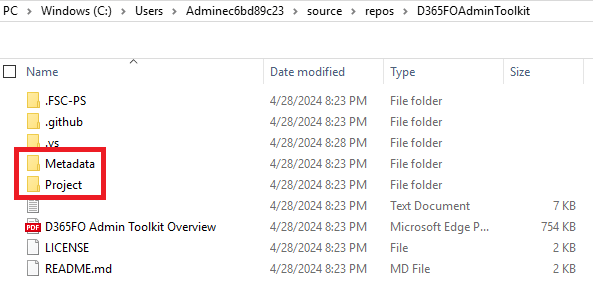
Once the solution is cloned, navigate to the folder where the solution was copied in a File Explorer, you will find a Metadata and a Project folder. The Project folder contains the Visual Studio files necessary to maintain the project solution itself and the Metadata folder contains the actual X++ source code. Normally the Project folder would live within your local user’s folder on the C:\ drive and the Metadata folder need to reside in the PackagesLocalDirectory folder of the environment, this can either be on a separate drive path (like K:\AosService\PackagesLocalDirectory for cloud hosted environments) or can be on the same drive but in another location (like C:\AosService\PackagesLocalDirectory for locally hosted VHDs).
One of the unique aspects of Git is that you can only map a single folder to be under source control, so because we need to map the Project and Metadata folder to separate locations how do we accomplish this?
We can utilize a Windows feature called a ‘symbolic link’, this allows us to create a mapping from one file path location to another so that any changes made in one location also show up in another. In this way we can make Git happy to keep all of the files and folders under source control in one file location but can also make the AOS happy because the X++ code files are located in the correct location.
We will use Windows Command Line to accomplish this, you will need to launch the application with Administrative permissions to successfully execute the command. The syntax is as follows:
mklink /d <PathToPackagesLocalDirectory> <PathToGitFolder>
For cloud hosted D365FO environments, the path to the PackagesLocalDirectory folder should be:
- K:\AosService\PackagesLocalDirectory
For local VHDs, the path to the PackagesLocalDirectory will be:
- C:\AosService\PackagesLocalDirectory
For example, in my case the syntax was:
mklink /d K:\AosService\PackagesLocalDirectory\D365FOAdminToolkit C:\Users\Adminec6bd89c23\source\repos\D365FOAdminToolkit\Metadata\D365FOAdminToolkit
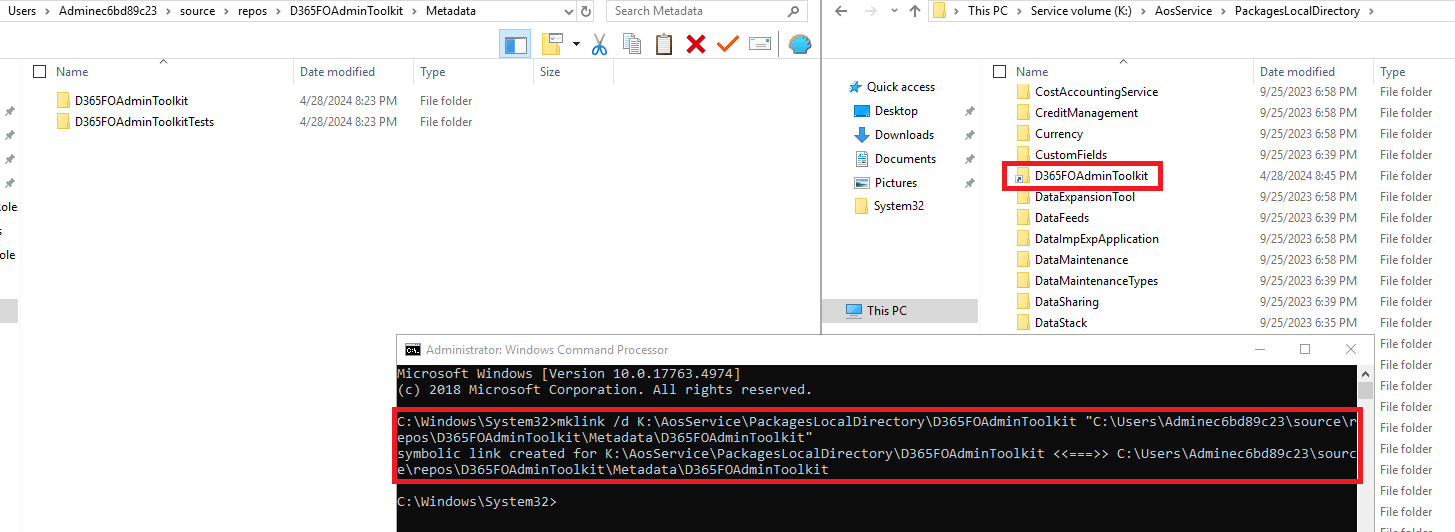
Once the command is executed, you will get confirmation it was successful and you will notice the folder is created in the PackagesLocalDirectory folder. You may notice that this folder icon looks slightly different than the rest as it has a small arrow in the bottom left hand corner, this is to alert everyone that this folder is linked from another location.
We will perform the same process above for the D365FOAdminToolkitTests folder:

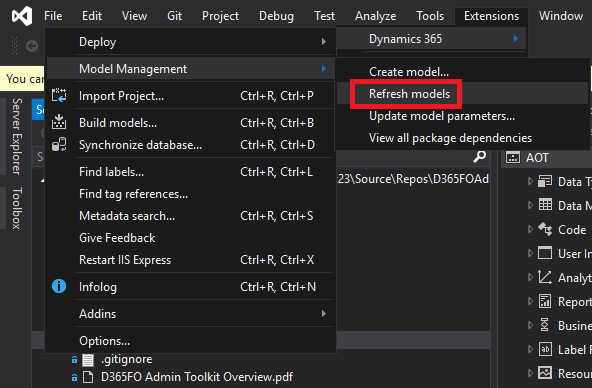
Back in Visual Studio go to Extensions -> Dynamics 365 -> Model Management -> Refresh Models
Now double click on the .SLN file, this loads the solution as the active solution in Visual Studio
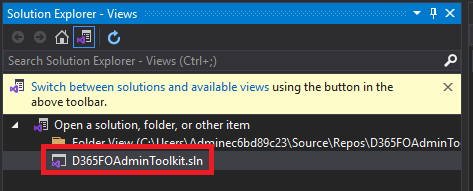
At this point, the solution will load within Visual Studio:

This solution contains both X++ projects and a .NET project, I’ve written in the past about how you can have both project types in one solution.
This is important in our case because there are referenced libraries in the .NET project that we need to gather for the solution to work. If you open the References menu under the .NET project, you will see a host of library references that have a yellow triangle next to them, these are libraries where Visual Studio is not sure where to find. In most cases these are handled by NuGet during the build (we’ll get to that in a second) but there are two native D365FO libraries that we reference that you have to manually add. These include:
- Microsoft.Dynamics.AX.Metadata.Core
- Microsoft Dynamics.AX.Security.Management

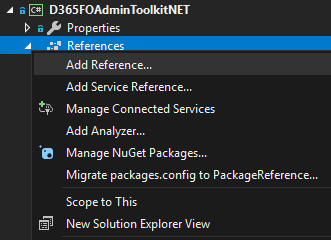
To add these native D365FO libraries, right click on References and go to Add Reference…
Then go to the Browse menu and click the ‘Browse…’ button at the bottom of the screen:

Then navigate to your PackagesLocalDirectory folder and look for the bin folder, in our case that was:
- K:\AosService\PackagesLocalDirectory\bin
If you are using the new Unified Development Environment deployed via PPAC, the path will be:
- C:\Users\[UsersDirectory]\AppData\Local\Microsoft\Dynamics365\[AppVersion]\PackagesLocalDirectory\bin
Then find both of the DLLs listed above.

Once those are added we have to set up the NuGet package manager for Visual Studio. NuGet is a package manager where developers can share pre-packaged libraries for others to use. This is where a majority of the libraries we reference are stored, but we have to setup a connection to NuGet for this to work. To do this right click on the .NET project and click on ‘Manage NuGet Packages…’:

In the window that opens, look for the settings gear icon in the upper right hand corner:

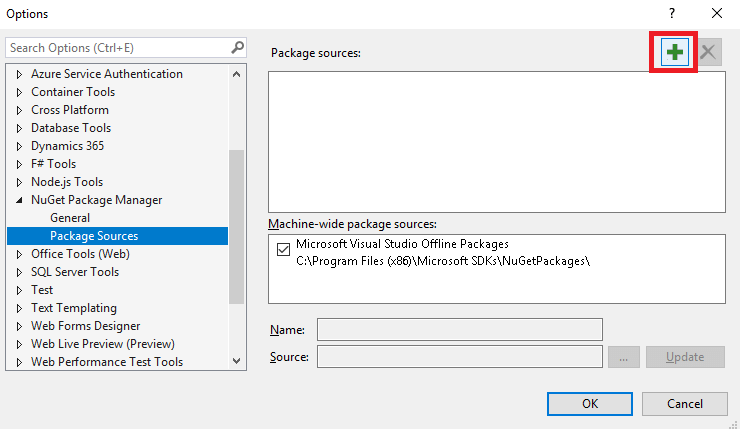
On the Options dialog that appears, click on the green plus icon to add a new package source:
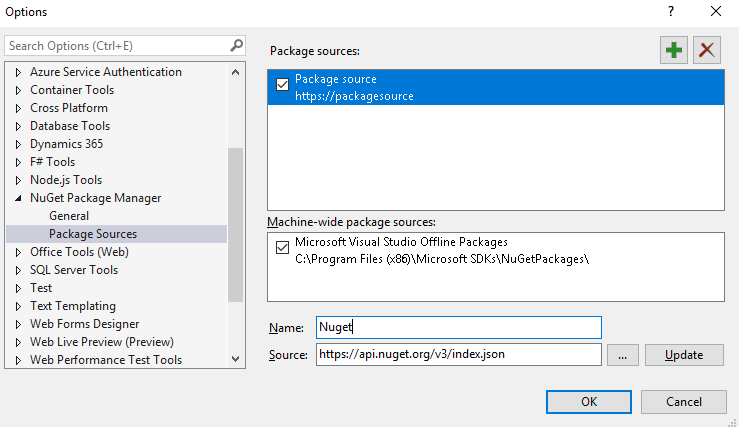
Now enter the following information:
- Name: Nuget
- Source: https://api.nuget.org/v3/index.json
And click OK.
Now you should be able to go to the .NET project, right click on it, and go to Build. The build process will automatically download the necessary DLLs from NuGet.

If everything was configured correctly, you will get a confirmation that the build succeeded:

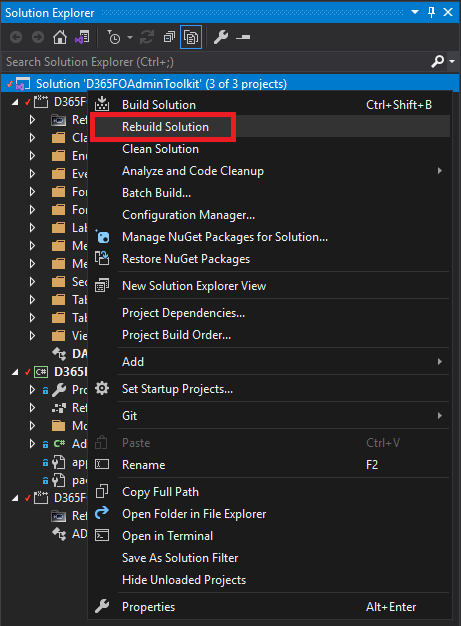
Now that we know that the .NET project builds successfully, we can build the entire solution by right clicking the solution and going to ‘Rebuild Solution’:
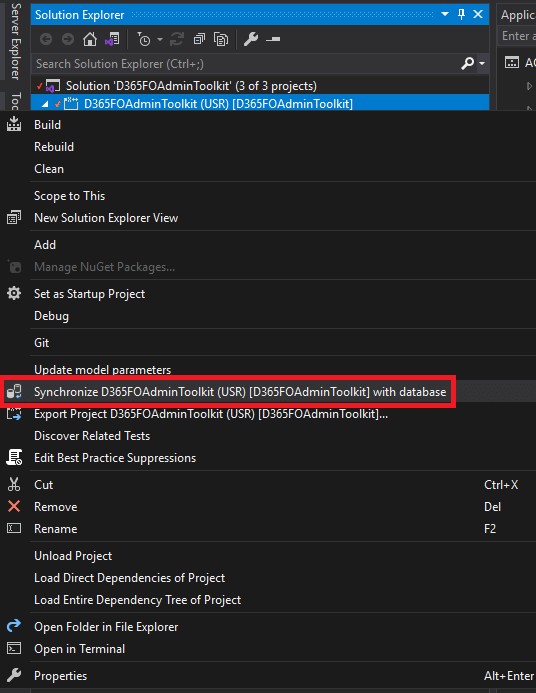
And once that completes, be sure to synchronize the X++ project to the database:
Congratulations! You’ve successfully cloned a project from GitHub and can now execute, modify, and deploy the solution locally!
Follow Up
I want to create a follow up post to show the steps to perform if you would like to contribute to a project that is hosted on GitHub using this guide: https://docs.github.com/en/get-started/exploring-projects-on-github/contributing-to-a-project
Dear Alex
I am now starting with some custom security rules for D365FO.
But it is still not clear how to get D365 Extension working on Visual Studio 2022.
Can you please just drive me where I can find it?
Thanks
KLeber
Kleber,
The ‘Dynamics 365’ extension, is available through the following options:
– A D365FO development environment deployed via LCS (https://www.youtube.com/watch?v=ZWyKoat-vdA)
– A D365FO development environment downloaded and deployed via VHD (https://alexdmeyer.com/2023/07/05/step-by-step-guide-to-deploy-a-local-vhd-of-d365fo/)
– Using the new unified developer experience (https://devblogs.microsoft.com/powerplatform/the-public-preview-for-the-unified-experience-is-live/)
Hi Alex!
I tried to clone to a Local VHD of D365FO version 10.0.41 and got the following errors:
C:\Users\localadmin\Source\Repos\D365FOAdminToolkit\Project\D365FOAdminToolkit\D365FOAdminToolkit\D365FOAdminToolkit.rnrproj : error : The imported project “C:\Program Files (x86)\MSBuild\Microsoft\Dynamics\AX\Microsoft.Dynamics.Framework.Tools.BuildTasks.targets” was not found. Confirm that the expression in the Import declaration “C:\Program Files (x86)\MSBuild\Microsoft\Dynamics\AX\Microsoft.Dynamics.Framework.Tools.BuildTasks.targets” is correct, and that the file exists on disk. C:\Users\localadmin\Source\Repos\D365FOAdminToolkit\Project\D365FOAdminToolkit\D365FOAdminToolkit\D365FOAdminToolkit.rnrproj
C:\Users\localadmin\Source\Repos\D365FOAdminToolkit\Project\D365FOAdminToolkit\D365FOAdminToolkitTests\D365FOAdminToolkitTests.rnrproj : error : The model ‘D365FOAdminToolkitTests’ specified on the project cannot be found.
I couldn’t find the file “C:\Program Files (x86)\MSBuild\Microsoft\Dynamics\AX\Microsoft.Dynamics.Framework.Tools.BuildTasks.targets”,
but I found the files “C:\Program Files (x86)\MSBuild\Microsoft\Dynamics\AX\Microsoft.Dynamics.Framework.Tools.BuildTasks.17.0.targets” and “C:\Program Files (x86)\MSBuild\Microsoft\Dynamics\AX\Microsoft.Dynamics.Framework.Tools.Extensibility.17.0.targets”
Mihail,
You can update the .rnrproj file to point to the correct ‘BuildTasks.targets’ file and then you should be able to open / build the toolkit. The entries for the ‘BuildTasks.targets’ file should be at the bottom of the .rnrproj file.
Thank you Alex! It works!
Hi Alex! I successfully did all the steps and successfully rebuilt the solution, but when I started D365FO I got an error in the browser:
This site can’t be reached
The webpage at https://usnconeboxax1aos.cloud.onebox.dynamics.com/ might be temporarily down or it may have moved permanently to a new web address.
ERR_HTTP2_PROTOCOL_ERROR
and an error in the Windows Event Log:
AX is shutting down due to an error. An error occurred when starting the AOS. Exception details: Microsoft.Dynamics.AX.InitializationException: An error occurred when starting the AOS. —> System.UnauthorizedAccessException: Access to the path ‘C:\AOSService\PackagesLocalDirectory\D365FOAdminToolkit’ is denied. at System.IO.__Error.WinIOError(Int32 errorCode, String maybeFullPath) at System.IO.FileSystemEnumerableIterator`1.CommonInit() at System.IO.FileSystemEnumerableIterator`1..ctor(String path, String originalUserPath, String searchPattern, SearchOption searchOption, SearchResultHandler`1 resultHandler, Boolean checkHost) at System.IO.DirectoryInfo.EnumerateDirectories(String searchPattern) at System.Linq.Enumerable.d__17`2.MoveNext() at System.Collections.Generic.List`1..ctor(IEnumerable`1 collection) at System.Linq.Enumerable.ToList[TSource](IEnumerable`1 source) at Microsoft.Dynamics.Ax.Xpp.LabelHelper.GetResourceDirectories() in D:\dbs\sh\l23t\0115_212536\cmd\1\Source\Kernel\ServerShared\LabelHelper.cs:line 638 at Microsoft.Dynamics.Ax.Xpp.LabelHelper.GetInstalledLanguages() in D:\dbs\sh\l23t\0115_212536\cmd\1\Source\Kernel\ServerShared\LabelHelper.cs:line 438 at Microsoft.Dynamics.Ax.Globalization.LanguageManager.EnumerateLanguageFiles(function* function) — End of inner exception stack trace — at Microsoft.Dynamics.Ax.Globalization.LanguageManager.EnumerateLanguageFiles(function* function) at gopts(Int32 , Char** ) at Microsoft.Dynamics.AX.AOS.StartupInternal(String[] Arguments)
And as I see everything is Ok with the folder permissions.
Do you know what the reason might be?
The error is pointing to the fact that the AX service account does not have access to the C:\AOSService\PackagesLocalDirectory\D365FOAdminToolkit folder.
Im having some issues when compiling the toolkit after checking in. Any help?
c:\temp\fscps_bld\packages\Microsoft.Dynamics.AX.Platform.CompilerPackage.7.0.7367.49\DevAlm\Microsoft.Dynamics.Framework.Tools.BuildTasks.targets(85,5): error : Error: dynamics://Class/ADMExportEnvConfig(7,1) – The type or namespace name ‘D365FOAdminToolkitNET.Models’ could not be found (are you missing a using directive or an assembly reference?). [c:\temp\fscps_bld\10.0.41_build\Build\D365FOAdminToolkit.rnrproj]
c:\temp\fscps_bld\packages\Microsoft.Dynamics.AX.Platform.CompilerPackage.7.0.7367.49\DevAlm\Microsoft.Dynamics.Framework.Tools.BuildTasks.targets(85,5): error : Error: dynamics://Class/ADMApplicationInsightsSysAdminReasonProperty/Method/newFromValue(5,16) – ‘ADMApplicationInsightsSysAdminReasonProperty.new’ expects 0 argument(s), but 1 specified. [c:\temp\fscps_bld\10.0.41_build\Build\D365FOAdminToolkit.rnrproj]
c:\temp\fscps_bld\packages\Microsoft.Dynamics.AX.Platform.CompilerPackage.7.0.7367.49\DevAlm\Microsoft.Dynamics.Framework.Tools.BuildTasks.targets(85,5): error : Error: dynamics://Class/ADMApplicationInsightsSysAdminFromDateTimeProperty/Method/newFromValue(5,16) – ‘ADMApplicationInsightsSysAdminFromDateTimeProperty.new’ expects 0 argument(s), but 1 specified. [c:\temp\fscps_bld\10.0.41_build\Build\D365FOAdminToolkit.rnrproj]
c:\temp\fscps_bld\packages\Microsoft.Dynamics.AX.Platform.CompilerPackage.7.0.7367.49\DevAlm\Microsoft.Dynamics.Framework.Tools.BuildTasks.targets(85,5): error : Error: dynamics://Class/ADMApplicationInsightsSysAdminToDateTimeProperty/Method/newFromValue(5,16) – ‘ADMApplicationInsightsSysAdminToDateTimeProperty.new’ expects 0 argument(s), but 1 specified. [c:\temp\fscps_bld\10.0.41_build\Build\D365FOAdminToolkit.rnrproj]
c:\temp\fscps_bld\packages\Microsoft.Dynamics.AX.Platform.CompilerPackage.7.0.7367.49\DevAlm\Microsoft.Dynamics.Framework.Tools.BuildTasks.targets(85,5): error : Error: dynamics://Class/ADMExportRoleAccess/Method/main(12,22) – The name ‘D365FOAdminToolkitNET.AdminToolkitNET’ does not denote a class, a table, or an extended data type. [c:\temp\fscps_bld\10.0.41_build\Build\D365FOAdminToolkit.rnrproj]
c:\temp\fscps_bld\packages\Microsoft.Dynamics.AX.Platform.CompilerPackage.7.0.7367.49\DevAlm\Microsoft.Dynamics.Framework.Tools.BuildTasks.targets(85,5): error : Error: dynamics://Class/ADMExportEnvConfig/Method/main(47,17) – The name ‘D365FOAdminToolkitNET.Models.User’ does not denote a class, a table, or an extended data type. [c:\temp\fscps_bld\10.0.41_build\Build\D365FOAdminToolkit.rnrproj]
c:\temp\fscps_bld\packages\Microsoft.Dynamics.AX.Platform.CompilerPackage.7.0.7367.49\DevAlm\Microsoft.Dynamics.Framework.Tools.BuildTasks.targets(85,5): error : Error: dynamics://Class/ADMExportEnvConfig/Method/main(47,58) – Class ‘D365FOAdminToolkitNET.Models.User’ was not found. Are you missing a module reference? [c:\temp\fscps_bld\10.0.41_build\Build\D365FOAdminToolkit.rnrproj]
c:\temp\fscps_bld\packages\Microsoft.Dynamics.AX.Platform.CompilerPackage.7.0.7367.49\DevAlm\Microsoft.Dynamics.Framework.Tools.BuildTasks.targets(85,5): error : Error: dynamics://Class/ADMExportEnvConfig/Method/main(48,17) – The qualifier ‘user’ is not valid for field ‘AccountType’. [c:\temp\fscps_bld\10.0.41_build\Build\D365FOAdminToolkit.rnrproj]
c:\temp\fscps_bld\packages\Microsoft.Dynamics.AX.Platform.CompilerPackage.7.0.7367.49\DevAlm\Microsoft.Dynamics.Framework.Tools.BuildTasks.targets(85,5): error : Error: dynamics://Class/ADMExportEnvConfig/Method/main(49,17) – The qualifier ‘user’ is not valid for field ‘Alias’. [c:\temp\fscps_bld\10.0.41_build\Build\D365FOAdminToolkit.rnrproj]
c:\temp\fscps_bld\packages\Microsoft.Dynamics.AX.Platform.CompilerPackage.7.0.7367.49\DevAlm\Microsoft.Dynamics.Framework.Tools.BuildTasks.targets(85,5): error : Error: dynamics://Class/ADMExportEnvConfig/Method/main(50,17) – The qualifier ‘user’ is not valid for field ‘Company’. [c:\temp\fscps_bld\10.0.41_build\Build\D365FOAdminToolkit.rnrproj]
c:\temp\fscps_bld\packages\Microsoft.Dynamics.AX.Platform.CompilerPackage.7.0.7367.49\DevAlm\Microsoft.Dynamics.Framework.Tools.BuildTasks.targets(85,5): error : Error: dynamics://Class/ADMExportEnvConfig/Method/main(51,17) – The qualifier ‘user’ is not valid for field ‘Email’. [c:\temp\fscps_bld\10.0.41_build\Build\D365FOAdminToolkit.rnrproj]
c:\temp\fscps_bld\packages\Microsoft.Dynamics.AX.Platform.CompilerPackage.7.0.7367.49\DevAlm\Microsoft.Dynamics.Framework.Tools.BuildTasks.targets(85,5): error : Error: dynamics://Class/ADMExportEnvConfig/Method/main(52,17) – The qualifier ‘user’ is not valid for field ‘Enabled’. [c:\temp\fscps_bld\10.0.41_build\Build\D365FOAdminToolkit.rnrproj]
c:\temp\fscps_bld\packages\Microsoft.Dynamics.AX.Platform.CompilerPackage.7.0.7367.49\DevAlm\Microsoft.Dynamics.Framework.Tools.BuildTasks.targets(85,5): error : Error: dynamics://Class/ADMExportEnvConfig/Method/main(53,17) – The qualifier ‘user’ is not valid for field ‘ExternalUser’. [c:\temp\fscps_bld\10.0.41_build\Build\D365FOAdminToolkit.rnrproj]
c:\temp\fscps_bld\packages\Microsoft.Dynamics.AX.Platform.CompilerPackage.7.0.7367.49\DevAlm\Microsoft.Dynamics.Framework.Tools.BuildTasks.targets(85,5): error : Error: dynamics://Class/ADMExportEnvConfig/Method/main(54,17) – The qualifier ‘user’ is not valid for field ‘Language’. [c:\temp\fscps_bld\10.0.41_build\Build\D365FOAdminToolkit.rnrproj]
c:\temp\fscps_bld\packages\Microsoft.Dynamics.AX.Platform.CompilerPackage.7.0.7367.49\DevAlm\Microsoft.Dynamics.Framework.Tools.BuildTasks.targets(85,5): error : Error: dynamics://Class/ADMExportEnvConfig/Method/main(55,17) – The qualifier ‘user’ is not valid for field ‘NetworkDomain’. [c:\temp\fscps_bld\10.0.41_build\Build\D365FOAdminToolkit.rnrproj]
c:\temp\fscps_bld\packages\Microsoft.Dynamics.AX.Platform.CompilerPackage.7.0.7367.49\DevAlm\Microsoft.Dynamics.Framework.Tools.BuildTasks.targets(85,5): error : Error: dynamics://Class/ADMExportEnvConfig/Method/main(56,17) – The qualifier ‘user’ is not valid for field ‘UserId’. [c:\temp\fscps_bld\10.0.41_build\Build\D365FOAdminToolkit.rnrproj]
c:\temp\fscps_bld\packages\Microsoft.Dynamics.AX.Platform.CompilerPackage.7.0.7367.49\DevAlm\Microsoft.Dynamics.Framework.Tools.BuildTasks.targets(85,5): error : Error: dynamics://Class/ADMExportEnvConfig/Method/main(57,17) – The qualifier ‘user’ is not valid for field ‘UserName’. [c:\temp\fscps_bld\10.0.41_build\Build\D365FOAdminToolkit.rnrproj]
c:\temp\fscps_bld\packages\Microsoft.Dynamics.AX.Platform.CompilerPackage.7.0.7367.49\DevAlm\Microsoft.Dynamics.Framework.Tools.BuildTasks.targets(85,5): error : Error: dynamics://Class/ADMExportEnvConfig/Method/main(58,17) – The qualifier ‘user’ is not valid for field ‘UserInfo_language’. [c:\temp\fscps_bld\10.0.41_build\Build\D365FOAdminToolkit.rnrproj]
c:\temp\fscps_bld\packages\Microsoft.Dynamics.AX.Platform.CompilerPackage.7.0.7367.49\DevAlm\Microsoft.Dynamics.Framework.Tools.BuildTasks.targets(85,5): error : Error: dynamics://Class/ADMExportEnvConfig/Method/main(59,17) – The qualifier ‘user’ is not valid for field ‘Helplanguage’. [c:\temp\fscps_bld\10.0.41_build\Build\D365FOAdminToolkit.rnrproj]
c:\temp\fscps_bld\packages\Microsoft.Dynamics.AX.Platform.CompilerPackage.7.0.7367.49\DevAlm\Microsoft.Dynamics.Framework.Tools.BuildTasks.targets(85,5): error : Error: dynamics://Class/ADMExportEnvConfig/Method/main(60,17) – The qualifier ‘user’ is not valid for field ‘SID’. [c:\temp\fscps_bld\10.0.41_build\Build\D365FOAdminToolkit.rnrproj]
c:\temp\fscps_bld\packages\Microsoft.Dynamics.AX.Platform.CompilerPackage.7.0.7367.49\DevAlm\Microsoft.Dynamics.Framework.Tools.BuildTasks.targets(85,5): error : Error: dynamics://Class/ADMExportEnvConfig/Method/main(63,17) – The qualifier ‘user’ is not valid for field ‘PersonName’. [c:\temp\fscps_bld\10.0.41_build\Build\D365FOAdminToolkit.rnrproj]
c:\temp\fscps_bld\packages\Microsoft.Dynamics.AX.Platform.CompilerPackage.7.0.7367.49\DevAlm\Microsoft.Dynamics.Framework.Tools.BuildTasks.targets(85,5): error : Error: dynamics://Class/ADMExportEnvConfig/Method/main(65,17) – The qualifier ‘User’ is not valid for field ‘PersonName’. [c:\temp\fscps_bld\10.0.41_build\Build\D365FOAdminToolkit.rnrproj]
c:\temp\fscps_bld\packages\Microsoft.Dynamics.AX.Platform.CompilerPackage.7.0.7367.49\DevAlm\Microsoft.Dynamics.Framework.Tools.BuildTasks.targets(85,5): error : Error: dynamics://Class/ADMExportEnvConfig/Method/main(79,17) – The name ‘D365FOAdminToolkitNET.Models.SecurityUserRoleAssociation’ does not denote a class, a table, or an extended data type. [c:\temp\fscps_bld\10.0.41_build\Build\D365FOAdminToolkit.rnrproj]
c:\temp\fscps_bld\packages\Microsoft.Dynamics.AX.Platform.CompilerPackage.7.0.7367.49\DevAlm\Microsoft.Dynamics.Framework.Tools.BuildTasks.targets(85,5): error : Error: dynamics://Class/ADMExportEnvConfig/Method/main(79,85) – Class ‘D365FOAdminToolkitNET.Models.SecurityUserRoleAssociation’ was not found. Are you missing a module reference? [c:\temp\fscps_bld\10.0.41_build\Build\D365FOAdminToolkit.rnrproj]
c:\temp\fscps_bld\packages\Microsoft.Dynamics.AX.Platform.CompilerPackage.7.0.7367.49\DevAlm\Microsoft.Dynamics.Framework.Tools.BuildTasks.targets(85,5): error : Error: dynamics://Class/ADMExportEnvConfig/Method/main(80,17) – The qualifier ‘userRole’ is not valid for field ‘AssignmentMode’. [c:\temp\fscps_bld\10.0.41_build\Build\D365FOAdminToolkit.rnrproj]
c:\temp\fscps_bld\packages\Microsoft.Dynamics.AX.Platform.CompilerPackage.7.0.7367.49\DevAlm\Microsoft.Dynamics.Framework.Tools.BuildTasks.targets(85,5): error : Error: dynamics://Class/ADMExportEnvConfig/Method/main(81,17) – The qualifier ‘userRole’ is not valid for field ‘AssignmentStatus’. [c:\temp\fscps_bld\10.0.41_build\Build\D365FOAdminToolkit.rnrproj]
c:\temp\fscps_bld\packages\Microsoft.Dynamics.AX.Platform.CompilerPackage.7.0.7367.49\DevAlm\Microsoft.Dynamics.Framework.Tools.BuildTasks.targets(85,5): error : Error: dynamics://Class/ADMExportEnvConfig/Method/main(82,17) – The qualifier ‘userRole’ is not valid for field ‘UserId’. [c:\temp\fscps_bld\10.0.41_build\Build\D365FOAdminToolkit.rnrproj]
c:\temp\fscps_bld\packages\Microsoft.Dynamics.AX.Platform.CompilerPackage.7.0.7367.49\DevAlm\Microsoft.Dynamics.Framework.Tools.BuildTasks.targets(85,5): error : Error: dynamics://Class/ADMExportEnvConfig/Method/main(83,17) – The qualifier ‘userRole’ is not valid for field ‘SecurityRoleIdentifier’. [c:\temp\fscps_bld\10.0.41_build\Build\D365FOAdminToolkit.rnrproj]
c:\temp\fscps_bld\packages\Microsoft.Dynamics.AX.Platform.CompilerPackage.7.0.7367.49\DevAlm\Microsoft.Dynamics.Framework.Tools.BuildTasks.targets(85,5): error : Error: dynamics://Class/ADMExportEnvConfig/Method/main(84,17) – The qualifier ‘userRole’ is not valid for field ‘SecurityRoleName’. [c:\temp\fscps_bld\10.0.41_build\Build\D365FOAdminToolkit.rnrproj]
c:\temp\fscps_bld\packages\Microsoft.Dynamics.AX.Platform.CompilerPackage.7.0.7367.49\DevAlm\Microsoft.Dynamics.Framework.Tools.BuildTasks.targets(85,5): error : Error: dynamics://Class/ADMExportEnvConfig/Method/main(98,17) – The name ‘D365FOAdminToolkitNET.Models.SecurityUserRoleOrganization’ does not denote a class, a table, or an extended data type. [c:\temp\fscps_bld\10.0.41_build\Build\D365FOAdminToolkit.rnrproj]
c:\temp\fscps_bld\packages\Microsoft.Dynamics.AX.Platform.CompilerPackage.7.0.7367.49\DevAlm\Microsoft.Dynamics.Framework.Tools.BuildTasks.targets(85,5): error : Error: dynamics://Class/ADMExportEnvConfig/Method/main(98,89) – Class ‘D365FOAdminToolkitNET.Models.SecurityUserRoleOrganization’ was not found. Are you missing a module reference? [c:\temp\fscps_bld\10.0.41_build\Build\D365FOAdminToolkit.rnrproj]
c:\temp\fscps_bld\packages\Microsoft.Dynamics.AX.Platform.CompilerPackage.7.0.7367.49\DevAlm\Microsoft.Dynamics.Framework.Tools.BuildTasks.targets(85,5): error : Error: dynamics://Class/ADMExportEnvConfig/Method/main(99,17) – The qualifier ‘userRoleOrg’ is not valid for field ‘HierarchyType’. [c:\temp\fscps_bld\10.0.41_build\Build\D365FOAdminToolkit.rnrproj]
c:\temp\fscps_bld\packages\Microsoft.Dynamics.AX.Platform.CompilerPackage.7.0.7367.49\DevAlm\Microsoft.Dynamics.Framework.Tools.BuildTasks.targets(85,5): error : Error: dynamics://Class/ADMExportEnvConfig/Method/main(100,17) – The qualifier ‘userRoleOrg’ is not valid for field ‘OperatingUnitType’. [c:\temp\fscps_bld\10.0.41_build\Build\D365FOAdminToolkit.rnrproj]
c:\temp\fscps_bld\packages\Microsoft.Dynamics.AX.Platform.CompilerPackage.7.0.7367.49\DevAlm\Microsoft.Dynamics.Framework.Tools.BuildTasks.targets(85,5): error : Error: dynamics://Class/ADMExportEnvConfig/Method/main(101,17) – The qualifier ‘userRoleOrg’ is not valid for field ‘OrganizationId’. [c:\temp\fscps_bld\10.0.41_build\Build\D365FOAdminToolkit.rnrproj]
c:\temp\fscps_bld\packages\Microsoft.Dynamics.AX.Platform.CompilerPackage.7.0.7367.49\DevAlm\Microsoft.Dynamics.Framework.Tools.BuildTasks.targets(85,5): error : Error: dynamics://Class/ADMExportEnvConfig/Method/main(102,17) – The qualifier ‘userRoleOrg’ is not valid for field ‘OrganizationType’. [c:\temp\fscps_bld\10.0.41_build\Build\D365FOAdminToolkit.rnrproj]
c:\temp\fscps_bld\packages\Microsoft.Dynamics.AX.Platform.CompilerPackage.7.0.7367.49\DevAlm\Microsoft.Dynamics.Framework.Tools.BuildTasks.targets(85,5): error : Error: dynamics://Class/ADMExportEnvConfig/Method/main(103,17) – The qualifier ‘userRoleOrg’ is not valid for field ‘SecurityRoleIdentifier’. [c:\temp\fscps_bld\10.0.41_build\Build\D365FOAdminToolkit.rnrproj]
c:\temp\fscps_bld\packages\Microsoft.Dynamics.AX.Platform.CompilerPackage.7.0.7367.49\DevAlm\Microsoft.Dynamics.Framework.Tools.BuildTasks.targets(85,5): error : Error: dynamics://Class/ADMExportEnvConfig/Method/main(104,17) – The qualifier ‘userRoleOrg’ is not valid for field ‘UserId’. [c:\temp\fscps_bld\10.0.41_build\Build\D365FOAdminToolkit.rnrproj]
Niel,
It doesn’t appear that your project has the correct references in place, please be sure the X++ project references the .NET project and ensure that the .NET project is built first.
Hello Alex,
Thank you for this great tutorial !
I followed all the steps and everything worked in the end.
I got the same error as Mikhail during the build process, and I was able to fix it by editing the .rnrproj file.
Also, during the final build step, I encountered many error messages — rebuilding the projects several times eventually resolved them.
Time to explore the tool !
Thank you !
The qualifier ‘userRole’ is not valid for field ‘AssignmentMode’.
The “BuildTask” task returned false but did not log an error.
The type or namespace name ‘D365FOAdminToolkitNET’ could not be found (are you missing a using directive or an assembly reference?).
The type or namespace name ‘D365FOAdminToolkitNET.Models’ could not be found (are you missing a using directive or an assembly reference?).
The name ‘D365FOAdminToolkitNET.Models.User’ does not denote a class, a table, or an extended data type.
Class ‘D365FOAdminToolkitNET.Models.User’ was not found. Are you missing a module reference?
The qualifier ‘user’ is not valid for field ‘AccountType’.
The qualifier ‘user’ is not valid for field ‘Alias’.
The qualifier ‘user’ is not valid for field ‘Company’.
The qualifier ‘user’ is not valid for field ‘Email’.
The qualifier ‘user’ is not valid for field ‘Enabled’.
The qualifier ‘user’ is not valid for field ‘ExternalUser’.
The qualifier ‘user’ is not valid for field ‘Language’.
The qualifier ‘user’ is not valid for field ‘NetworkDomain’.
The qualifier ‘user’ is not valid for field ‘UserId’.
The qualifier ‘user’ is not valid for field ‘UserName’.
The qualifier ‘user’ is not valid for field ‘UserInfo_language’.
The qualifier ‘user’ is not valid for field ‘Helplanguage’.
The qualifier ‘user’ is not valid for field ‘SID’.
The qualifier ‘user’ is not valid for field ‘PersonName’.
The qualifier ‘User’ is not valid for field ‘PersonName’.
The name ‘D365FOAdminToolkitNET.Models.SecurityUserRoleAssociation’ does not denote a class, a table, or an extended data type.
Class ‘D365FOAdminToolkitNET.Models.SecurityUserRoleAssociation’ was not found. Are you missing a module reference?
The qualifier ‘userRole’ is not valid for field ‘AssignmentStatus’.
The qualifier ‘userRole’ is not valid for field ‘UserId’.
The qualifier ‘userRole’ is not valid for field ‘SecurityRoleIdentifier’.
The qualifier ‘userRole’ is not valid for field ‘SecurityRoleName’.
The name ‘D365FOAdminToolkitNET.Models.SecurityUserRoleOrganization’ does not denote a class, a table, or an extended data type.
Class ‘D365FOAdminToolkitNET.Models.SecurityUserRoleOrganization’ was not found. Are you missing a module reference?
The qualifier ‘userRoleOrg’ is not valid for field ‘HierarchyType’.
The qualifier ‘userRoleOrg’ is not valid for field ‘OperatingUnitType’.
The qualifier ‘userRoleOrg’ is not valid for field ‘OrganizationId’.
The qualifier ‘userRoleOrg’ is not valid for field ‘OrganizationType’.
The qualifier ‘userRoleOrg’ is not valid for field ‘SecurityRoleIdentifier’.
The qualifier ‘userRoleOrg’ is not valid for field ‘UserId’.
The name ‘D365FOAdminToolkitNET.AdminToolkitNET’ does not denote a class, a table, or an extended data type.
The type or namespace name ‘D365FOAdminToolkitNET’ could not be found (are you missing a using directive or an assembly reference?).
The name ‘D365FOAdminToolkitNET.AdminToolkitNET’ does not denote a class, a table, or an extended data type.
The “BuildTask” task returned false but did not log an error.
The ‘ADMSysAdminLogHelper’ argument of the ‘classStr’ compile-time function does not specify a known class.
The name ‘ADMSysAdminLogHelper’ does not designate a class or table.
The qualifier ‘ADMConfigsConstants’ is not valid for field ‘configNameShowReasonDialog’.
The name ‘ADMSysAdminLogHelper’ does not designate a class or table.
The qualifier ‘ADMConfigsConstants’ is not valid for field ‘configNameShowReasonDialog’.
The name ‘ADMSysAdminLogHelper’ does not designate a class or table.
The qualifier ‘ADMConfigsConstants’ is not valid for field ‘configNameShowReasonDialog’.
The name ‘ADMSysAdminLogHelper’ does not designate a class or table.
The name ‘ADMConfigs’ does not designate a class or table.
The ‘ADMEntraIdGroupHelper’ argument of the ‘classStr’ compile-time function does not specify a known class.
The name ‘ADMEntraIdGroupDynamicRoleAssignment’ does not denote a class, a table, or an extended data type.
The qualifier ‘entraIdGroupDynamicRoleAssignment’ is not valid for field ‘UserInfo’.
The qualifier ‘entraIdGroupDynamicRoleAssignment’ is not valid for field ‘AutomaticRoleAssignment’.
The name ‘ADMEntraIdGroupSecurityRoleAssignmentRule’ does not denote a class, a table, or an extended data type.
The qualifier ‘entraIdGroupSecRoleAssignmentRule’ is not valid for field ‘UserInfo’.
The qualifier ‘entraIdGroupSecRoleAssignmentRule’ is not valid for field ‘SecurityRole’.
The name ‘ADMEntraIdGroupHelper’ does not designate a class or table.
Variable declaration can be inlined
Object initialization can be simplified
Myna,
It looks like one (or both) of the following is happening:
1) Your .NET project is not being built to the same .NET version as your X++ project (these must be the same, the current version that the DLLs are built against is v4.8) – this could mean updating the .rnproj and/or .csproj files
2) Your .NET project does not have the proper references set, the DLLs required are either from Nuget or from the X++ PackagesLocalDirectory\bin folder
The local Microsoft DLLs that need to be referenced are:
– Microsoft.Dynamics.AX.Metadata
– Microsoft.Dynamics.AX.Metadata.Core
– Microsoft.Dynamics.AX.Metadata.Modeling
– Microsoft.Dynamics.AX.Security.Management
– Microsoft.Dynamics.AX.Xpp.AxShared
– Microsoft.Dynamics.AX.Xpp.Support
I can validate that the D365FOAdminToolkit does contain all of the necessary files required for building the solution, as I cloned the solution again and built it from scratch to confirm.
Hi, I am new to D365 F&O and your blog has been very helpful in setting up the UDE for us. Last year we had a project in LCS and the code is available in our Azure dev ops repository. We do not have the dev box anymore. We have a new F&O UDE environment. We were able to successfully build the model however when we try to deploy, it fails with failed dependency. Would greatly appreciate any guidance on how we may resolve this issue. Thanks in advance.
Swapna,
I think I would need to see the dependency error to be able to give you more direction, but this normally means a there is some piece of code that you have locally that isn’t making it to your cloud instance. If you want to share the error message, I can take a deeper look at it.