
There are two main ways to deploy D365FO for development and testing purposes, the more streamlined way is to deploy a preconfigured environment via LCS. While this is extremely straightforward it does incur Azure costs as the resources (virtual machine, networking, storage, etc) are deployed within your Azure instance. The other option is to deploy these resources locally via a virtual hard drive (VHD). This process can help you save overall cost but is also not as straight forward. Let’s look at the steps to do this.
Download the VHD
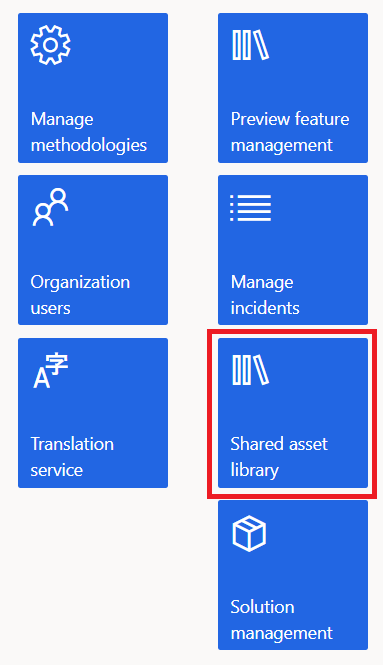
The first thing to do is to download the VHD from Lifecycle Services (LCS) and navigating to the ‘Shared Asset Library’:
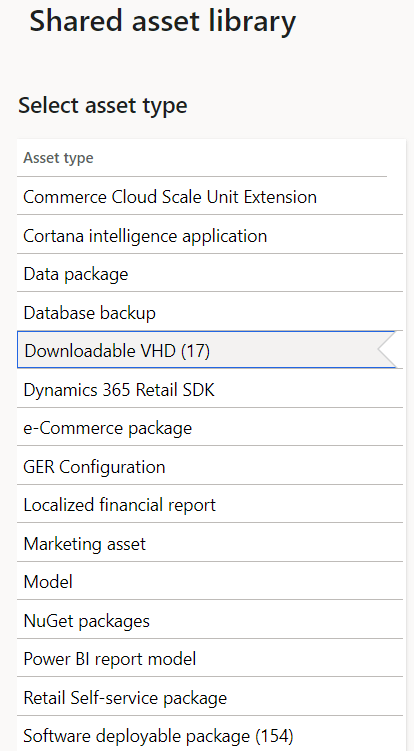
Then navigate to ‘Downloadable VHD’:
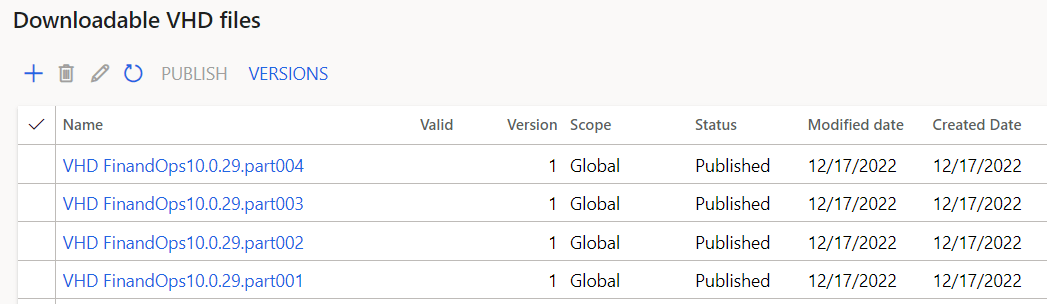
Next find the latest VHD version available and download all files related to it, the download will be broken into ‘parts’ be sure to download all parts:
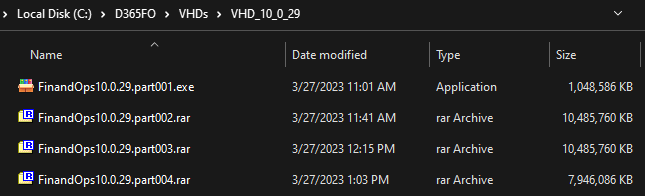
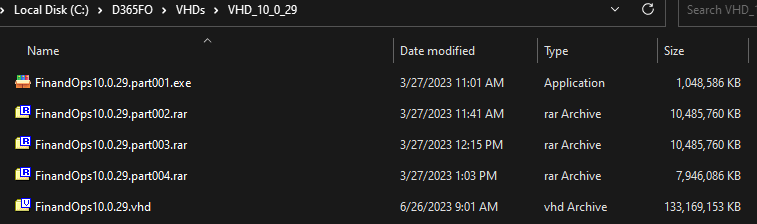
Once downloaded put all files into one folder, you should see one file is of type .exe and the rest are of type .rar. This is because the download is compressed, we need to uncompress it by executing the .exe file which will create the VHD for us:
When you run the .exe file, you will be guided through the extract process and asked for a folder where you would like the VHD to be placed.
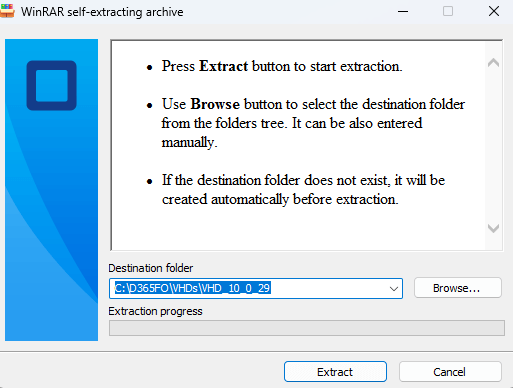
After the extraction is complete a VHD file will be created, please note here that these files are MASSIVE (in the screenshot below you can see it is over 133 GB) so be sure wherever you extract this file to has plenty of room. Also for performance reasons, I always recommend these to be stored on a SSD.
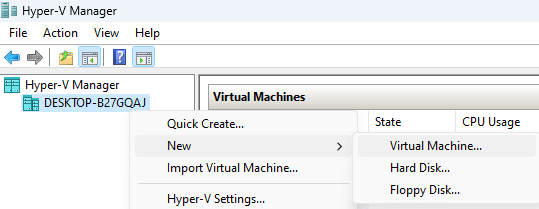
The next step is to set up your VHD in a virtualization setup, for my example I am going to use the Hyper-V Manager built into my version of Windows but you can also use others. For some instances of Windows you may need to ‘enable’ the Hyper-V Manager. Within Hyper-V Manager, right click on your computer name and go to New -> Virtual Machine.
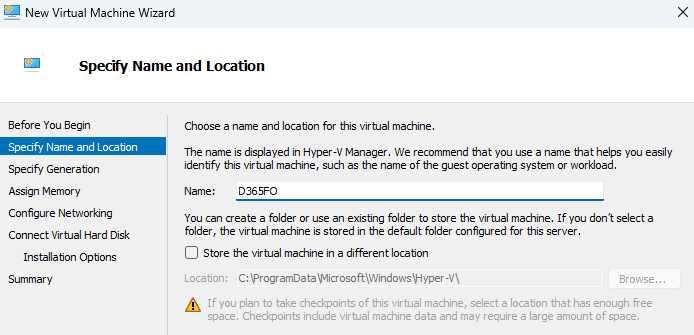
Next specify a computer name and ensure where you want to store the virtual machine data.
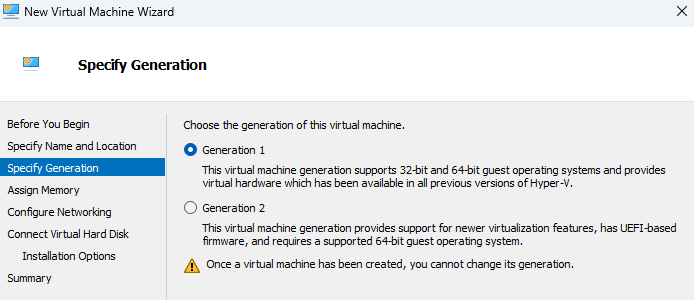
For the virtual machine generation, I have found that these VHDs only work with Generation 1. If you try to select Generation 2 you will not be able to actually deploy the machine.
On the Assign Memory step, you can set up the amount of RAM you want to allocate to the virtual machine. If feasible with your setup, I would recommend 16 GB or above for performance.

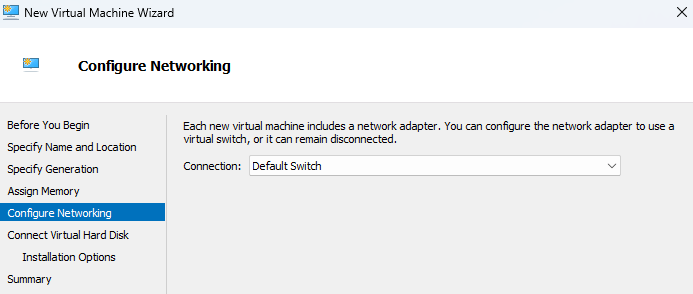
If you want your D365FO environment to be able to connect to the public Internet be sure to set the Connection to ‘Default Switch’ on the Configure Networking step.
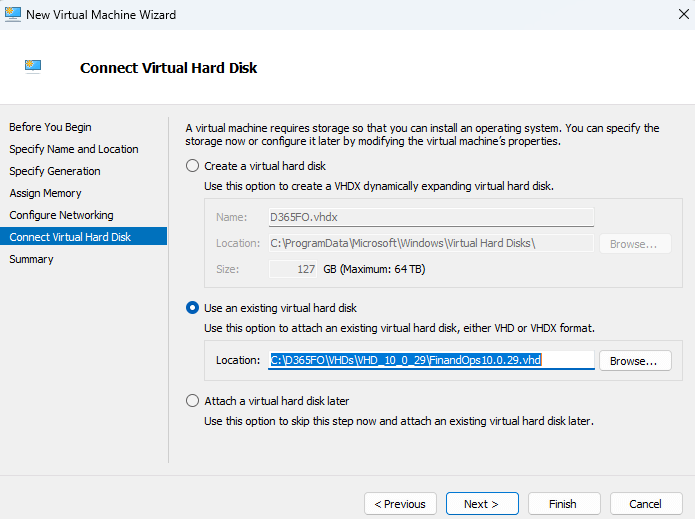
It is important that you select the ‘Use an existing Virtual Hard Disk’ option when on the Connect Virtual Hard Disk step. Then point to the path to the VHD you created in the earlier step.
Once you select ‘Finish’ you will see your machine is successfully created.

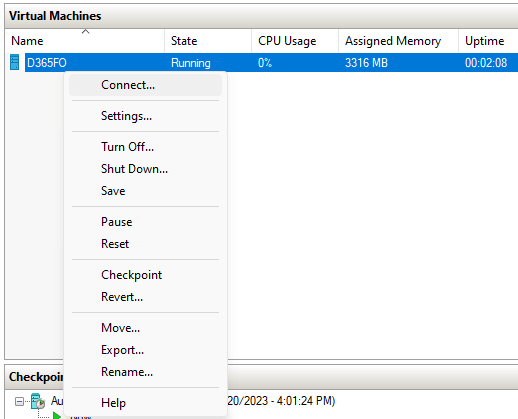
You can then right click on the machine and select ‘Start’

Once the machine is running you can right click again on it and select ‘Connect’ (also note that this is where you can also control the machine eg: shutdown, machine settings, create a checkpoint).
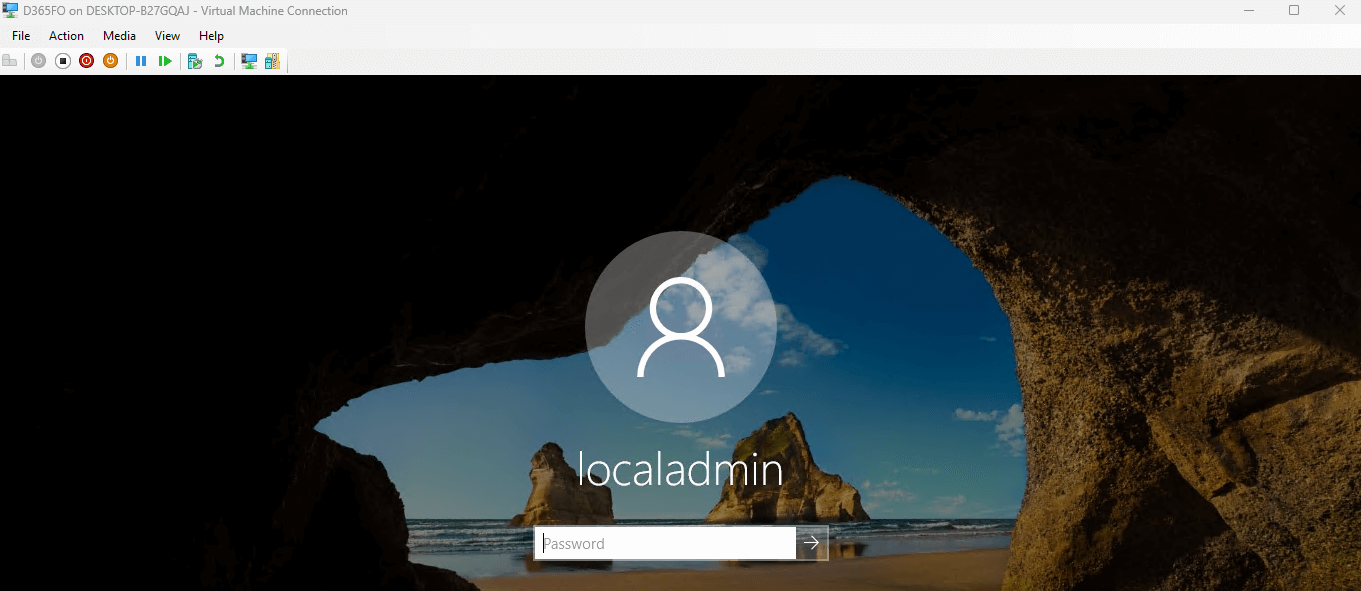
Once you connect and the machine starts, you will be presented with an initial login screen. An account named ‘localadmin’ is automatically created on the machine and has administrative privileges. The password for this account is: pass@word1
Once you successfully log into the machine, there are some steps that need to be done prior to your D365FO instance actually working.
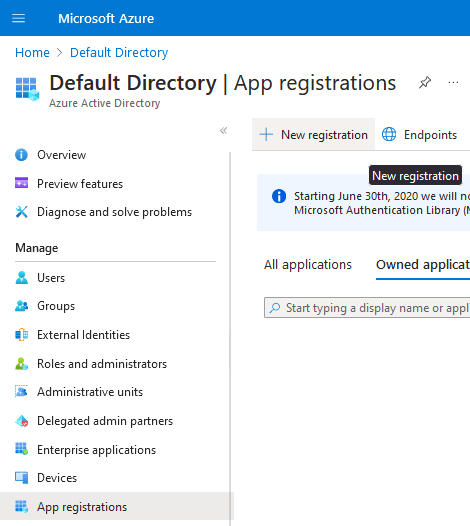
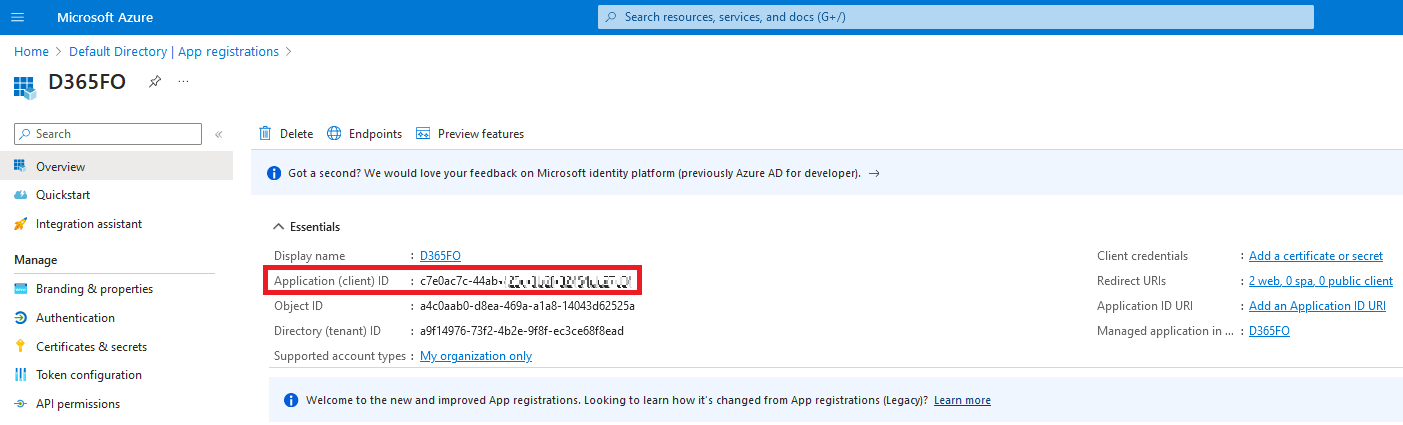
The first is that you have to tie the VHD you just created to an Azure AD instance via an App Registration (this will allow for D365FO to authenticate users within this tenant to the instance). This can either be through a work instance or a personal instance (I am going to use the instance tied to my @outlook.com account). Navigate to https://portal.azure.com and then select Active Directory, then select App Registrations.
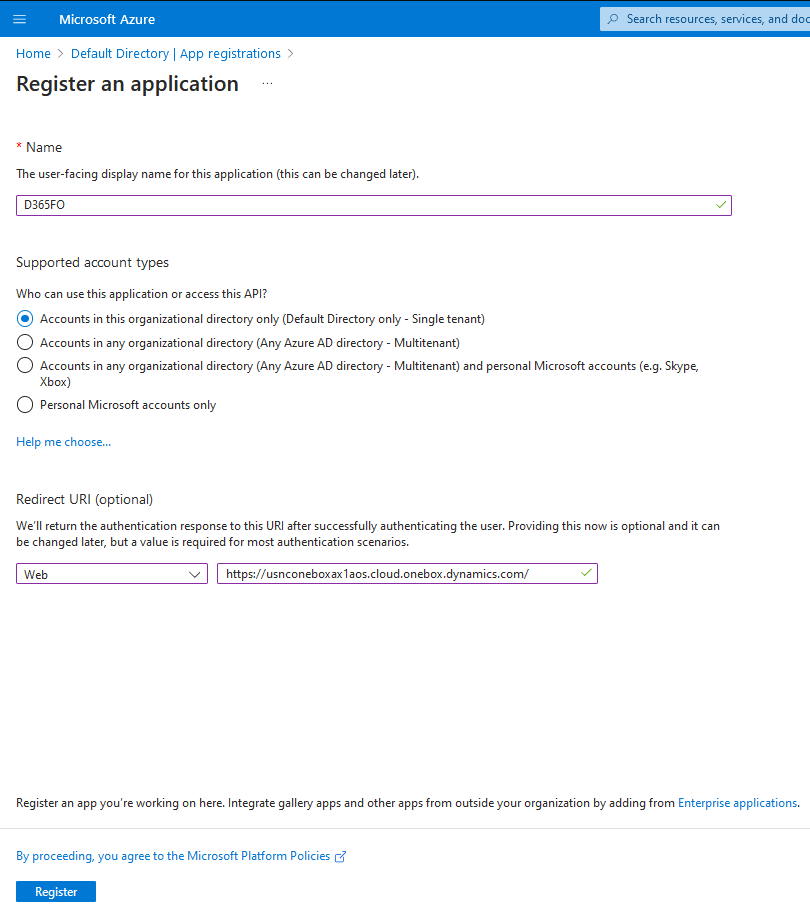
Give your app registration a name and select the ‘Accounts in this organization directory only) radio button, in the Redirect URI add an entry of ‘https://usnconeboxax1aos.cloud.onebox.dynamics.com/’ then click Register.
Once the app registration is created, navigate to the Authentication blade and add an additional redirect URI of ‘https://usnconeboxax1aos.cloud.onebox.dynamics.com/oauth/’ and then click Save.
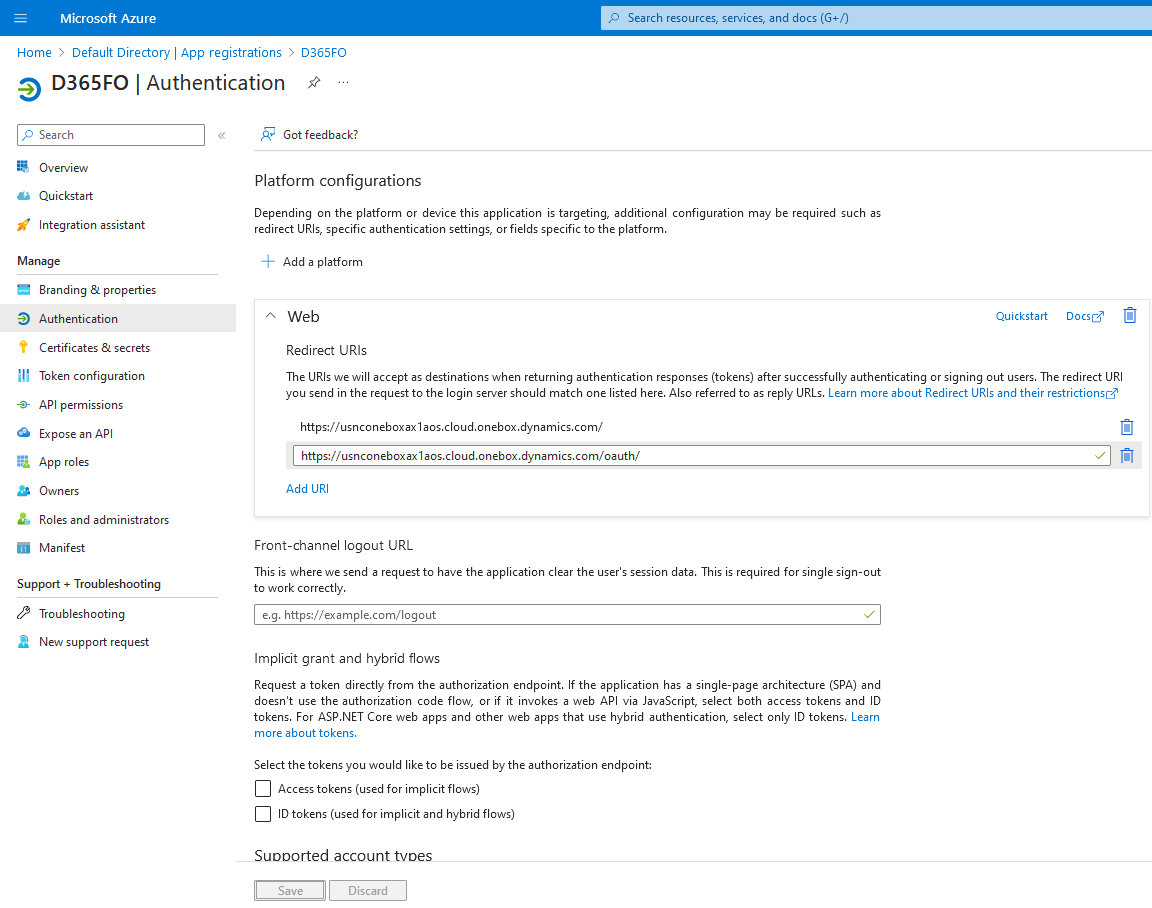
Once both redirect URIs are added navigate to the Overview page and make a note of the Application (client) ID field, we will need this GUID in the next step.
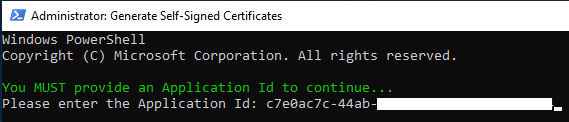
Now back on your D365FO environment, on your desktop you should see a ‘Generate Self-Signed Certificates’ PowerShell shortcut, double click it:

It will ask for your Application Id, copy the value from the Azure AD app registration you just created and then hit Enter:
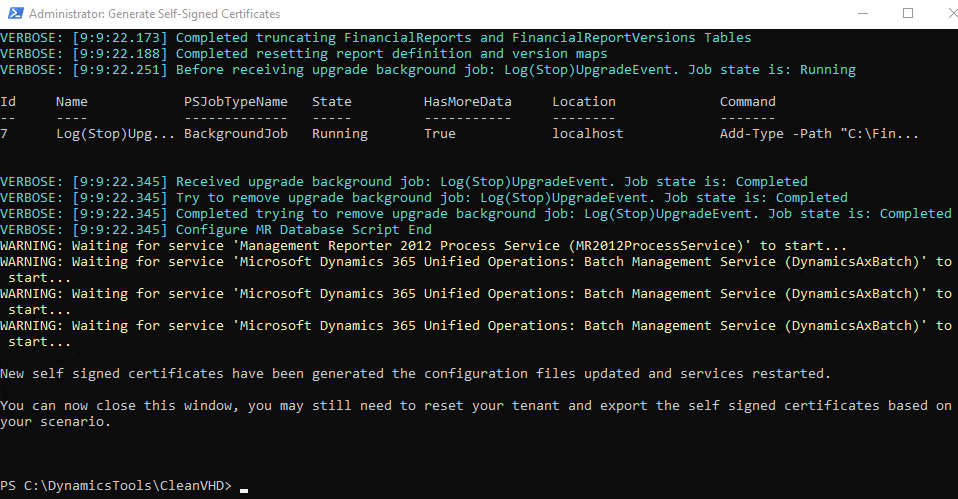
Once the PowerShell script has executed you will get a verification that the certificates have been successfully generated:
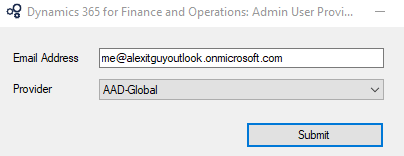
Next we need to provision our initial admin user within the environment, double click the AdminUserProvisioning tool:

Note: As of the 10.41 release, this shortcut no longer exists. The application can be found at the following directory: C:\AOSService\PackagesLocalDirectory\bin
You will need to supply an email address of the user who will be the initial admin of the D365FO instance, please note that this must be an AAD user in the same Azure tenant as the app registration created earlier:
Note: After successful execution of this step, you may need to restart the AOSService site in IIS (referenced in the next step) to successfully be able to log into your D365FO environment.
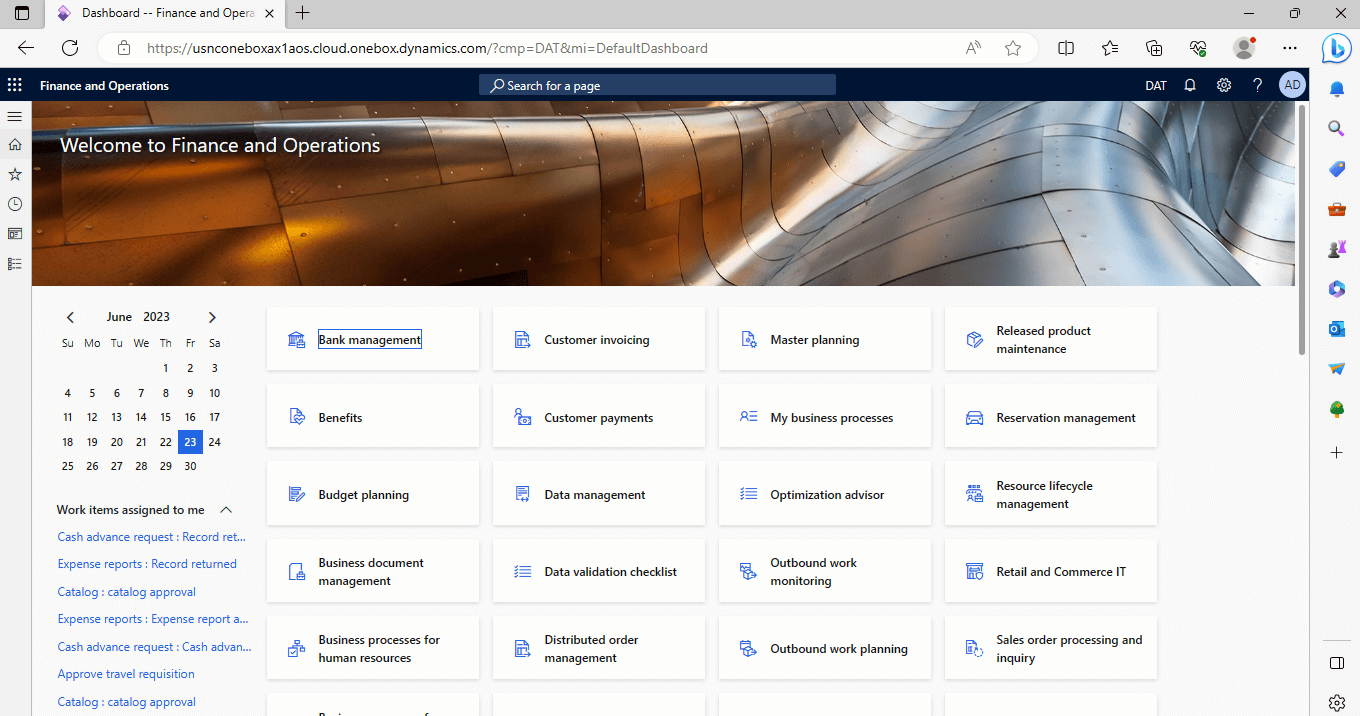
Now that the setup is done, we can launch our D365FO environment. Microsoft uses the Internet Information Services (IIS) Manager to administer the website. If you open this utility and navigate to the AOSService in the left hand pane, you can then find the default URL of the D365FO instance and launch it by clicking on it (or you can use this https://usnconeboxax1aos.cloud.onebox.dynamics.com/).
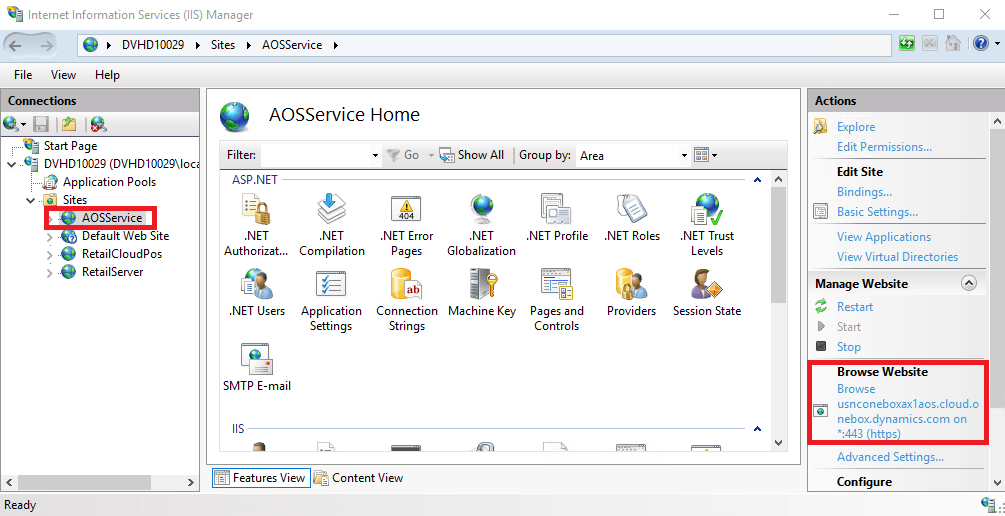
And you can see that you can successfully navigate to your D365FO instance.
Post Setup Steps
1) Bookmark the default D365FO URL
2) Create a separate ‘admin’ user on the VHD so you don’t have to log in as ‘localadmin’
3) Be sure that RDP is enabled (allows for you to connect from any machine on your network not just the host machine).
4) Install other apps (Google Chrome/Mozilla Firefox, Notepad++, Classic Start etc). I recommend using Ninite to help speed up the process
5) Don’t forget about Windows server licensing, the license attached to the VHD deployment is only good for a small amount of time. If the license expires you will notice that your virtual machine will start to turn off randomly.
There are two options to address this:
- Apply a valid Windows Server license
- You can extend the license validity via Command Prompt command
Feedback: What steps do you do after deploying a new D365FO instance?
Good instructions, thank you!
What I would add is a few words on how to set the environment into maintenance mode (e.g., if you want to change the License configuration).
Since the password of the SQL admin user is not known anymore (the old password does not work for me), the easiest way which I have found is to create a new SQL admin user (for creating a new user, you can use the Windows credentials) and run the Microsoft.Dynamics.AX.Deployment.Setup.exe command with this user.
Could you please share the system requirements to install these vhd?
https://learn.microsoft.com/en-us/dynamics365/fin-ops-core/dev-itpro/dev-tools/development-system-requirements
Alex, thanks for this guide. I followed every step but when try to log into the browser, I’m getting the error AADSTS700016 : Application with identifier ‘MYAPPID’ was not found in the directory ‘Microsoft Services’. This can happen if the application has not ….’
Surprising I can start the debugger and get a user session going with the same email account I used before and failed. Any idea what’s wrong ?
Frank,
Does the user you are logging in as exist in the same Azure Active Directory tenant where your app registration is created? (They need to be in the same tenant)
Is the user you are using to log in a non-work account (ex: email ending in @outlook.com)? (Logging into the UI requires a Azure AD / work account, you can create a free following the first part of this blog post: https://alexdmeyer.com/2023/05/09/how-to-sign-up-for-power-apps-with-microsoft-account/)
Launching a debugger session does not use a normal user session and instead uses a ‘services’ account.
Hi Alex, thanks for this. Unfortunately I am also having error when logging into the onebox url – “AADSTS700016 : Application with identifier ‘xxx’ was not found in the directory ‘ ’ ” I do have an Entra (formerly Azure AD) personal account with assigned role Global Administrator, registered the app (it shows up in both Entra and Azure portals) and assigned myself as the app owner. Should I be using @[EntraIDname].onmicrosoft.com rather than my actual account’s email address? If so, should I enter that when using the AdminProvisioningTool, when logging into the onebox url, or BOTH?
Tee,
I don’t think this is a permissions issue, I think it is an account issue. You have to create a user account on our tenant (similar to this blog post https://alexdmeyer.com/2023/05/09/how-to-sign-up-for-power-apps-with-microsoft-account/). You cannot use a @outlook.com account to log into D365FO, you would need to use a @.onmicrosoft.com (for example I used me@alexitguy.onmicrosoft.com) and that is the email address I used in the AdminProvisioningTool.
This is the truth
Hi Alex,
Thanks for Grate post. I did all as shown above. all good.
but USMF not showing in frontend. data nothing coming. but in SQL data there. in my frontend only DAT showing no data for me. Can you please help me on it.
Krishna,
If the data is there in SQL then it sounds like your user might have a user role restriction for the DAT company.
Are you assigned the SysAdmin role? Did you run the AdminUserProvisioning utility for your user?
Hello Alex,
Thank you for this post. it’s really helpful.
I have encountered error “login failed for user axdbadmin” while running AdminUserProvisioning utility. Additionally, Microsoft Dynamics 365 Unified Operations: Batch Management Service couldn’t start at all. Could you please help me on this?
Simon,
I would recommend looking through this forum post: https://community.dynamics.com/forums/thread/details/?threadid=2e4cc315-072d-4836-b2f5-77bbfde1669f
Olá Alex, no meu caso as VMs funcionaram perfeitamente, porem o build no projeto/solution no VS não funcionam apenas o Build Full na model, sabe o que pode estar ocorrendo?
Olá Diógenes, que erro você recebe ao tentar construir a solução? Você pode fornecer uma captura de tela?
Peço desculpas por quaisquer erros de tradução.
hello Alex,
i did setup everything and i can login(i’m admin) but my collegues cannot. They recieve an error stating that an approval from admin is requested but i don’t understand what to aprove where to find these approval?
thank you
Evald,
I would need the exact error message and the steps to reproduce the error to be able to assist (and screenshots would be great). My guess would be that potentially this local VHD is tied to an Entra ID instance that is separate from the Entra ID tenant the user exists in and this user was added as a ‘guest’ to D365FO. Therefore the D365FO tenant is asking for permissions to be able to view the user details from the user’s tenant. This would require approval from an administrator with access from the user’s Entra ID tenant.
My recommendation in this case would be to create a new user in whatever tenant you created your D365FO environment in and log in that way, that way no approvals are required.
I think you are right. Seems the admin of the tenant must give permission everytime a user try to login on this instance of 365FO or assign to me that role so i can do that. https://learn.microsoft.com/en-us/entra/identity/enterprise-apps/configure-admin-consent-workflow
Waiting from the internal support for these permissions.
hi Alex,
fyi, i confirm it was a problem with the permission on the Tenant of azure.
BR
How we can update future MS updates ?
Manish,
Microsoft releases updates via LCS just like the VHD download. You can apply the updates like you would normal deployable packages, I reference the following blog post to do the installation via command line: https://alexdmeyer.com/2020/11/25/how-to-fix-the-devinstall-option-is-not-applicable-to-the-current-deployable-package-error/
Thanks Alex.
hi Alex,
Thanks for Grate’s post.
I tested with FinandOps10.0.37 version. On the Authentication step, my app was not redirecting until I removed the /oauth/ from the Redirect Uri.
(Error AADSTS50011 The redirect URI ‘https://usnconeboxax1aos.cloud.onebox.dynamics.com/’ specified in the request does not match the redirect URIs configured for the application).
Do you think this is correct of me?
Roumen,
If you were able to get the process working by removing the /oauth portion of the redirect URI then I think that is OK.
Hey Alex, thanks a lot for this article! I have an azure account and all it has is
a. D365 F&O App registered
b. A user created to login into D365 (……onmicrosoft.com)
Will it cost me anything?
Rishi,
If you deploy any resources to Azure it will have a cost associated with it, however depending on your account you may get ‘Azure credits’ each month that you can use towards paying for these.
Following this guide though, the overall cost will be small but I am not sure exactly what the cost would be (will have to do some analysis on my Azure tenant).
Hi Alex, thanks a lot for this useful blog.
I have followed all the steps and created a virtual machine, and I am able to access it on the machine where all setups like VHDs and everything is there.
Can you please guide me how I can RDP to this VM from another PC?
Point number – 3) Be sure that RDP is enabled (allows for you to connect from any machine on your network not just the host machine).
Parul,
If you are on the same local subnet as the VHD you can simply connect to it either via IP or hostname and whatever credentials you use to log in.
If you want to connect to it externally, you would have to either set up a home network VPN (where you could connect to the VPN and then connect to your VHD) or port forward the RDP service through your local router’s firewall (I would not recommend this approach as this will mean it is directly exposed to the Internet and can present a security threat).
Hi Alex, I got this error “D365FO failed to start. Not enough memory in the system to start the virtual machine.
Could not initialise memory:Not enough memory resources available to complete this operation. (0x8007000E).
I currently have 1tr SSD and 8gig ram.
Thanks.
Ola,
The error message is letting you know that there is not enough available memory to assign to the virtual machine as well as run your host machine, you can either:
– Add more RAM to your host machine
– Lower the assigned memory to your virtual machine (probably not advisable as performance in your D365FO machine will suffer but you can definitely test it out)
If using Windows Hyper-V as your virtualization engine, ensure that ‘Dynamic Memory’ is enabled: https://learn.microsoft.com/en-us/previous-versions/windows/it-pro/windows-server-2012-r2-and-2012/hh831766(v=ws.11)
Thanks for the response Alex.
Please, do you have an article on deploying D365FO through a preconfigured environment via LCS? The VHD option did not work for me as my Surface Pro 8 RAM can’t be upgraded.
I have tried LCS and Azure but I kept getting errors. My shared library in LCS is even blank with no item. Please help. I am developing my skills to be a functional consultant and I need the access to the software urgently.
Thanks
Ola,
Without knowing what errors you are seeing in LCS I can’t really provide much help there, but here are some tutorials on deploying a D365FO VM via LCS:
https://learn.microsoft.com/en-us/dynamics365/fin-ops-core/dev-itpro/dev-tools/access-instances
https://www.youtube.com/watch?v=ZWyKoat-vdA
Thanks, Alex, I will go through these two and come back should there be a need.
Great information – these instructions are perfect – one thing you may want to add is the location of the AdminUserProvisioning location since I did not have that on my desktop – the location is here – run as an administrator – \AosService\PackagesLocalDirectory\bin\AdminUserProvisioning.exe
Thanks again!
Thanks for adding this Steve, great addition!
While creating VDH below error my facing
Request Id: 3cbf370c-375c-46c3-8ec5-e31589b74200
Correlation Id: 59c03b26-18f5-411f-b78b-fef9ccc12b3c
Timestamp: 2024-07-17T09:58:12Z
Message: AADSTS700016: Application with identifier ‘1d7cbae8-e4ee-4f94-8a20-9529c0444248’ was not found in the directory ‘PICS Unit’. This can happen if the application has not been installed by the administrator of the tenant or consented to by any user in the tenant. You may have sent your authentication request to the wrong tenant.
Sai,
Like the error message is saying, it looks like the Azure tenant where the ‘app registration’ was created is not the same tenant you are trying to authenticate against. These must be in the same tenant to successfully authenticate.
Dear Kumar ,I have the same error as you. If you have a solution, please help me fix the error.
Hi Alex
Incredible information.
I followed every step and actioned:
1. Complete App registration
2. Set up an Entra ID user xxx@yyy.onmicrosoft.com
When I attempted to input my Email address in the AdminUserProvisioning Tool, I encountered an error saying “The remote name could not be resolved: “login.windows.net”. Could you shed your light on this?
Look forward to your response.
Cappuncino,
Did you run the AdminUserProvisioningTool as Admin? Is your VHD successfully connected to the Internet?
Hi Alex,
Yes, I ran it as Admin and my VHD successfully connected to the Internet.
I have the same problem ‘The remote name could not be resolved: “login.windows.net”’.
Have you solved it?
Hi Mikhail and Cappucino, I have the same issue as you guys ( “The remote name could not be resolved: “login.windows.net”).
Did you manage to solve it? how? can you please help?
Caribe,
Have you validated that your VM has access to the Internet and it can successfully resolve ‘login.windows.net’?
Similar issues:
https://preview.community.dynamics.com/forums/thread/details/?threadid=815fd4fc-eac1-4bdc-a4fd-70eb7aa93ca2
https://community.dynamics.com/forums/thread/details/?threadid=f542cfcb-b573-455f-a979-a424dc799b59
Hi Alx,
I resolved the “The remote name” issue by re-configuring the virtual switch. However, I encountered an authentication issue which stops me from completing the Admin User Provisioning. Could you please provide some insights?
Thank you
Hi Alex,
After I input my email address in the AdminUserProvisioning tool and hit submit, it says “Log in failed for user ‘axdbadmin’ “.
Could you please provide some insights?
Thank you
I would recommend looking through this thread: https://community.dynamics.com/forums/thread/details/?threadid=2e4cc315-072d-4836-b2f5-77bbfde1669f
Hi Alex,
I deployed VHD FinandOps10.0.39 but i did not find the AdminUserProvisioning tool in the desktop
Can you guide me please?
You should be able to find it at the following file path: C:\AOSService\PackagesLocalDirectory\bin\AdminUserProvisioning.exe
All the necessary steps are done but the below link is giving me an error:
https://usnconeboxax1aos.cloud.onebox.dynamics.com/
“Hmmm…can’t reach this page” error message.
What might be the issue?
Lebogang,
This error can mean any number of things but the end result is that the web browser cannot find this URL. I would be checking the following:
1) Ensure the Dynamics 365 web server is actually started and running via Internet Information Services (IIS)
2) Ensure the ‘World Wide Web Publishing Service’ service is running
3) Check the Event Viewer for any messages related to Microsoft / Dynamics to see if there are any errors or info logs related to starting D365 processes
NOTE: You will only be able to access this URL on the same machine as the VHD (you will not be able to access this URL on any other machine by default
Alex, when running the step to provision our initial admin user within the environment, double click on the AdminUserProvisioning tool, and provide the mail, I get this error message:
“Error: underlying connection closed: failed to establish trust relationship for SSL/TLS secure channel”.
New self-signed certificates have been generated, configuration files have been updated, and services have been restarted.”
Lotso,
Here are some links I think might help:
– https://learn.microsoft.com/en-us/dynamics365/fin-ops-core/dev-itpro/dev-tools/vhd-setup#run-the-setup-script
– https://community.dynamics.com/forums/thread/details/?threadid=09a6f2bb-b497-41bf-86bb-77a73d6835ca
– https://community.dynamics.com/forums/thread/details/?threadid=fbbfae14-e432-ee11-bdf4-00224827e88b
Hello Alex,
Your post is really great. I am getting the same error that you have discussed in the thread but my problem is that it is picking up the wrong Application ID. Can you please suggest where i can check to update the correct Application ID?
AADSTS700016: Application with identifier ‘9af18559-ed54-4cc4-993b-d0cbbea1da7f’ was not found in the directory ‘*****************’. This can happen if the application has not been installed by the administrator of the tenant or consented to by any user in the tenant. You may have sent your authentication request to the wrong tenant.
1. The tenant ID is correct.
2. The application ID that it picked up is for an old application that I linked to and I had to delete and recreate a new one.
3. The Self Signed Certificate is registered to the new Application ID from Azure.
4. I have changed the Application ID under the Application settings in AOSService in IIS. Not really sure where else I need to update the Application ID to the new one from the tenant.
Shraddha,
Is the App Registration within Azure configured correctly and have the correct permissions assigned and granted access by an Azure admin (if needed)?
You would need to be sure that the Self Signed Certificate step is re-ran with the correct App Registration info, this process should update the App Registration for all impacted areas as far as I know.
Hi Alex, I have 2 questions
1) I just created my VHD, registered my app (I’m the owner and added the app as contributor to the resource group where my VHD is running in Azure)
I followed every step, Created my self-signed certificates and added user.
Restarted my AOS but when I try to login on D365, I get following error
“Need admin approval
unverified
needs permission to access resources in your organization that only an admin can grant. Please ask an admin to grant permission to this app before you can use it.”
–> I have no idea what could cause this, App and admin user are in the same tenant. Admin user is also owner of the app.
2) When you want to recreate self-signed certificates in a VHD because you have an other APP id, Should you say Y/N to the question if you already have a certificates? Because if you say Yes they ask the thumbprint, but it’s not clear to me from which certificate?
If you choose Yes you get a lot of error saying ‘Cannot find path ‘C:\DynamicsTools\CleanVHD\Working\web.config”
Thanks!
Dadazie,
1) I believe this is tied to the App Registration permissions, you will need to have an admin within your Entra ID tenant grant the necessary permissions to the App Registration you created.
2) I always try and create a new certificate, you may have to place the web.config file at that path, I am not sure why it would not be there but I would try that first.
Hi Alex,
Thanks for such a wonderful guide.
I need to import the database to D365 usnconebox environment, however the lcs is not working in the VM.
Am I missing on something? Can you please let me know how to import the database on a Local VHD of D365FO
Thanks in advance!
Karthik,
Since this is a local VHD there will not be an LCS component for it, but you should be able to still use the normal .bacpac method of restoring a database: https://www.linkedin.com/pulse/restore-production-database-dev-environment-d365fo-using-abbas-tfwbe/
Additional info: For version 10.0.39 the Admin provisioning tool is not on the desktop. It can be found on C:\AOSService\PackagesLocalDirectory\bin as it needs to be run as from the given steps here. Much appreciated!
Hey Alex, thank you for the guide! I have my instance up and running, but had to use Oracle VirtualBox as I didn’t have HyperV. When my VM is running there is no room left at all on the hard drive and it’s causing issues as you can imagine – any idea what to do? I was able to add another hard drive to the VM, but I really need more room on the VHD itself where C: drive is running all my Microsoft apps, but I see it’s property states as “fixed storage size”.
Andrew,
I have not tried implementing Oracle VirtualBox with a D365FO VHD but I was able to find the following:
https://www.diskinternals.com/vmfs-recovery/increase-virtualbox-disk-size/
https://forums.virtualbox.org/viewtopic.php?f=35&t=50661
Hi Alex. Thank you for a excellent blog of how to activate the Hyper-V Image. I have some small improvement Proposal for your blog.
1. The AdminUserProvision Tools seems not to be present on the Newest Hyper-V Image from Microsoft (10.0.41) please add the folder path to your description.
2. And after Running the AdminUser Provision I was unable to login to D365 FO. I restarted the AOS Server in the IIS server and this solved the Problem.
Once again thank you for a excellent blog post for this issue.
Have a nice day
Verner,
Thanks for reaching out, I have updated the blog to add the file path for the AdminUserProvisionTool.
I also added in a step that restarting the AOS Server after executing the tool might be required for successful login.
Thanks for the suggestions!
You mentioned that we need to specify 16 GB of RAM
Is this related to the RAM of the laptop itself?
So if my laptop is 16 GB RAM, and i assign 16 GB to the VM what would happen?
Hello,
The RAM requirement is based on the amount you allocate to the VHD. You will only be able to assign a portion of the available RAM on the host machine (in your case your laptop) to the VHD, therefore you must have 32 GB or more RAM on the host machine to effectively run the VHD with 16 GB of RAM.
Hi Alex, great post. Have you ever upgraded your VHD with the deployable packets from LCS? I’m trying to do so, and have “slimmed” the VHD, but still not enough room on the VHD to download the package and do the update. Have you encountered this and do you know of a way to increase size or maybe attach another drive so the deployable package can be downloaded there?
Ole,
Yes I had to increase the size of my VHD’s hard drive to be able to fit version update packages, each hypervisor is going to be slightly different on how to increase your disk size.
For Windows Hyper-V, I used steps similar to this: https://www.nakivo.com/blog/increase-disk-size-hyper-v-complete-guide/
Hi Alex, thank you for this, much appreciated.
Hi Alex,
Many thanks for the very helpful step by step guide. Unfortunately, I encountered an error when generating the self-signed certificate:
ForEach-Object : CertEnroll::CObjectId::InitializeFromValue: Wrong parameter. 0x80070057 (WIN32: 87
ERROR_INVALID_PARAMETER)
In C:\DynamicsTools\CleanVHD\Build-Vhd.ps1:278 characters:29
+ $EnhancedKeyUsage | ForEach-Object {
+ ~~~~~~~~~~~~~~~~
+ CategoryInfo : OperationStopped: (:) [ForEach-Object], ArgumentException
+ FullyQualifiedErrorId : System.ArgumentException,Microsoft.PowerShell.Commands.ForEachObjectCommand
Can you please give me a hint to solve the problem?
Stefan,
It looks like this error is because the account being used to create the self-signed certificate might not be in an Azure tenant that has valid D365FO licenses. I would ensure that the user account that is executing the PowerShell script is a user within the Azure tenant where your App Registration was created and that has valid D365FO licenses.
https://community.dynamics.com/forums/thread/details/?threadid=69455dda-bce5-425d-850f-da06c4bd11c9
Good afternoon, All,
I am starting my journey as a Functional Consultant and I am looking for the enviorment where I can play with the system with Gloval Admin role. Alex, your guide seems like a perfect solution for me but I have 2 questions before I attempt to run the VM. Do I need to have work / schoold account with MS with D365F&O License? Does the VM save all changes in the enviroment so I don’t need to start from the beginning?
Thank you in advance!
Sebastian,
You will need to either be a Microsoft partner / end user to gain access to LCS to download the initial VHD files. Microsoft does not allow for ‘trials’ of D365FO.
If you are able to obtain the VHD files, then the environment will act as any other development instance of D365FO.
Thank you, Alex. Much appreciated.
Hi Alex
Thank you for this blog post. Found it very useful.
After following all the steps, including the restarting of the IIS web service, I am not able to sign in to the D365 environment. The following error is displayed in the browser “You are not authorized to login with your current credentials. You will be redirected to the login page in a few seconds.To troubleshoot signin issues, please visit https://go.microsoft.com/fwlink/?linkid=2252604.”
Is this something you have observed and resolved?
Many thanks
Ade
Ade,
Have you tried to log out and log back in with this user?
Can you check your UserInfo table in SQL to see if the user you are logging in with exists in the table with the correct email address?
Good morning Alex
I am trying to set up my environment using someone else’s application ID when I go onto user provisioning admin should I use their email address or mine?
Diego,
You should use the email address of whatever user is going to be the initial administrator of the environment.
Based on your description, I would guess it would be the person who you are setting this up for.
Hi Alex.
Thanks a lot for the great walk through of setting up an Hyper-V Image.
I would like to upgrade the Hyper-V image to the latest version 10.0.45. Is this possible and how do I do the upgrade?
Hope this is not off topic for this Guide.
Best Regards
Verner Jensen
Verner,
Upgrading a local VM is a similar process to updating a cloud hosted environment.
1) Download the new update from LCS Shared Asset Library
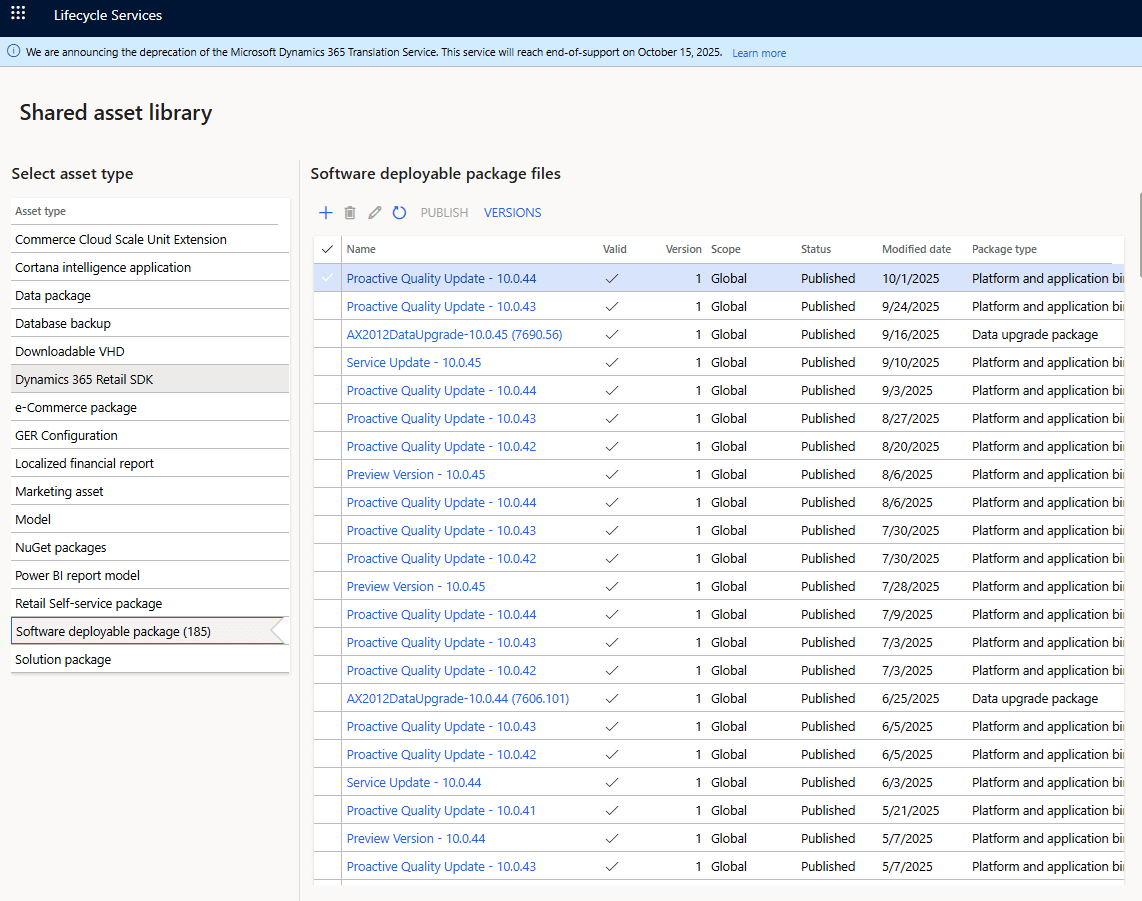
– It will be listed under Software Deployable Package
2) Apply the update via either command line or via LCS Environment Management
– If you are applying via command line, you might find this blog post helpful: https://alexdmeyer.com/2020/11/25/how-to-fix-the-devinstall-option-is-not-applicable-to-the-current-deployable-package-error/
Hi Alex.
Thanks for you’re guide and help. I managed to get the Hyper-V image updated. I found an error in the DefaultTopologyData.xml file. The AOSService was missing.
After I added the line everything worked as expected.
Best Regards
Verner Jensen
I followed the given steps and instruction, it worked, VM configured successfully. it is helpful. thanks