
I’ve written in the past about Least Privilege Security in D365FO but one aspect I haven’t covered yet is the process of setting up field level security in D365FO.
In D365FO, entry point security has changed slightly from AX 2012 and has simplified security by allowing menu item access to drive data source access. I’ve written about this in detail in a previous post.
But if you want to be more granular than allowing access to a particular form then field level security is the way to go. The idea of field level security is to restrict a users access to individual fields on a form.
How to Determine Which Table Field Corresponds to the User Interface Element You Want To Permit/Restrict
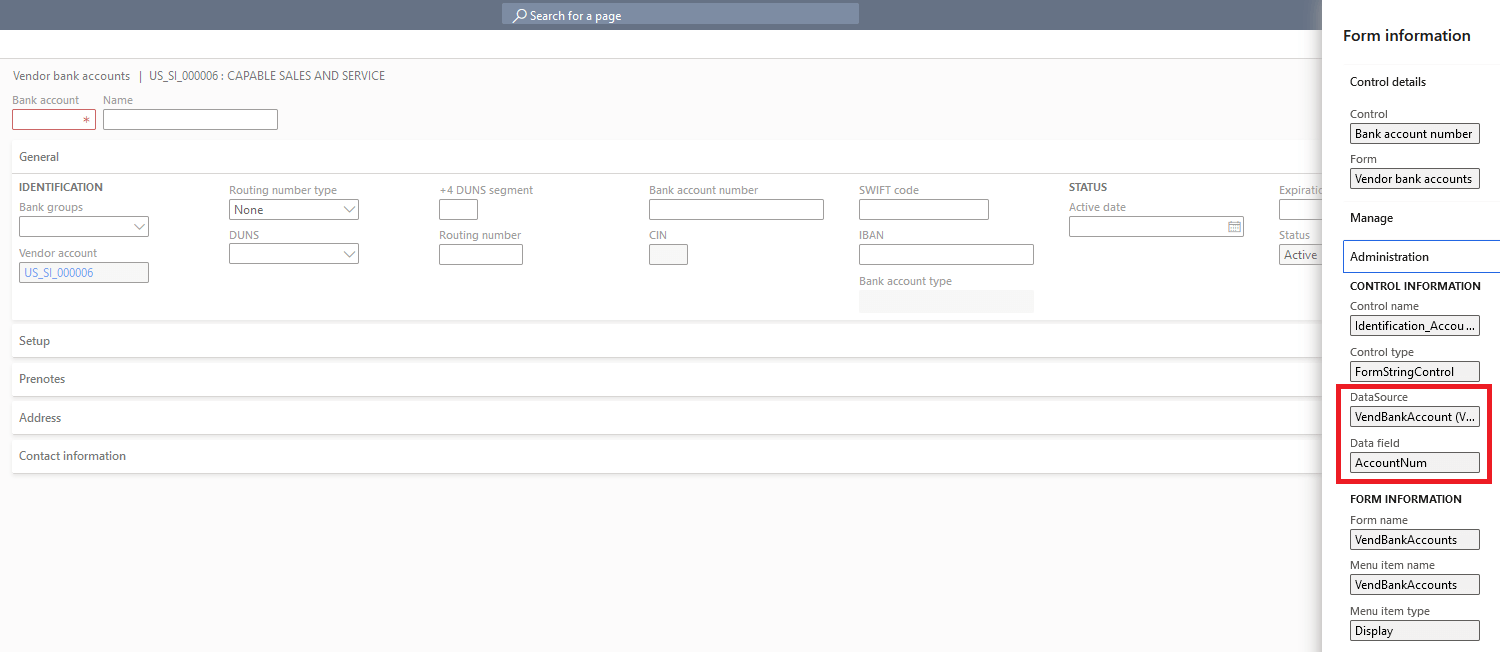
The first step in performing field level security is to determine the table and field you need to permit/restrict. The easiest way to do this is to find the field in the user interface, right click on it go to Form Information -> then click on the Form Name option, this will cause the Form Information dialog to appear on the right hand side of the screen. In this dialog will be an Administration heading with the Data Source and Data Field parameters. The Data Source and Data Field parameters correspond to the table and field that you would have place field level security on.

Scenario 1 – Read access to a vendor but user should not be able to see the Bank Account field
When trying to remove access to particular fields on a form, the easiest option is to set those fields to No Access/Deny (depending on if you set it from the AOT or user interface). This deny is an explicit deny which means it will override any other grants this user has to this table field combination.
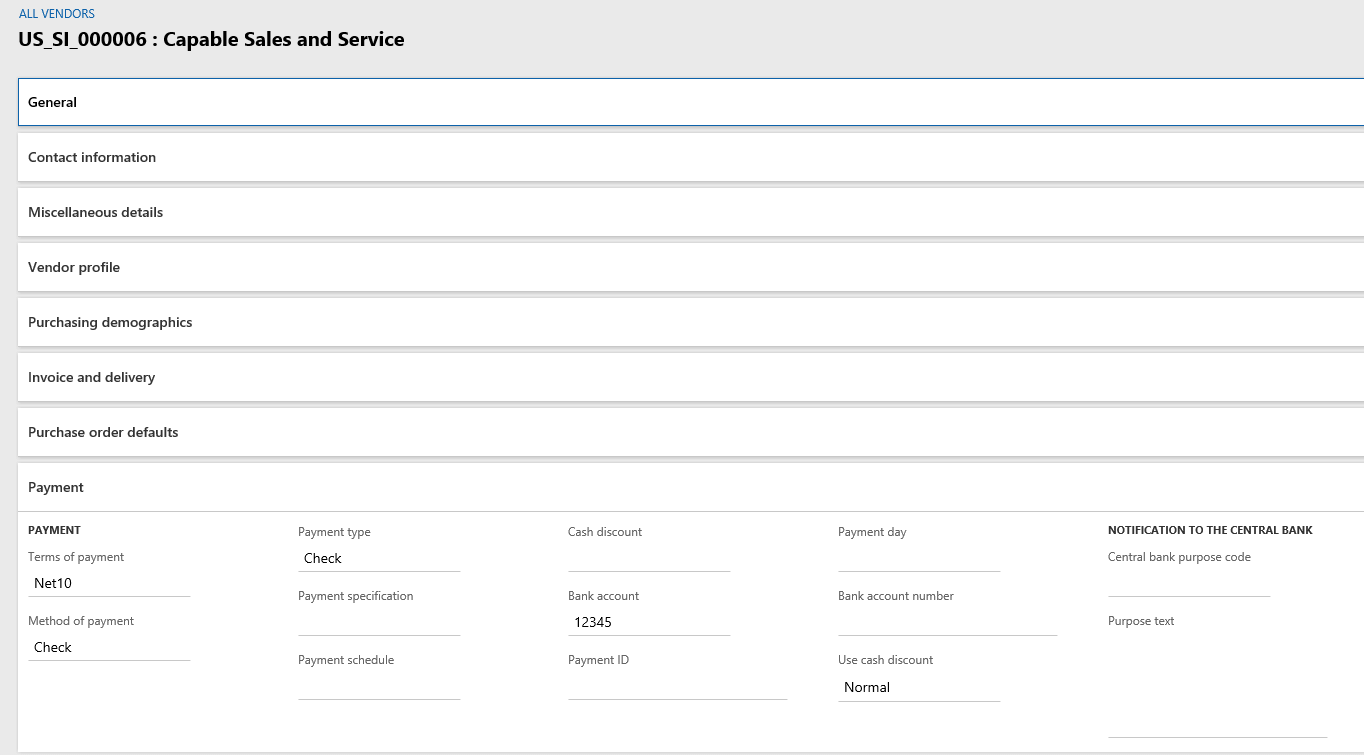
So for example if we have a privilege that has Read access to the VendTableListPage, they would see something like this with the Bank Account field (12345) being shown under Payment tab:
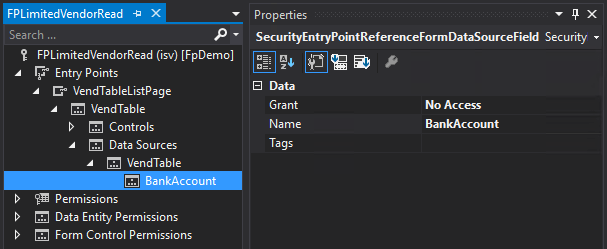
To remove Read access to the Bank Account field, find the VendTableListPage entry point in the security layer we are modifying and under the Data Sources we add the VendTable table and then the BankAccount field and set the field to have No Access.
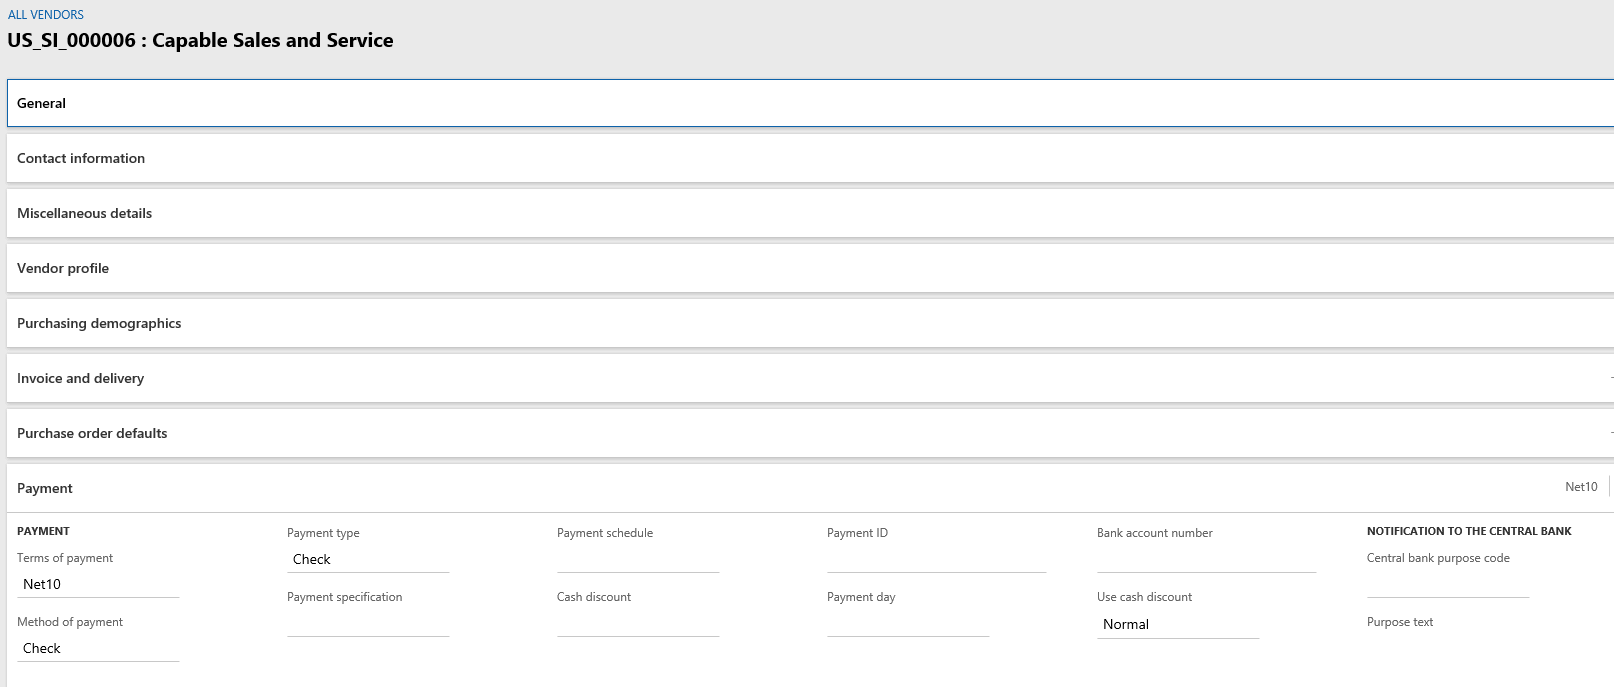
Now when we look at this again you can see the user has no visibility to see the Bank Account field at all.
Scenario 2 – Read access to Vendor but Update access to Credit Limit
This scenario was tougher to figure out as my initial thought was to set Read permissions to the VendTableListPage menu item, Read access to the VendTable, and Update permission to the CreditMax field but this turned out to make all the fields on the form read only. To be able to make the form editable in any way I had to set the data source to an Update permission. But by doing this it also made every other field on the Vendor editable, so to alleviate this you have to set Read permission to all other fields. (In the example below I only did a few fields on the VendTable for testing)

So in my example I set Update permission to the CreditMax field, and Read permissions to the CreditRating, BidOnly, OneTimeVendor, LocallyOwned, and Currency fields.
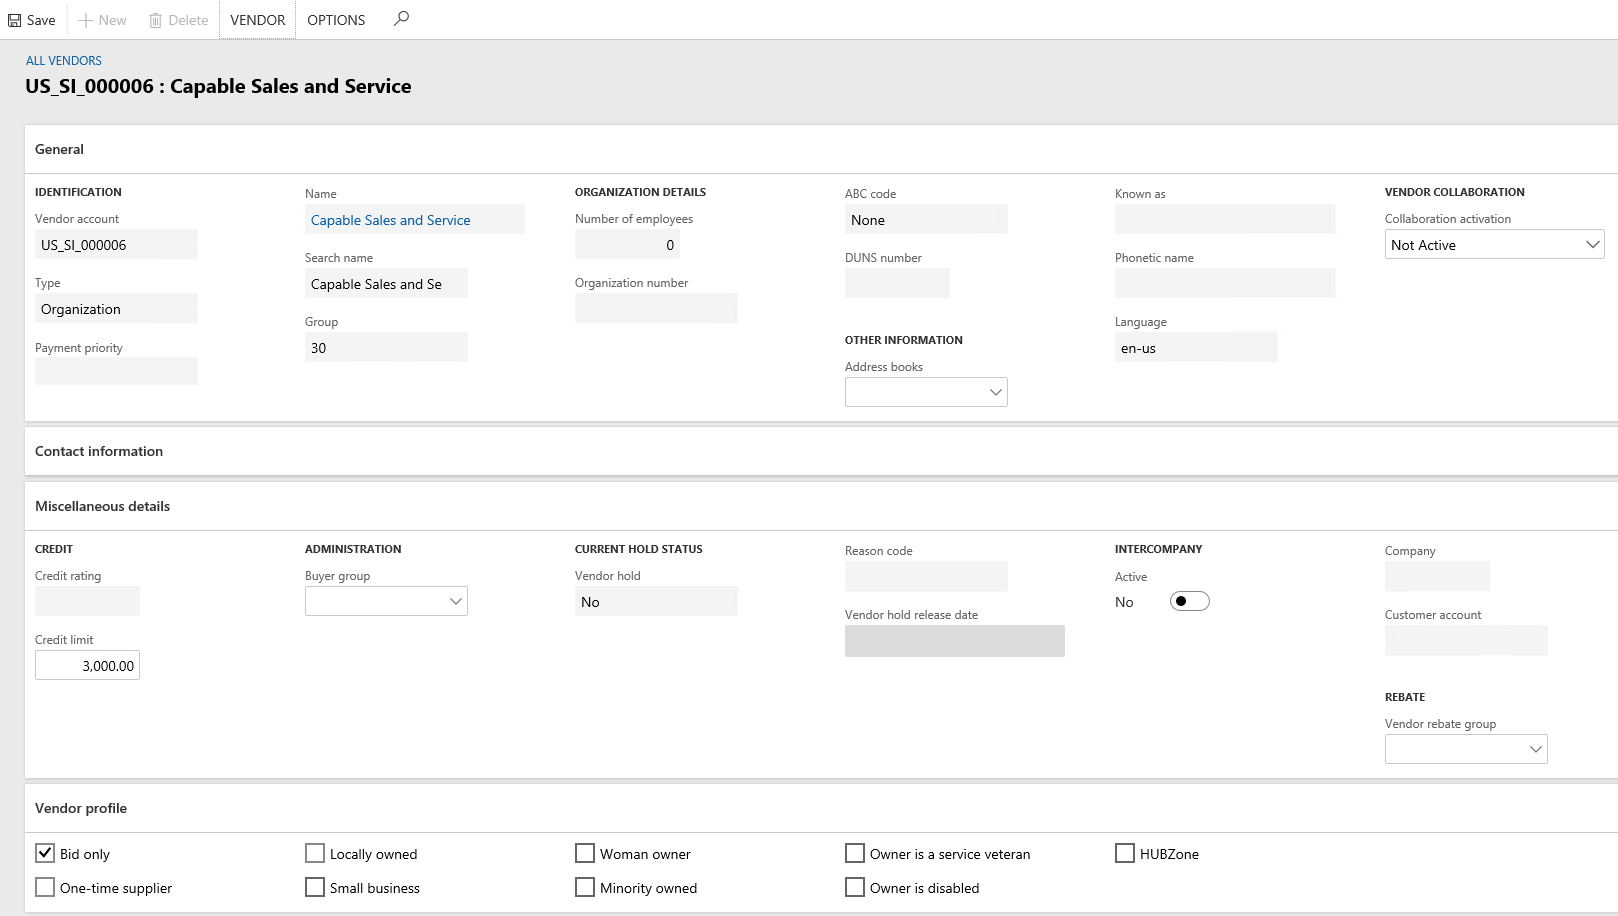
In the example above you can see that the Credit Limit field is editable but the Credit Rating field is not.
It is tough to see in the screenshot but there are some differences under the Vendor Profile section as well. The Bid Only, One-Time Suppiler, and Locally Owned checkbox fields are not able to be edited while the other options are able to be edited.
Multiple data sources on a single form
You may notice in the example above, that there are some fields on the form that do not exist on the VendTable table. Since these fields exist on another table the security for them default back to the entry point security (in this case the security on the VendTableListPage menu item). Because of this, we want the access to the entry point to be the most restrictive possible as we don’t want to inadvertently grant more access to fields on the form when setting up field level security.
Field Level Security Overview
Setting up field level security can be a time consuming process, especially on forms that have multiple data sources and on tables that have a large number of fields. But it can be the best way to permit/restrict a user to perform particular functions while keeping other data protected.
The process for this would be:
- Identify the table field combination you would like to restrict as well as the entry point (menu item) associated with it
- Set the security at the entry point as restrictive as possible
- Set the security at the table level as the least restrictive as needed
- For example, if you want to be able to update certain fields but not others, you would set Read permission to the entry point and Update permission at the table level
- Set field level security as needed
- By default, field security will match permission set at table level
- Need to set permissions on each table field that you want to be more restrictive than the access you set at the table level
- For example, if you want the user to not be able to update certain fields but not others you would need to set all fields that the user should not be able to update at a Read permission
Hopefully this walk through helps with understanding the field level security process, as always if you have any questions feel free to reach out!
Hey Alex,
Any idea on how to handle security of fields which are taking data from display or edit methods. I have tried multiple of getting through by applying security at tabular and form control level but was unsuccessful. Any idea on how to handle this situation in D365 ?
Saad,
I’m not sure I understand what you are asking, you can apply security at the menu item, table, or table field level. Forms and form controls can not have security assigned to them. Security will flow down from menu item to table to table field but with a pessimistic security model you can remove that access at any point. If you would like, please reach out to meyer@gofastpath.com with more information on your question.
Hi Alex – Thanks for this post
I don’t have access to the AOT tables as shown above in scenarios 1 and 2
Could these 2 scenarios be replicated through the user interface in D365 and how?
Tunde,
Yes this can be done via the user interface, by adding a reference to the table first and then adding the access to the table fields.
Hi Alex,
Similar question to Tunde’s above. I’m trying to restrict access to custom button on a custom form from the UI rather than AOT. Is this possible? Or can only fields within forms be locked down?
For my example, I would like the users in this role to be able to open the custom form, but not edit the custom button we have added to the action bar at the top of the page.
Megan,
It would depend on the type of button you have created, if it backed by a menu item action you can restrict access fairly easily using the normal object permissions (by denying access to it for example).
If the button is part of a form control and the button press is handled in code, then you would have to use form control level permissions to handle whether a user has access to it or not.
In either case, both of these options can be done via both the user interface and the AOT.
Hello Alex, I could not find the way to use form control level permission on user interface.
Could you please share a screenshot or explain it?
Thanks in advance
Ferhat,
Form Control permission are a separate permission type from field level security. I think it will make more sense to create a blog post surrounding form controls. I will update you once I have it created!
Hi Alex
I add a table reference, but do not see the form to select fields within the table. How is that activated and opened?
Thanks
Al
Al,
Once you have assigned the table to the role/privilege and select the table then click Add Reference:
Then the table fields are listed for assignment:
Hi Alex,
I wanted to updated the security role to read only for the Due Date field while confirming the sales order.
Do you know how we can acheive that?
Binit,
When you want to ensure that a user only has read only access to a field, using the Deny permission is one way to achieve that. You can set the Update, Create, and Delete permissions for the Due Date table field to deny allowing only the Read permission.
HI Alex,
Thanks for a great blog.
I have a question, on the vendor block field, the client wants some users to be able to set the on-hold to All, and only selected users to be able to set it back to No.
I assume I need a developer for that?
Let me know what you think
Thanks
Yif
Yif,
Thank you for the kind words, for your scenario you would need a developer to create a customization on that drop down as there isn’t any native functionality that would give you the functionality you are looking for.
Thanks for the quick response!
Yes that makes sense, I was hoping not to use a developer 😉
Take care
Yif
Hi
I need to know on how to restrict user access to particular vendor group?
Mohamed,
You would need to look at using Extensible Data Security (XDS): https://alexdmeyer.com/2019/02/20/extensible-data-security-xds-framework-in-d365fo/
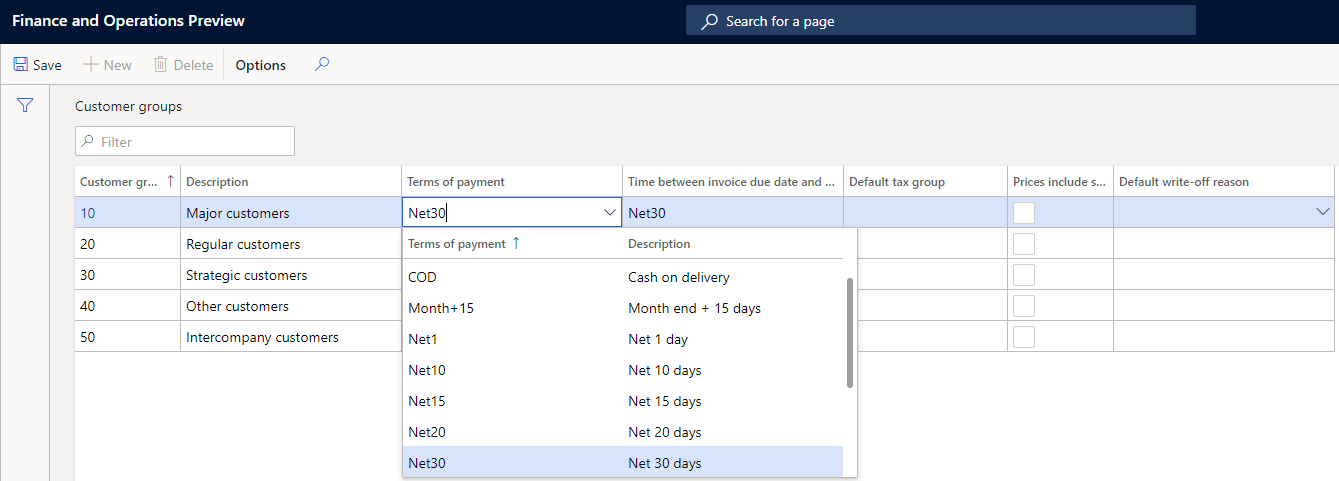
Hi I am trying to create 3 roles to control 3 different fields in the same table.
For example I use CustGroup (MenuItem and Table have same name)
Role 1 should be allowed to Update Terms of Payment
Role 2 should be allowed to Update Default Tax Group
Role 3 should be allowed to Update Default Write Off Reason
If a user have Role 1, he should have access to update Terms of Payment, but NOT Default Tax Group or Default Write Off Reason.
If a user have role 1 & 3 he should have update access to Terms of Payment and Default Write Off Reason, but NOT Default Tax Group and so on.
Is this possible?
Will it be possible through the User interface? (I don’t have developer access)
Thomas,
You should be able to accomplish this by following Scenario #2 in the blog post. By setting up Read access to the menu item, Update access to the table, and then setting each field as Read access on the table except for the fields you mentioned for each role respectively.
And yes you should be able to do this via the user interface.
Hi Alex,
Thank you for you quick response.
Unfortunately it does not work as desired.
I created a role with these permission (like I understand your reply):
Role;Sub role;Duty;Privilege;Resource type;Context \ Resource;Read;Update;Create;Delete;Correct;Invoke;License
NKTP CustGroup PaymTerms (TEST);;;Maintain CustGroup PaymTerms (TEST);Menu item display;CUSTGROUP;Grant;Unset;Unset;Unset;Grant;Unset;Operations
NKTP CustGroup PaymTerms (TEST);;;Maintain CustGroup PaymTerms (TEST);Table Field;CUSTGROUP\BANKCUSTPAYMIDTABLE;Grant;Unset;Unset;Unset;Unset;Unset;None
NKTP CustGroup PaymTerms (TEST);;;Maintain CustGroup PaymTerms (TEST);Table Field;CUSTGROUP\CLEARINGPERIOD;Grant;Unset;Unset;Unset;Unset;Unset;None
NKTP CustGroup PaymTerms (TEST);;;Maintain CustGroup PaymTerms (TEST);Table Field;CUSTGROUP\CUSTACCOUNTNUMSEQ;Grant;Unset;Unset;Unset;Unset;Unset;None
NKTP CustGroup PaymTerms (TEST);;;Maintain CustGroup PaymTerms (TEST);Table Field;CUSTGROUP\CUSTGROUP;Grant;Unset;Unset;Unset;Unset;Unset;None
NKTP CustGroup PaymTerms (TEST);;;Maintain CustGroup PaymTerms (TEST);Table Field;CUSTGROUP\CUSTWRITEOFFREFRECID;Grant;Unset;Unset;Unset;Unset;Unset;None
NKTP CustGroup PaymTerms (TEST);;;Maintain CustGroup PaymTerms (TEST);Table Field;CUSTGROUP\DEFAULTDIMENSION;Grant;Unset;Unset;Unset;Unset;Unset;None
NKTP CustGroup PaymTerms (TEST);;;Maintain CustGroup PaymTerms (TEST);Table Field;CUSTGROUP\NAME;Grant;Unset;Unset;Unset;Unset;Unset;None
NKTP CustGroup PaymTerms (TEST);;;Maintain CustGroup PaymTerms (TEST);Table Field;CUSTGROUP\PAYMTERMID;Grant;Grant;Unset;Unset;Unset;Unset;None
NKTP CustGroup PaymTerms (TEST);;;Maintain CustGroup PaymTerms (TEST);Table Field;CUSTGROUP\PRICEINCLUDESALESTAX;Grant;Unset;Unset;Unset;Unset;Unset;None
NKTP CustGroup PaymTerms (TEST);;;Maintain CustGroup PaymTerms (TEST);Table Field;CUSTGROUP\TAXGROUPID;Grant;Unset;Unset;Unset;Unset;Unset;None
NKTP CustGroup PaymTerms (TEST);;;Maintain CustGroup PaymTerms (TEST);Table Field;CUSTGROUP\TAXPERIODPAYMENTCODE_PL;Grant;Unset;Unset;Unset;Unset;Unset;None
NKTP CustGroup PaymTerms (TEST);;;Maintain CustGroup PaymTerms (TEST);Table;CUSTGROUP;Grant;Grant;Unset;Unset;Unset;Unset;None
The Menu Item seems to control the Update Access on all the fields, so Unset Update on the Menu Item, prevents update on all fields including PaymTermID, and even when the CustGroup table also has grant Update.
Thomas,
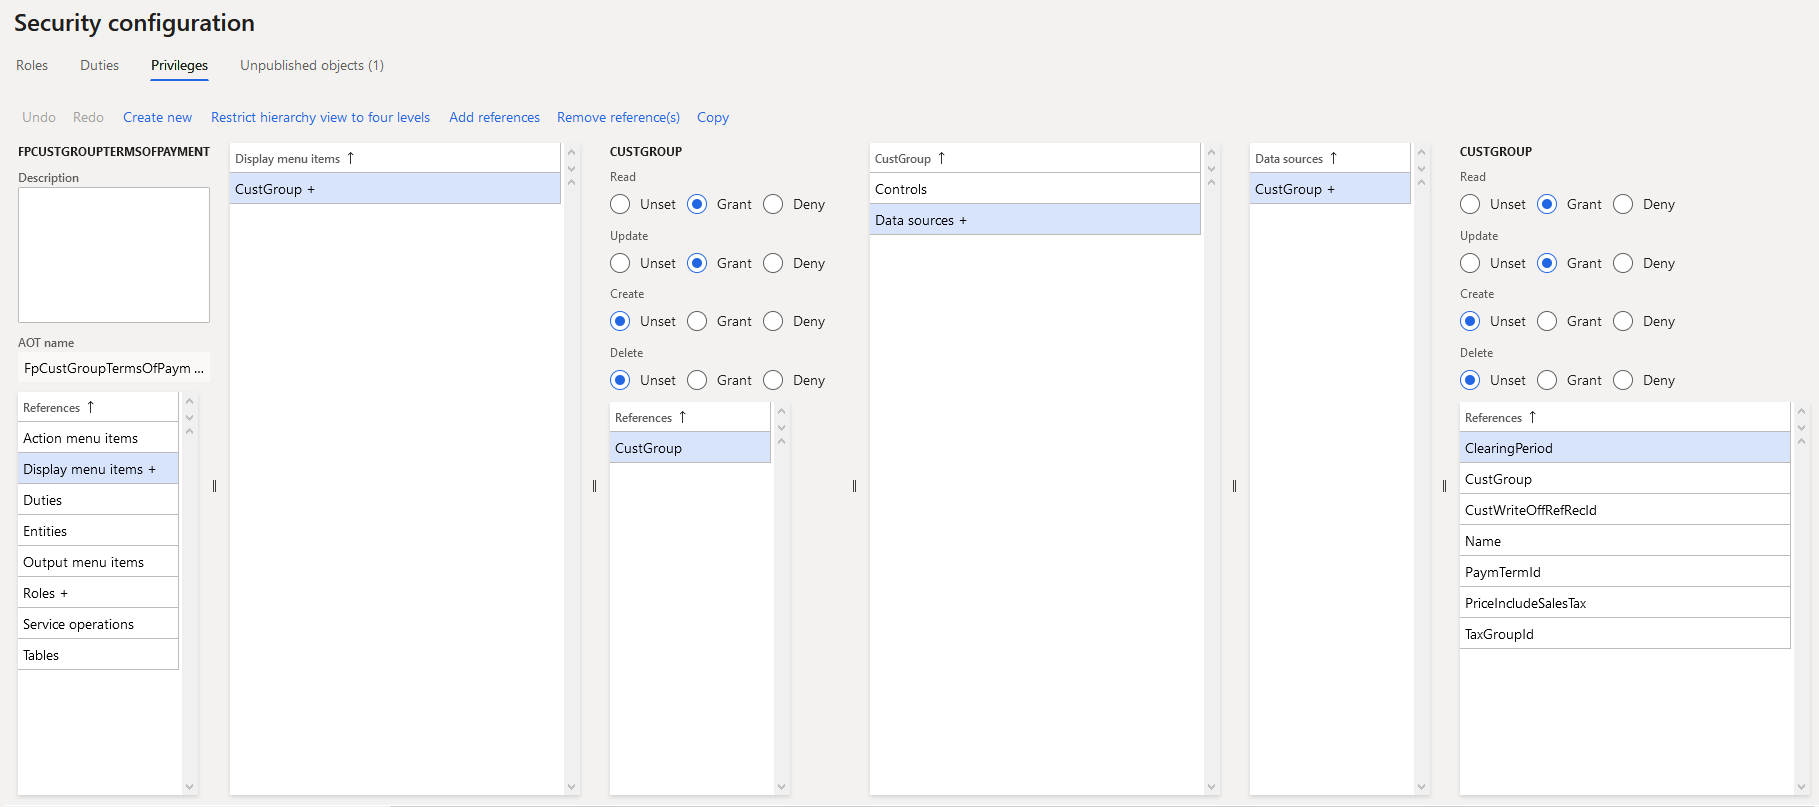
You are correct, it looks like in this case when combining security from multiple security layers you have to take a slightly different approach.
CustGroup Menu Item -> Update
CustGroup Table -> Update
Cust Group Fields -> Set to Read/Update depending on what should be available
Here’s how this looks from a permission perspective:
When applied, to a user these permissions allowed for:
– Modification to the Terms of Payment and Default Write Off Reasons
– No ability to edit/modify any other fields
Hi Alex,
The permissions for the different fields, seems to be set up on the Datasource, rather than on the Table as I already tried.
How do I add the Datasource as reference to the Menuitem?
When I select the MenuItem, there is no ‘Add reference’-button.
Thomas,
The Datasource of a form is the SQL table where the data is stored, so a datasource = table.
In my example, I set up the security from the AOT but you can also do the same thing from the user interface. For example:
Hi again,
It seems my problem was, that I tried to make changes to the AOT Privileges, rather than creating my own new Privileges in the “Non-AOT”-layer. (Does it have a proper name?)
Even on a duplicated Privilege, the datasource level could not be added!
Thanks again for your help – otherwise I would have resigned a long time ago.
Hi Alex,
How to restrict a particular field for some legal entities, how can we achieve this?
If there is any docs/blog reference please.
Thanks!
David,
If you want to restrict a user’s access to specific legal entities then that would be done on the user role assignment, I go over this process here: https://alexdmeyer.com/2020/01/07/options-for-configuring-user-legal-entity-restrictions-in-d365fo/
If you are saying you want a user to be able to see all fields on a form in some legal entities and only some fields on that same form in other legal entities, then that would require custom code to achieve.
Hi,
The question is slightly off-topic but I am not able to find a valid solution, hence asking here.
What I am trying to do: I am integrating my application(web) to integrate with Dynamics365 FO. I want to be able to enable/disable a certain user from the FO environment.
I have registered the Azure application on FO with Admin user. When the client app is registered with the Admin user, then the enable-disable operation is working fine (I am using oData rest end points, in this case /data/SystemUsers DataEntity)
Now, when I register the client app with some other User (I don’t want to register it with Admin so as to prevent the risk) the operation is failing. For the new User, I have assigned him following privileges:
1. Maintain Users
a. Tables – SecurityUserRole, SysUserInfo, UserInfo
For UserInfo table, I have given GRANT to fields enable and enabledOnce
b. Entities – SystemUserEntity
2. Maintain Users Entity
a. Tables = UserInfo, SysUserInfo
3. View Users
When I trigger the request, I am getting:
“message”: “Could not schedule SetValue for property Enabled: update access to property not granted”,
“type”: “Microsoft.Dynamics.Platform.Integration.Services.OData.ODataSecurityException”,
What am I missing here? What more privileges are required? I also tried with the default Maintain Users and Maintain User Entity privileges (with out modifying them ) then I get the following error:
Write failed for table row of type ‘SystemUserEntity;. Infolog: Error: User ‘TestUSer’; is not authorized to insert a record in table ‘SYSUSERINFO’. Request denied.; Error: Cannot create a record in User information (SysUserInfo). Access Denied: You do not have sufficient authorization to modify data in the database.
I am stuck here and not able to proceed. It will be of great help if you can provide some pointers
ND,
I am the lead developer on a project that allows for creating/updating/and terminating users within D365FO. Here are the permissions we have to set for this to be successful:
Duty: Maintain Security Settings
As well as the following access:
Thanks Alex for the details. It helped me log
Hi Alex, me again!
Can you please let me know how I would do this the other way around, and from the field itself find out which privilege/duty might be restricting access? I have a user with roles assigned who cannot edit the bank account number field, but can edit other fields on the bank accounts screen. I have access to the AOT and know the field name – I’m guessing something somewhere is stopping the user from editing the field – I just don’t know what!
Thanks
Asher,
Just to confirm, are you referring to the BankAccountTable -> AccountNum field? The reason I ask is because this field has TPF enabled which means that a user needs to be explicitly granted access to this field for a user to have access to it. You can get more information on the Table Permission Framework here: https://alexdmeyer.com/2019/01/24/table-permission-framework-in-d365fo/
To answer your initial question on going from a table/table field to determine which roles, duties, and privileges give access to it you have to keep in mind that D365FO changes how security to data sources are applied. The access a user has to the menu item will propagate down to the table and therefore the table field. There is no out of box report from D365FO that will show this but since I know Alltech is a Fastpath customer there are a couple different reports I have created that I think could help, feel free to reach out to our support team to get information on these.
Hi Alex
Yep, that’s the field! I’ll take a look, and reach out to the support team once we’ve got everything installed!
Thanks again for your useful insight
Alex
I used the method of running the related objects and licenses report and was able to find a privilege/duty which gave access to the field, added the duty to a custom role and this has resolved the issue.
Thank you!
Hi Alex,
Thank you for your time and efforts in terms of sharing your knowledge.
I have the following question – there is a custom table (MyTable) and there are many fields in it, and one of them is MyField. I want that MyField is not visible by default to every user, and MyField only avaliable for (Create/Read/Update/Delete) only if the User has an appropriate permission.
So, I set AosAuthorisation=Yes for MyField, and I set AosAuthorisation=CreateReadUpdateDelete for MyTable (also I did a build of the model with synchronization) – but my User (who is not an administrator) still can see MyField on the form.
Could you please explain what I did wrong?
Thank you, Oleksandr
Oleksandr,
If the AosAuthorization parameter is enabled on the table field then a user must have explicit access to the table field for them to have access so in your case this user must be directly assigned access via one of their role assignments to that table field for them to be able to see it on the form (they do not need to be an administrator to be able to see the field). Also there is no requirement for setting the AosAuthorization parameter at the table level as well unless you also want to require the user to have explicit access assigned to the table for them to have access.
Hi Alex,
I do not see a Data Field specified for the bank account number field under All Vendors. The DataSource is VendTable. How can I set deny permissions on it using the user interface if there isn’t a data field?
Thanks,
SM
SM,
The bank account field for vendors is the BankAccount field which ties to the VendBankAccount table.
Hi Alex, appreciate the response! However, I’m referring to the bank account NUMBER field, not the bank account field. “Bank account” has a data field BankAccount; “Bank account number” doesn’t seem to have one.
SM,
The vendor bank account number is not on the VendTable itself, it is on the VendBankAccount table -> AccountNum field.
Hi Alex,
Your posting was very useful and informative. I’m trying limit the field access via privilege data source control. But I’m stuck where in form information, the data field is blank.
Nazrin,
Can you provide the form and field you are looking for? I can take a look.
Your post is actually very timely as I am writing a blog post currently on the different options you have to look up where the data on a form is actually stored.
Hi Alex,
Can you please share, how would we can make Fast Tab read-only. I have scenario where user can maintain the customer but in All customer Fast Tab “Credit and collections” should be read only. Mean how can we make only one Fast Tab read only not the entire form or rest of the Fast Tabs.
Arif,
If you wanted to make the ‘Credit and Collections’ read only you would need to go through and make each table field contained in this tab to be grant ‘read’ access and then ‘deny’ update, create, and delete access.
Hey Alex,
I am doing the same thing but am noticing that certain data fields (references) do not appear in the user interface. These items are of control type “FormCheckBoxControl”. Are their instances where you need to update the permissions to a field in code and can’t in the UI?
Sarah,
There are instances where a field may be a part of a ‘form control’ which is a grouping of form elements that are grouped together because they are a part of similar functionality or selection of one element impacts another element.
Each data field on the UI should be referenced by a table field value in some way, shape, or form. If you give an example, I can take a look.
Hi,
I would like to make is so that only certain users can change the Project Stage dropdown under Project Management and Accounting > Projects > All Projects, is this possible? Thanks so much!
Zoe,
Looking at this scenario, the drop down you are referring to is actually a form control and the options of the drop down are each their own menu item. If you wanted to restrict a user to not have access to certain options or the entire drop down in general you would want to deny the corresponding menu item for each drop down option.
Thanks for your response, I don’t have access to the same UI as you, and when I try deny “update, create, and delete” abilities to the user for ProjProjectsListPage it doesn’t work. Do you know how to access CtrlStages from the more front end UI if that makes sense?
Zoe,
The screenshot I showed is from the AOT (Application Object Tree) which is the code backend of D365FO, you do not want to deny access tot he ProjProjectsListPage as that is the menu item driving the ‘All Projects’ form. You want to go through and deny access to the menu items tied to each entry of the drop down. The reason I was showing the AOT was that you can actually see the menu items behind each option in the drop down here, you will not be able to see this information from the UI.
For example, If I wanted to remove access to the ‘Created’ option in the Project Stage drop down I would deny access to the ProjStatusCreated menu item action (taken from the Menu Item Name and Menu Item Type parameters on the highlighted entry in the screenshot of my last reply). You could then do the same for all of the other options in the drop down as well.
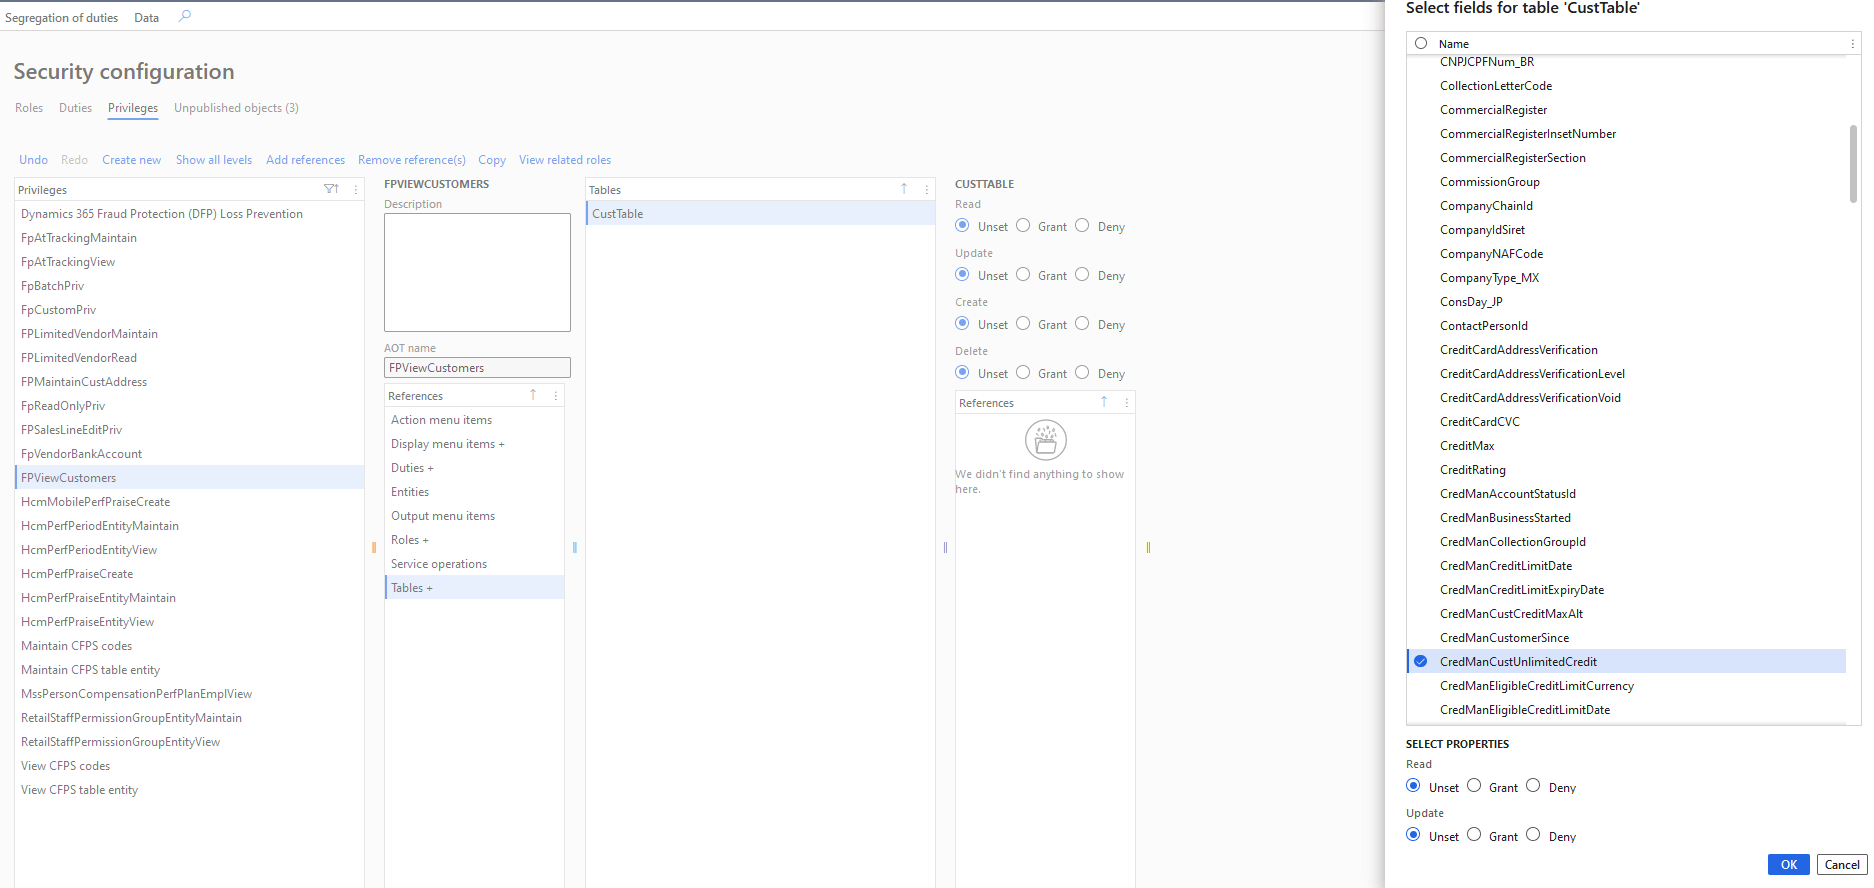
I am looking to limit access to the credit and collections fast tab on the All Customer page. I am able to limit “Credit Rating”, “Mandatory Credit Limit” and “Credit Limit”. All other sections are not showing up.
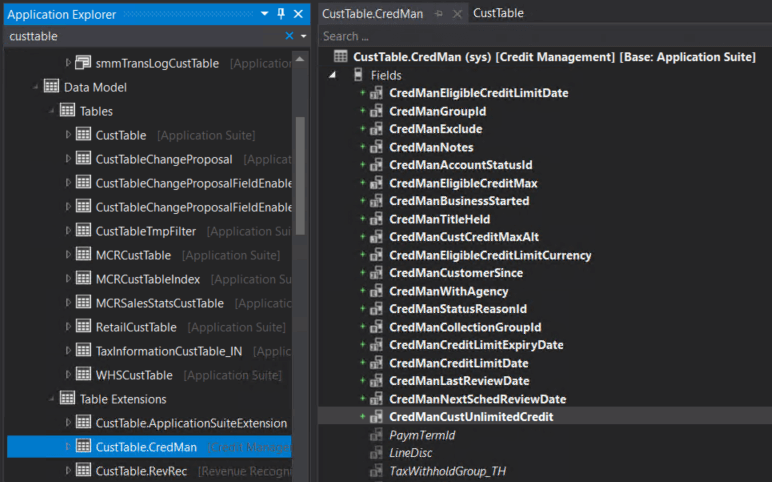
For instance the “Unlimited Credit Limit”. The data field name is “CredManCustUnlimitedCredit” but when I look that up in the list of data fields on the CustTable it does not show up.
Sarah,
For the ‘Unlimited Credit Limit’ option, I am able to see the CredManCustUnlimitedCredit field on the table:
Looking at the AOT, we can see that this field does not exist on the main table but is part of a table extension that exists in the Credit Management model:
Hi again, I am having another issue where I am trying to create a custom role whose only ability is to add a vendor. However, I am having an issue where although the user with this role is allowed to press the “New” button in Accounts payable > Vendors > All vendors, once they are at the place where they would type in all the information, they are not able to do so, they are not allowed to click into each field (such as Vendor account, Name, Group, etc) to edit it. I am wondering if you can help with this? Thanks
Zoe,
Granting Create access to the VendTableListPage menu item display should give the user the necessary access to create a vendor.

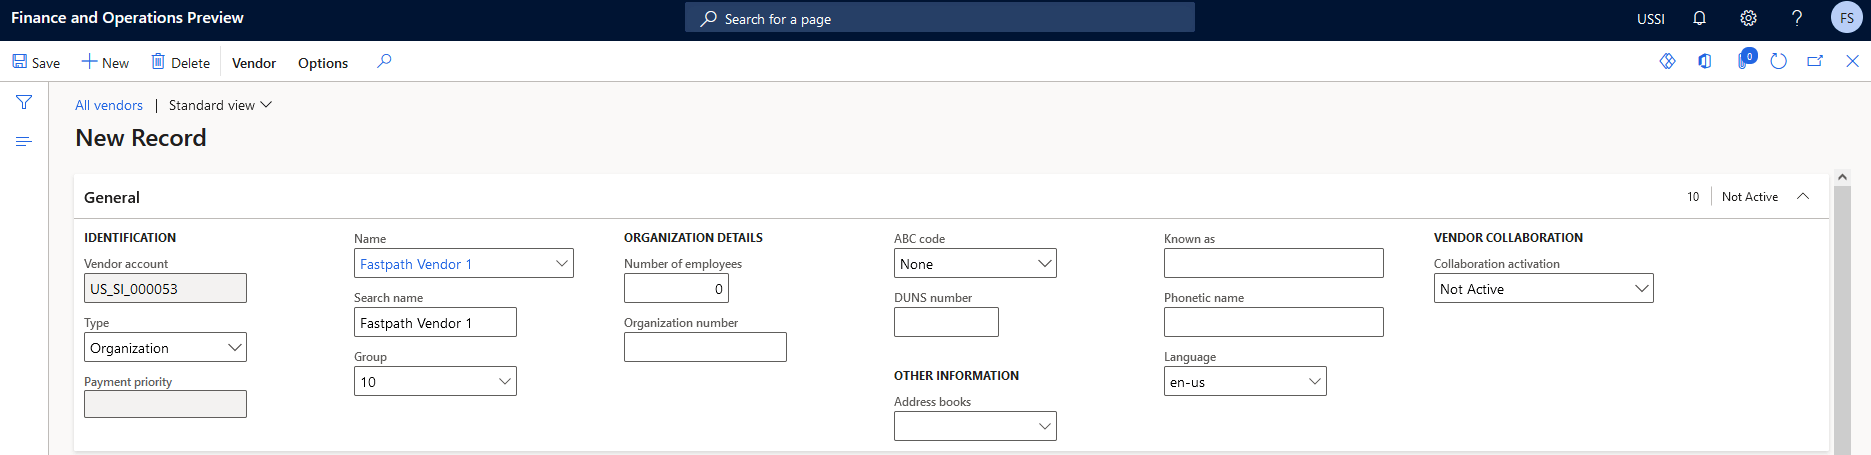
If I create a role with this access:
I can successfully create a vendor and access the fields you are referring to:
My role does have Create access to the VendTableListPage, but I changed Update and Delete to Deny because I don’t want them to be able to edit or delete existing vendors, do you think that’s why the role can’t edit the fields?
Zoe,
Security in D365FO is hierarchy based (Read -> Update -> Create -> Delete), you can’t grant access to Create and then Deny access to Update since that does not follow the hierarchy structure.
I wrote about this topic in the first part of this blog post: https://alexdmeyer.com/2019/03/04/things-to-watch-out-for-when-developing-d365fo-security-through-the-user-interface/
When i am adding the bank information in vendor master getting this error
Access Denied to field BirthPlace in VendTable
Can you suggest me which field is to give grant permission
Srinu,
The error would suggest granting access to VendTable -> BirthPlace
Hi Alex,
this site is like a fountain of knowledge in terms of security and thank you for sharing it with the community.
What I wanted to ask is what would you recommend as the best method from the rich client to identify the security objects for the dialog forms? For example “Automatic release to warehouse”?
Many thanks
Mike,
Thanks for the kind words and I’m glad you find my blog posts beneficial.
As far determining the securable object or where data for a particular form is stored, you might find this blog post useful: https://alexdmeyer.com/2021/12/08/determine-where-form-data-is-stored-in-d365fo/
Hi Alex,
I have followed the same steps as mentioned. Everything is working fine except the fact that through personalisation the fields can be added again using insert columns feature of personalisation. Do we have any solution for this?
Surendra,
What scenario are you trying to accomplish? (Are you trying to deny access to the field? Just trying to make a field readonly? etc.)
I want to try and replicate your scenario.
Thx Alex.
Is there a way to define reading/updating access to a specific field based on the ownership of the record ? That would save so much configuration time !
Thx a lot
Thibaut,
D365FO does not have the idea of ‘record ownership’ like other Dynamics 365 products do (specifically anything CRM related), where you can choose who to share the record based on an organization hierarchy for example.
However you can utilize Extensible Data Security (XDS) to provide a very limited functionality around this, for example if you wanted to limit a user to only seeing records they created you could do something like this: https://alexdmeyer.com/2021/06/21/how-to-apply-d365fo-extensible-data-security-based-on-the-current-user/
Hi! Alex,
There is the case where I wanted to make a mandatory field in a Item master for a particular security role. How can i achieve this…
Thanks
Sachin,
You can do this either through X++: https://www.linkedin.com/pulse/make-any-field-mandatory-form-level-x-d365-finance-gaurav-gulati/
Or via personalization: https://vamsipraneethdax.blog/2020/07/26/required-fields-in-dynamics-365-finance-and-operations/
Thanks for reply.
Can you please suggest how can we personalize the field mandatory in a Form for a particular User and freeze so that they can not change respectively.
If you want to make it so a user cannot ‘undo’ this personalization and force the field to be mandatory for all users, then the X++ option is the best option.
Hi Alex
I am facing a unique challenge all of the accounts payable roles including accountant that allow users to create a new payment journal are not able to create a new payment journal, the create new button/function is grayed out despite all the duties and privilege’s being correct and access to maintain and update being granted. Please may you kindly advise
Saru,
The Vendor Payment Journal is controlled by the LedgerJournalTable5 menu item display:

Looking at a role access report, the only out of the box role that has the ability to Create a new payment journal is the ‘Accounts Payable Payments Clerk’ role, all other AP roles only have Read access to this object.
Hi Alex,
Thanks a ton for sharing your knowledge and helping us.
I need your help with one security requirement.
I have created two custom fields in custTable and added them in custTable form. Those new fields should only be editable by user who has either system admin or Customer boarding role(custom role). How can I achieve this security please help.
Its urgent requirement, please guide.
Thanks a lot.
Karuna,
The SysAdmin role will always have access to all elements within the system, so you don’t have to worry about that.
If you only want one role to have access to this field I would recommend enabling table permission framework for this field (https://alexdmeyer.com/2021/10/27/using-tpf-to-protect-sensitive-data-in-grid-columns-for-d365fo/). This would allow you to control which role(s) should read / update this data.
Thank you Alex for help, I really appreaciate it.
I went though the link you shared.
I set the AOS authorisation of the field to Yes on the custTable.
1. I created a privilege, added the CustTableListPage Menu item to it. Set access to delete.
2. Added datasource CustTable and set the Grant to Unset.
3. Added both custom fields and set the Grant to update.
4. Applied this privilge to a role and assigned it to a user.
When I am editing those fields, I am getting the error ‘Access denied to field P21 Customer Number (TestP21CustomerNumber) in table Customers (CustTable).’
What I need is that whoever user has this security role should be able to update/ edit these fields. Also, other users who do not have this security role assigned to them, they should be able to read the value (but can not edit the field).
Please help with this scenario.
Karuna,
You will have to have two privileges one with Read access to the table field that gets assigned to users who should be able to view customers, and another privilege that has Update access to the table field for users that should be able to update those custom fields.
Alex, Then in that case does that that mean, that I will have to assign the update privilege to users who should be able to update the fields on customer master and secondly, I will assign the view privilege to users who should be able to inly view the field on the customr master form.?
But in this case I will have to update all security roles tagged on the customer master form with this view only privilege?
I am getting confused here please help.
Karuna,
You can either modify a current privilege (either out of the box or custom) that is assigned to the appropriate set of users to read or modify the custom column or you can create new privileges (like I mentioned in my previous comment) and assign those to the appropriate set of users.
You are correct that you would need to do this for all users that have access to customer master, so modifying an already assigned role may be slightly easier as it would already be assigned the necessary customer master access and you are just augmenting that with access to the custom fields.
Hi Alex,
Great post.
I have a scenario, sales manager can create a customer address, but can’t mark the address as Primary. Because primary address is used for customer invoicing. If a primary address is changed, invoice will be sent to the incorrect address of the customer, which void the invoice, and customer cant pay the invoice.
(address)IsPrimary field is from DirPartyLocation table. I have modified the field permission as “Deny”. But it is not working. The toggle is still enabled on UI forms, it’s still can be set for an Address, either “creating a new address” or “Editing an existing address”.
Also, on field level “Deny”, does it override any other “Grant”?
I duplicate an existing role “Sales manager”, and removed any other duties that might have the “Grant” to the field, incase “Deny” on field level doesn’t override any other “Grant”, which it’s normal way.
Role-SaleManagerCopy
Duty-Maitain customer masterCopy
Priviledge-Maintain customer records (financials)
Table-DirPartyLocation – Grant
Field – isPrimary Grant(Read), Deny(Update,Create,Delete)
Wei,
You are correct that a Deny permission overrides any Grants to an object. I think the issue you are running into is that the isPrimary field is not on the DirPartyLocation table but on the LogisticsElectronicAddress. I was able to find this by right clicking on the ‘Is Primary’ field on the grid and looking at the data source and data field:
How to can we restrict or deny fields on Form that is coming from data method instead of data field
Mayank,
You would have to look at where the data method is pulling data from and restrict access to that.
Otherwise you would have to look at custom code to disable/remove the field from the form.
Hi Alex,
I’m hoping you may be able to assist here. Using my sys admin access I developed a Excel Vendor invoice template to load in credit card transactions. When trying to publish this, the following error seems to crop up,
Error message: ‘Could not schedule SetValue for property Date: update access to property not granted’
I’m not sure this is a permissions issue since I was using my sys admin access. Do you have any suggestions to help me resolve this problem?
Neelesh,
Are you trying to publish this via the Excel add-in or how are you trying to publish the update?
If so, the permissions are set with the user you log into the Excel add-in by so you may need to ensure you are utilizing the correct user to actually perform the action. The error you are getting definitely looks like a permissions issue that whatever user is performing the update does not have Update permission to the data entity (and potentially the field on the data entity) you are using.
Hi Alex,
Thanks for the quick reply. I am trying to publish through Excel add-in back into F&O.
I’ll have another look at the Privileges against this this to see what this might be. But it was strange that as sys admin, it was still erroring out. There is a privilege called Ledger journal line CDS entity maintain – could this be the correct privilege to apply?
Many thanks,
Neelesh,
I would first validate what user is actually signed in via the Excel add-in, being assigned SysAdmin should give all permissions in the system so nothing additional should be needed to achieve this.
If the user signed in is correct, you may have to step through the process or gather additional logs to see what is actually causing the error to occur.