
I’ve written in the past about Dynamics 365 for Finance & Operations Security and how it differs from previous versions of Dynamics AX, now it’s time to look at how to set up security within the application. I will show how to do this from the user interface (in this post) and from the AOT (in a follow up post) while giving pro’s and con’s of each.
Setting up security in the user interface
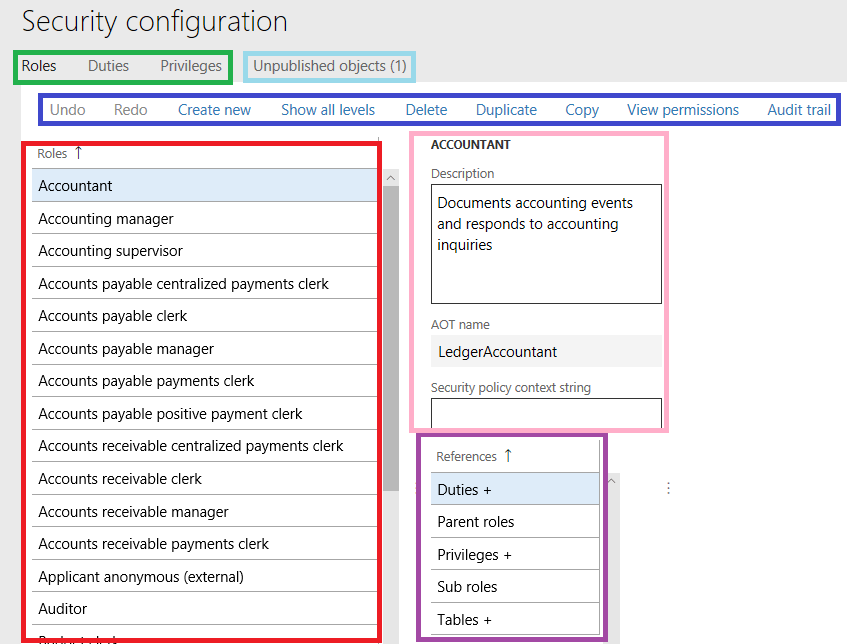
To set up security from the user interface, log into D365FO and navigate to System Administration -> Security Configuration. After navigating here you will be presented with a similar screen to the one below, I’ve broken the screen down into different sections based on their function.
- Green box – Allows you to switch between roles, duties, and privileges
- Blue box – Has a number of different options for performing against the currently selected role/duty/privilege
- Undo/Redo – undo/redo customizations applied to this security layer
- Create new – create a new security layer
- Show all levels – by default D365FO will only show 4 levels of fly-outs in the navigation, this option will force it to show a horizontal scroll bar to fit all fly-out levels
- Delete – remove the current security layer
- Duplicate – create a clone of the currently selected security layer, allows you to give it a new name
- Copy – copies the current security
- View Permissions – shows an entire hierarchy of security for the currently selected security layer
- Audit Trail – shows the history of all changes made to an object either from user interface or through AOT
- Red box – listing of all current objects in selected security layer
- Pink box – shows details about currently selected security layer object including Description and AOT name
- Purple box – shows all of objects that are either assigned to this security layer or that this security layer is assigned to, the plus icon (+) designates that there are objects already there. So in this case this role has duties, privileges, and tables assigned to it but does not have any sub roles or parent roles.
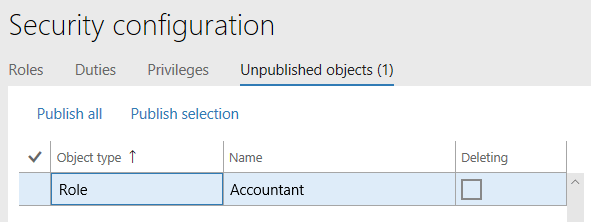
- Light blue – all changes made in the user interface must be ‘published’ before they go live, this object lists all of the changes that are not currently published yet
If I wanted to add a duty to this particular role I would then click on the Duties button within the References area (purple box above) and the menu bar would change slightly:
![]()
- Add references – allows you to assign a currently available security layer object from a lower layer and assign it to the current layer (ex: duty -> role, privilege -> role, privilege -> duty)
- Create new and add reference – allows you to create a new security layer and assign it to the current layer (ex: create new duty and assign it to the currently selected role)
If I wanted to remove a duty from this particular role, I would select a particular duty currently assigned to the role and the menu bar would again change slightly:
![]()
- Remove reference(s) – allows you to remove a single or multiple references that are currently assigned to a security layer
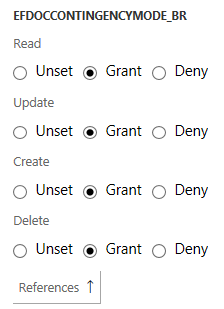
To change object permissions you will need to navigate to the Privileges area, find the privilege you would like to modify, find the object assigned to the privilege you would like to modify and select it. You will be presented with a fly-out similar to the one below. From here you can set each access type (Read, Create, Update, Delete) to a specific access level (Unset, Grant, Deny).
What’s the deal with Unpublished Objects?
When a user makes a change to security in the user interface, this change does not go live immediately. Instead it goes to the Unpublished Objects area within Security Configuration. To make security changes actually become active, you will need to go to this area once your changes are done and either select ‘Publish all’ to publish all changes made or select individual changes and select ‘Publish selection’ to only publish certain security changes.
Where do security changes done in the user interface get stored/saved?
In previous versions of AX, when you made a change to security within the application that change was propagated back to the AOT and went live immediately, this is no longer the case within D365FO. This is because of the change to the overall architecture of the application as a whole (the design time and run-time are no longer within the same environment) changes to security made within the user interface are not pushed into the AOT. Instead these changes are put within what Microsoft calls the ‘security delta’ and are stored as data within the database instead of metadata code within the AOT. So when the security framework looks to see what a particular role, duty, or privilege has access to it first looks in the AOT, then looks at the security delta to see if any customizations need to be applied. It then takes a combination of these two (with the security delta taking precedence) and uses that to determine what a security element has access to.
How do you export/import/move/source control security changes made in the user interface?
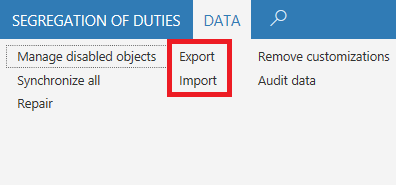
Because security changes made in the user interface are not stored as metadata in the AOT, the next question is ‘How do we manage these changes?’ Luckily Microsoft allows for that by allowing users to export/import all of their security customizations done in the user interface to an XML file. This file can then be taken to another environment to imported or can be used in source control so you always have a record of any security changes made in the user interface.
This functionality can be found under the ‘Data’ menu option in the menu bar.
Conclusion
I hope this overview helped with getting acquainted with setting up security from the user interface with D365FO. A follow up post will show how this all can be done from the AOT.
If I wanted to cancel an unpublished security change, how would I do that? I can see the item in the unpublished objects, but the Undo/Redo buttons are not enabled.
Once a change to a role, duty, or privilege is made in the user interface a record is written to the SecurityUnpublishedObjects and SecurityCustomizedDiskObject tables. There is an Undo button in the user interface which undoes the change but the records in these tables are not removed but they are reverted back to their original state. Which means it still shows up as an unpublished object but there is no change between the old and new security. To remove this you can either publish the ‘changes’ which will have no effect as there isn’t a change in security or remove the affected records in both of these tables manually.
Does setting up Security impact to Dynamics 365 Performance?
Setting up security does not effect D365FO performance.
It does impact performance as after security implementation the request would run against security data model elements to ascertain whether the request is allowed or not.
Mav,
The check to see whether a user has access to an element is done on every request, regardless of if the user has modified security or not.
Alex, thank you for the great overview of security in D3FO – well done. One quick question about the “Remove customizations” button. Does this remove ALL customizations or only the role currently in focus? Thanks in advance, -Mike
Michael, thanks for the kinds words!
To answer your question yes, that ‘Remove Customizations’ button removes all customized security made in the user interface. Customizations made in the AOT are not removed.
Hi Alex, I realize this is an old post but I am hoping to get your guidance on the “Remove Customizations” as well. We are in the middle of a project to migrate from AX 2012 to D365FO. Our IT team has decided to make all security changes using AOT and build to all the environments each night. Works great. I should note that we are using a dedicated test environment to setup ALL of our security, then our implementation partner will help us copy that security setup to the other environments when we go live.
Early in the project we had added a couple security privilege changes, using the web UI, to make a button visible on a form. Did not use AOT for that. It was quick and easy to make the change and publish it. It was honestly my lack of patience with using AOT because I wanted to quickly see if the change would work by doing it in the UI.
After seeing the successful results of the change in the UI, I reversed the security privilege back to its OOTB state, then published it.
Then I went back and made the same security privilege change in AOT, it was built to all environments and worked great, except for in our test environment where we had done the “test” to that security privilege. It appears that the UI is overriding the AOT in that test environment.
So I’d like to undo the few security changes that were published, without impacting the rest of our security configuration. One very important security area we DO NOT want to negatively impact is our role/user assignments. That is another story, but the short version is we spent many weeks in this test environment web UI assigning users/groups to the appropriate roles. This is where are UAT tests are going to be in the coming weeks, and I don’t want to accidentally blow all that work away by using a tool we are not yet familiar with, like the “Remove Customizations” tool.
So with all that said, will “Remove Customizations” remove all the users we manually assigned to every role in the web UI?
Thank you!
Scott
Scott,
The ‘Remove Customizations’ functionality will remove any security changes done via the UI – it will not touch the User Role assignments (unless a role was created in the UI and assigned to a user, then that particular role will be removed from the user role assignment).
As far as the UI security change overriding the AOT – I think you might find this blog post I did somewhat useful in that I go through this exact scenario (eg: what happens if you make a conflicting security change both in the UI and in code): https://alexdmeyer.com/2019/03/04/things-to-watch-out-for-when-developing-d365fo-security-through-the-user-interface/
Hello, and thank you for this rich article,
I have a question about security roles, privilieges, and duties tables,
In AX 2012 it was easy to create them by code (not only security elements but all AOT objects)
With D365FO it’s no longer the case, we are talking about 2 separated environements (Dev &
Application) , so to add these elements i think it’s can be a little difficult,
I wanna ask you, what are technical possibilities to add for example a new record in security
privilieges or sec Role table , to be able see it in SystemSecurityConfiguration Form in D365FO,
I would highly recommend not modifying the tables surrounding security data in the database.
There are two options when setting up security in D365FO: either through the AOT or through the D365FO user interface.
Personally I think the process of creating security in the AOT for D365FO is easier than AX 2012.
I would recommend that users only make security changes in either the AOT or user interface for simplicity.
For more information about setting up security from the AOT, feel free to check out Part II of this security setup series here: https://alexdmeyer.com/2018/07/19/setting-up-security-in-dynamics-365-for-finance-and-operations-part-ii-from-the-aot/
Hi Alex,
Thank You for your detailed outline on this topic and for explaining how front-end security blends/relates with AOT. In that regard a couple of more questions, what are the functions of the “Synchronize all” and “Repair” buttons.
Regards,
Alex T
Synchronize all -> Performs the same process as a Publish All in the Unpublished objects area, takes all security changes done in the user interface that have not been published and publishes them making them ‘live’ security
Repair -> Rebuilds indexes in the database on security tables to help with performance (I’ve never had a need to actually run this)
Is it best practice to publish all your changes after your make them or if you decide you don’t want them, undo & publish? I just came on to help a client that has over 100 unpublished changes in their security setup, so I’m hesitant to make updates and publish any of the roles because I don’t know what else I’ll be publishing along with them. Would it be better to hit the Undo button and publish them all so they get removed from the list before I make my own changes & publish?
Megan,
The issue you are describing is one of the pain points of making changes from the user interface, especially in your situation not knowing what else is in those Unpublished Objects changes because Microsoft does not give you a good way to see the potential changes or an easy way to undo changes.
If this is a non-production environment, depending on the situation I would almost suggest removing all entries from the SecurityUnpublishedObjects table directly in SQL and starting over as then you would know what you are actually publishing.
I wrote about the Unpublished Objects area and why adding an undo button here is so hard.
Feel free to reach out if you have additional questions.
Hi Alex,
I want to record a change log in respective role if i change duties or privilege in respective role.
Do we have any place like note field to input the data?
I tried below path to record my changes as an attachment.
I selected the role and clicked on Audit Trail -> attachment -> “New” icon is greyed out.
Could you please guide me best practice
Ashik,
You are correct that the attachment feature does not work for security events (I’m not sure why it wouldn’t in this case). An option I can see would be to create an extension table just for storing the notes for the security events and then extending the SysSecObjectEvents form to include that additional data. It’s not a pretty or elegant solution but if you need the ability to store notes for a security change within D365FO this is how I would probably go about it.
My preferred option would be to store these notes about changes in your source control system when you check in your security changes there. This is probably the more robust solution for what you are trying to do.
Hi Alex, On the Vendor master>Vendor bank account form, I need to allow the user to create a new bank account record but restrict the user from editing the existing vendor bank account information like SWIFT code, bank account number etc. How do I achieve this? At a time, I need to have both create access for new records but restrict update access for existing record.
Thanks,
Vish
Vish,
You cannot have a form where you can create a record but not update the records on that page because of the hierarchy based permissions within AX/D365FO (Read -> Update -> Create -> Delete). The access to an object builds on top of the access below it so if a user has the ability to create an object, they also have the ability to update that object. The only thing I can think to do in this scenario is to create a custom form where the only thing you could do would be to create Vendor Bank Accounts.
Hi Alex,
I added few tables and made changes onto existing OOB privilege. How do I undo that once published? Is it possible?
Shivani,
If you are talking about undoing the changes to security, you remove all changes to security done in the user interface by going to System Administration -> Security Configuration -> Data -> Remove Customizations
This process will remove all security customizations done through the user interface, unfortunately there is no way to just undo certain customizations.
How to remove multiple references from a privilege, say 100s of action items added into the privilege?
Rahul,
There is no way to remove multiple privileges at once via the user interface, this can only be done via the AOT.
Hi Alex, I believe your articles are among the best sources on security for D365FO and will be used for a long time.
But at least for now, it is possible to select multiple references (menu items) and remove them all at once.
Anton,
I appreciate the kind words – and do agree that it is now possible to select multiple entries when adding securable objects. I do that process in this blog post: https://alexdmeyer.com/2022/06/20/an-update-to-creating-a-read-only-role-for-d365fo-user-interface/
Hi Alex
A question regarding importing/exporting security configuration between environments…
Can this be done multiple times having made changes to roles/duties/privileges? Will it just overwrite any changes? I have a dev environment for security and we have our main testing environment.
If I make changes in dev, can I simply keep exporting/importing to overwrite the changes, or will this cause conflicts?
Thanks
Asher,
The import/export functionality can be utilized multiple times if required, keep in mind that this process is additive unless there is a conflicting access change and then it will overwrite the current change.
Also remember that by default, all security changes made in the user interface are a part of this export there is no way to select an individual role, duty, or privilege to bring over. To be able to do this you would need something like the D365FO Security Converter tool I wrote.
Finally, remember to treat your security as code and be sure you are following the same promotion process for your security as you would code.
Hi Alex
Thanks very much for this – useful as always
We’re just in the process of setting up FastPath so I’ll be interested in having a look at the Security Converter Tool
Thanks again
What is the difference between Read, Create, Update, and Delete?
What is the difference between Unset, Grant, and Deny?
Mark,
Here are the differences between the different access types and access levels:
Access Types:
– Read -> User can view the records
– Update -> User can update records
– Create -> User can create records
– Delete -> User can delete records
These access types are tied to a specific object type and are hierarchy based, so if a user is assigned the Create permission they automatically get Read and Update access as well.
Access Levels (work in conjunction with access types):
– Grant -> This is the normal grant process where a user needs access to an object (for example you would set Grant access level to the Read access type for a user to be able to view records)
– Deny -> This is an explicit deny which overrides any other grants the user has to this object at that particular access type
– Unset -> The default state, if you don’t want to grant access specifically but also don’t want to deny access to this object you would set it as unset
I have one user to view the form of cart master and sales order and he only views the records. How do I get him to access the functions not only just viewing the records?
Mark,
You will have to provide more information on what you are actually trying to grant access to. Please feel free to send more information to meyer@gofastpath.com and we can discuss further.
How does this D365FO security configuration audits the users?
Mark,
I am not sure what question you are asking here, can you provide more context?
How security configuration will benefit the users?
Mark,
The security configuration form allows you to modify D365FO security from the user interface instead of having to go through code in the AOT.
From references in roles, what are sub roles and tables?
From references in privileges, what are entities, and service operations?
Mark,
A Subrole is a role that you assigned to another role, the resulting role will include all of the access of the subrole. See more here.
A table refers to a SQL table object.
Entities refer to data entities. See more here.
Service Operations refer to API endpoints that external services can access. See more here.
I will also say that I have a security class that goes through all of the questions you have been asking and may be of interest to you available here: https://alex-meyer-security-classes.thinkific.com/courses/dynamics-365-for-finance-operations-security
Hi Alex, great discussions here!
I have a question that’s somewhat general in nature:, if it’s too general to treat here, I understand.
I’m being asked “what can we NOT do, if we use ONLY the UI, for building security?”
e.g. if we don’t use the AOT, is there a list of sorts, of things we cannot do in terms of role/duty config that would be significant to a business?
Regards,
Rich
Rich,
You can perform all normal security setup/configuration from the user interface just like you can from the AOT. You can perform things like:
– Creating/modifying/removing any roles, duties, privileges
– Cloning any roles, duties, privileges
– Grant/Deny access to objects
The biggest difficulty with creating security in the user interface is the maintainability between environments. It is somewhat difficult (without 3rd party tools) to maintain what changes have been made and moving those changes between environments. Security changes made in the AOT have the benefit of becoming part of the code base so the maintainability aspect is easier.
Feel free to reach out with any further questions.
Hi Alex,
I have one question,
In my scenario Security(Roles and Privileges) are created on UI,now i want to restict the access for records based on user.
How can this be achived.
Can we give record level security at UI level?
DS,
Record level security has been deprecated from AX 2012 and D365FO.
It has been replaced by Extensible Data Security. XDS can only be applied via code and cannot be done via the UI.
Howcan be applied using code?
How can i get role defined in UI to AOT.
we have resctricted to use the converter tool
DS,
There is no way to do this natively in D365FO, this is why I created the Security Converter Tool.
Also just to clarify the role does not need to be in the AOT for XDS to be applied, you can use the role’s Security Policy Context String parameter to apply XDS to a role whether its created in the UI or AOT.
Can you tell me how to add UI role to Policy in AOT ,please
DS,
My XDS blog post shows the process to set this up.
And just to clarify, you do not add a role to a policy. You create a policy in the AOT and then associate it to a role via the Security Policy Context String parameter of the role.
Hi Alex ,thanks for solution.It did work for me.
i have other issue.when i do sync of my model it gives me error System.InvalidOperationException: An exception was encountered while initializing chain of command initializer, see event viewer for the detailed information.
In event viewer nothing is tehre.
How to fix such issues
DS,
I would open a ticket with Microsoft support.
I am trying to take an existing OOB and make a copy, rename and modify as needed. For some reason when I duplicate the Retail Store Manager as Retail Store Manager 2, it appears that the access acts differently than the original Role. Need help as one works with the warehouse filter and the other not.
Peter,
Not sure what you mean by ‘one works with the warehouse filter and the other not’ but there are cases where Microsoft handles security in code (by checking for a role name) or via a separate form (for example Case Categories). You may be running into an issue like that.
I talk about each of these scenarios in the final part of this blog post: https://alexdmeyer.com/2019/11/11/gaps-in-the-security-diagnostics-for-task-recordings-feature-in-d365fo/
How can I find a Privilege to allow access to specific pages? I want to allow access to Print Payment Copy from the Payment History page.
This button is controlled by the VendChequeCopy Menu Item Action.
The easiest way to find this is to look for the form/menu item display that this resides on (in this case the VendorPaymentHistory), in your case you are looking to grant access to a button which is controlled by a separate permission than the form itself.
How can I find a Privilege to allow access to specific pages
Hello,
The easiest option would be to use the Page Option -> Security Diagnostics feature to find all roles, duties, and privileges that have access to a certain form.
Hi
have you found the way how to assign organization to multiple users security role sets ? E.g. I do have 50 users with security role A. Is there any way to assign them all to the same organization not clicking one-by-one ?
Any suggestion appreciated..
Witold,
You can either use the SecurityUserRoleOrganization data entity via DMF or use a tool like Fastpath to help perform that.
I’ve attempted to create a privilege with all output menu items at a delete level, in attempt to create a privilege that grants all reports access to a user (to be used in conjunction with a read-only sysadmin privilege). However, I am seeing “Access denied to field X in table Y” errors when attempting to test it.
Any idea why delete level access wouldn’t allow the running/viewing of a report (specifically sales order invoices)?
Any input is appreciated, thanks!
Chris,
I believe what you are running into is the Table Permission Framework, when this is enabled even granting full access to the menu item is not enough to grant access to the underlying data source. Explicit table or table field access must be given for the user to be granted access to that data.
I cannot paste the screenshot here, but we have deleted few custom roles that were no longer in use and then when I go to any form and look at security diagnostics, it shows as if they have access to a role that is blank. How can we get rid of that..?
Please review this blog post on how to address this: https://alexdmeyer.com/2021/06/03/how-to-fix-broken-security-references-in-d365fo/