I had a comment on one of my blog posts that Microsoft had updated the functionality that existed to help create a read only role from the D365FO user interface so I wanted to show how much easier it is to perform this process now.
In my previous post, I showed how you had to manually manipulate an XML file and use regular expressions find/replace to achieve the desired security file to be imported. This is no longer required as Microsoft has included a an option to ‘select all’ objects within a security dialog.
To utilize this option:
1) Go to System Administration -> Security Configuration
2) Go to privileges and create a new privilege
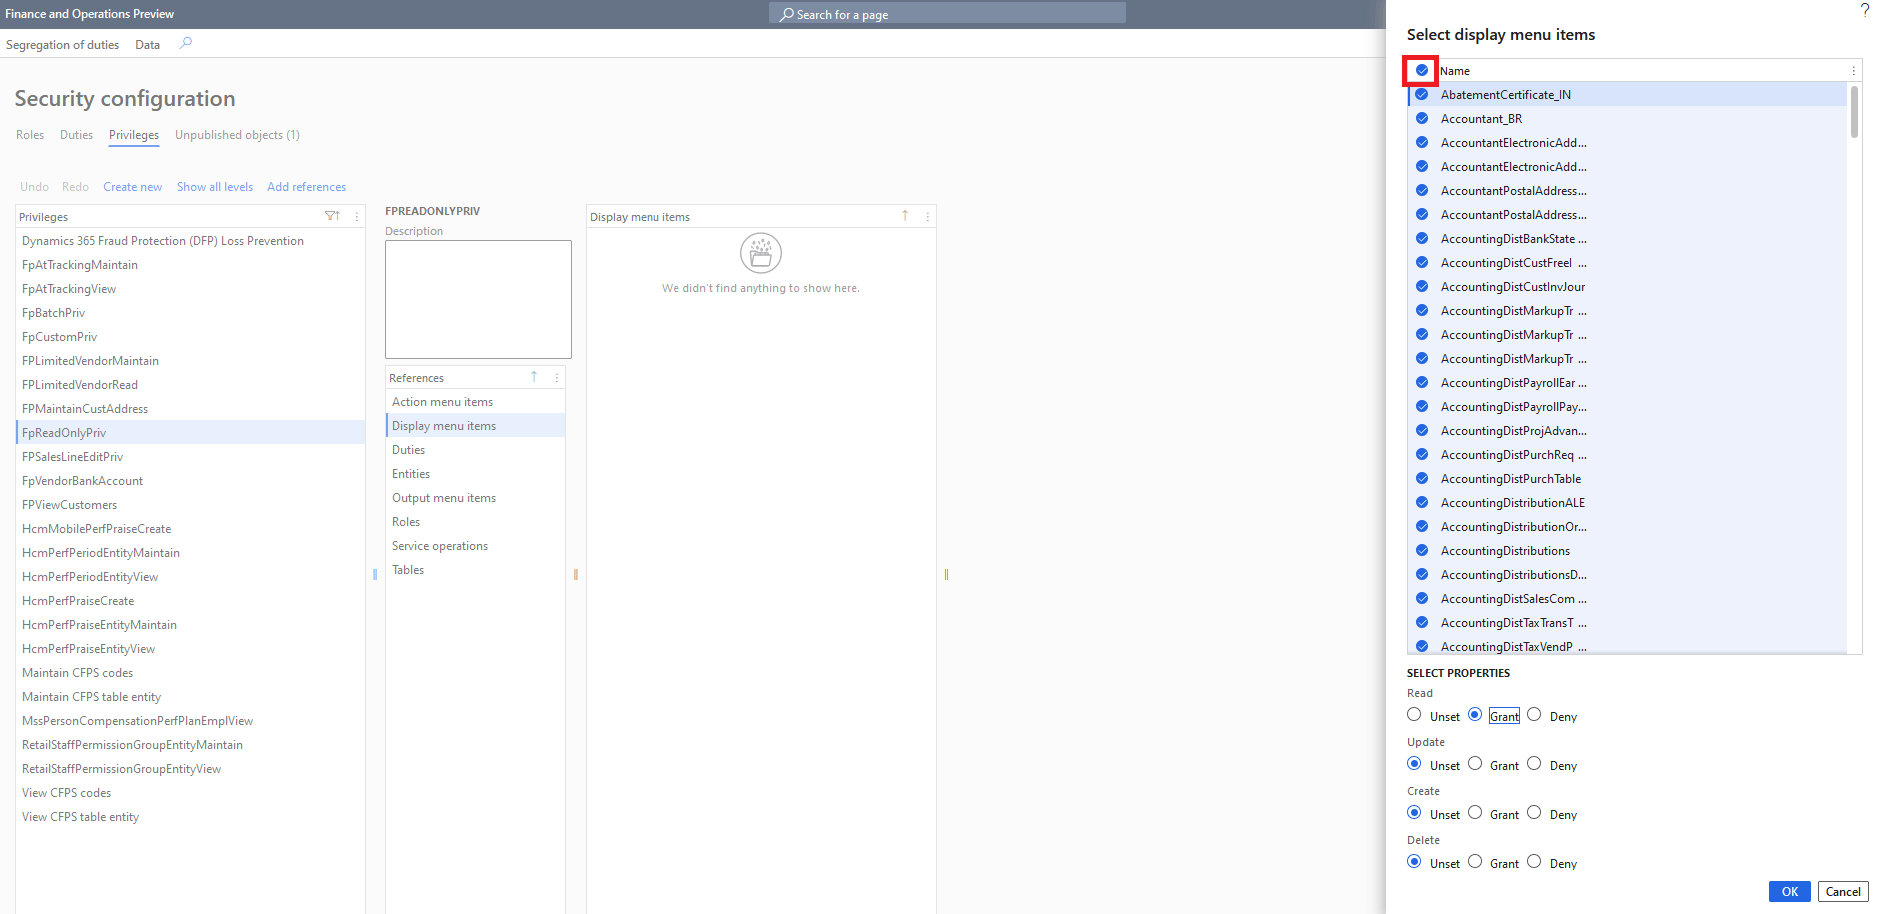
3) Click on Display Menu Items then click on ‘Add References’
4) In the dialog that pops up, click on the check mark in the menu bar next to ‘Name’ (this selects all options in the dialog)
5) In the bottom of the dialog, select which permission you would like to apply across all selected items (in our case we would select the Grant option on Read)
6) Click OK
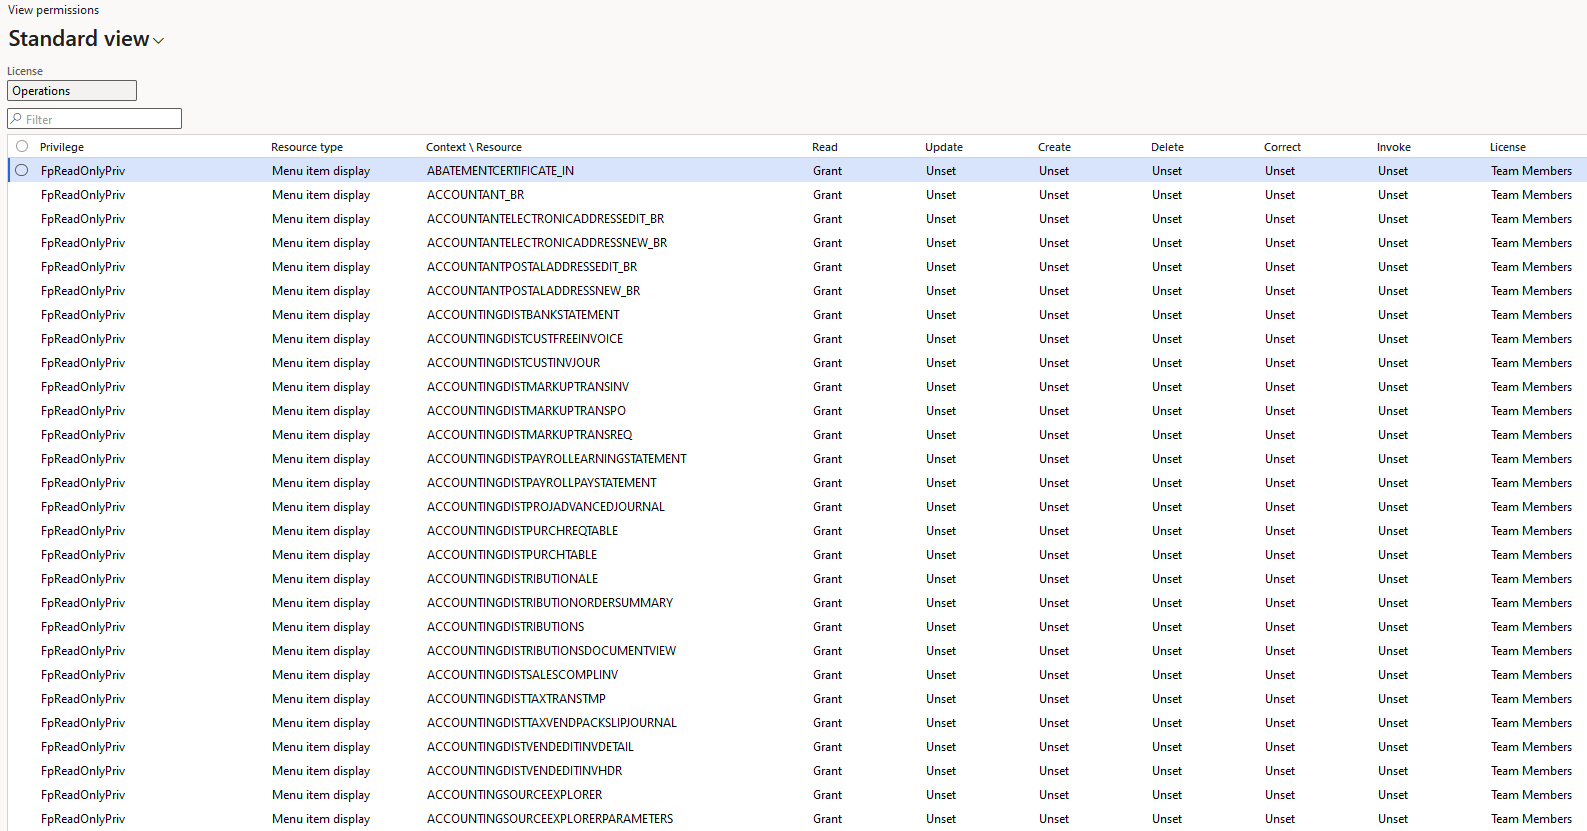
Once we publish this privilege, we can validate that this process was successful by selecting our privilege we just created and clicking on ‘View Permissions’:
While the process I wrote about in my initial post is still valid, I think we can all agree the process above is much easier.


Just a thought – Will it be worth to add Action Menu Items as well with the same Grant Read permissions. Most of the Forms have buttons that is also controlled through Action Menu items also.
Ananda,
The problem with adding menu item actions to a ‘read only role’ is that menu items actions are either that you have access to the item or not. Granting Read access to the object is the same as granting Delete access, and some menu item actions allow you to perform transactions within the system (posting journals, printing checks, etc).
The argument could be made to add menu item outputs to this role as these are just reports generated by the system. But in most cases a users looking for this type of role just want read access to all forms in the system which correspond to menu item displays.
So helpfull. Thank you.
I noticed at the top left, that the License is Operations. I was expecting a Team Member license for a read-only privilege. Thank you
Yuri,
Some menu items have an Operations level license requirement as the ViewUserLicense parameter, which forces this ‘read only’ role to require an Operations level license. As the values for the ViewUserLicense/MaintainUserLicense values are set by Microsoft there is no way to avoid this except to exclude those menu items from the role.
After these privileges have been granted and published, can you remove certain privileges to further restrict what can be viewed?
Thor,
Absolutely, this process just shows the potential for creating a ‘view only’ role, if there are modules or areas of D365FO that you do not want a user to have access to you can assign the menu items and then remove the ones that should not be assigned.
Thanks for the feedback. I have just created a custom “view only role” with access to only specific functionality and tested it. It works very well and saved me a lot of time.
This was extremely helpful
Hi Alex,
Thanks for this post, exactly what we are after!
Have you been able to identify the menu items to remove from the privilege to drop the license back to a team member license?
Thanks
Lauren
Lauren,
Here is a list of menu items that have above a ‘Team Members’ license at a View level: https://fastpath-my.sharepoint.com/:x:/g/personal/meyer_gofastpath_com/EdKsy5LyAedFm-B-2OcOjGMBRBKEn5LEUQ5zE7iZ075vKw?e=VDc2Gz
This is so helpful! Thank you for sharing this! Now I get to work on creating read-only access specific to roles versus the whole application. I thought that giving inquire/view duties would do that but it seems prior to my arrival that someone has added privileges to these duties that provide update/delete access in some cases. I am very grateful that the read only to everything is done though.
Question: to ensure that this only provides read access should I change the permissions for Update,Create,Delete to deny? I’m trying to ensure users truly only have ‘Read-only’ access.
Tracey,
I can understand the idea of wanting to do this, but there are objects a user will need access to at above a ‘Read’ level to operate within D365FO. If you look at the ‘System User’ role for example you can see there are quite a few entries which grant access at above a Read level but these are mostly to ‘system’ objects which would not have an impact on any organizational data.
My best piece of advice would be to follow the steps within the blog post to create a ‘Read Only’ role and then be sure to only assign this role plus the ‘System User’ role to a user. In that way you can be assured that the user will only be able to have ‘Read Only’ access.
This help me as well thanks for sharing,
I have a question after creating in TEST how can we move to Prod? or we need to create there again ?
Syed,
This blog post may help: https://alexdmeyer.com/2020/03/10/best-practice-for-moving-d365fo-security-between-environments/
Hi Alex,
When I try to add all display menu items by selecting them all, I get an error ‘it appears you lost network connectivity’. Adding a few does work.
Do you have any advice for this issue?
Sander,
It sounds like either your network or environment you are performing this on is not fast enough to perform adding all of the menu items to the role before the sessions times out. In this case, you may have to add the menu items in batches unfortunately.
Hi Alex,
I have a same issue with Sander, could you please show me how to add menu items in batch?
Thanks so much!
Lac,
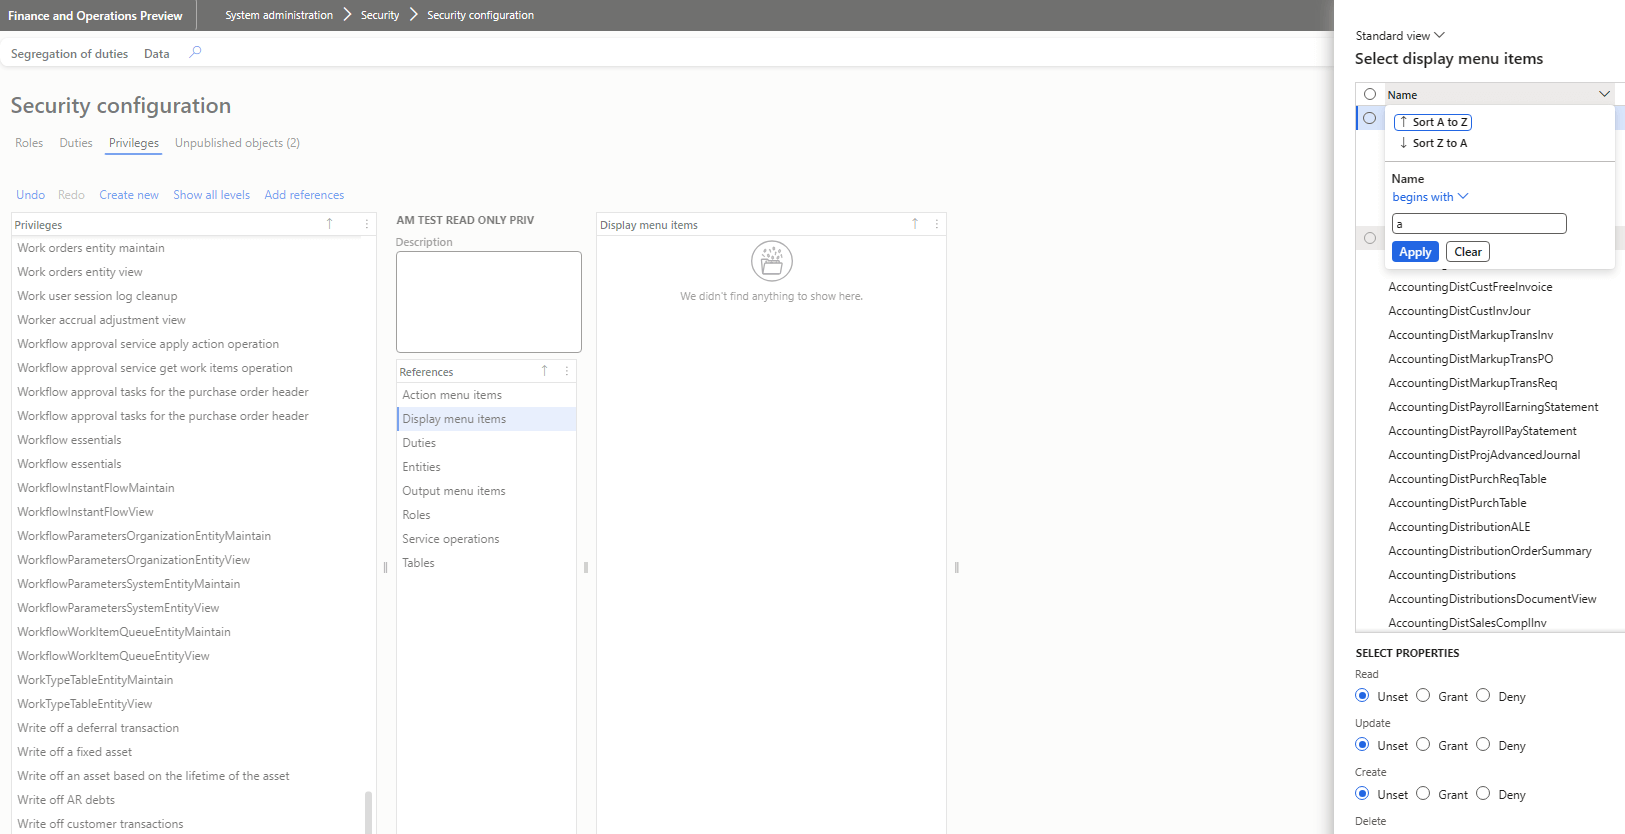
Instead of trying to add all of the menu items at once, you would choose a smaller number and iterate over the entire set. I would probably recommend filtering the results in some fashion and then trying to add that batch, for example filtering by ‘everything that starts with A’ and add those, then ‘everything that starts with B’ etc.

Thanks so much Alex!
Hello!
Can someone explain what are the columns “Correct” & “Invoke” in View Permissions page?
George,
The ‘Invoke’ permission is used for Service Operation endpoints, if a user has ‘Invoke’ access then they have access to call the endpoint otherwise they will not.
The ‘Correct’ permission is a hold over from AX 2012, it was used to update data within state tables (https://learn.microsoft.com/en-us/dynamicsax-2012/developer/security-privilege-properties#entry-point-properties).
Hi Alex,
Do you have any tip how to “split” the read-only role per APP i.e. Finance, SCM and Project?
Thanks,
Martin
Martin,
Are you looking to split it via license type? That will be difficult to do as the license you are referring to (Finance, SCM, and Project) are determined at the privilege level not the securable object level (https://alexdmeyer.com/2021/01/25/current-state-of-d365fo-user-licensing/).
As another approach, I am helping lead a project to create ‘template roles’ that would allow you to assign view/maintain access by D365FO module: https://appsource.microsoft.com/en-us/marketplace/consulting-services/roberthalf_protiviti.d365forfinanceandsupplychainsecurityroletemplates
Feel free to reach out if you would like more information on this.
Thank you for the article. I find when I add all, it actually allow create ability in Sys Admin, is there way to prevent that? Our Auditors want access to Sys Admin to view permissions per role. Read Only of course.
Deedee,
I’m assuming you are referring to the ability to create/modify security on the Security Configuration form? There is not a native way to handle this as if a user has access to the form the also have access to Publish security.
One way around this would be to utilize something like the D365FO Admin Toolkit which has an option to export all security to CSV for auditors to review.
Another option would be to customize the form to hide that button except for users that have certain roles (assigned SysAdmin for example).
Thanks for the article, this blog is very useful!
I tried the same method to build an ROE (read-only on everything) role, but it needs to be fine-tuned.
If there is any Form Control type of object linked to a Display menu item, it will not be linked automatically.
A practical example is the display item CustTable and its hanging Form Control TabFinancialDimensions.
If you simply add CustTable with Read rights, you will not have the Financial Dimensions tab on the All Customers (CustTable) page.
As an alternative solution:
1. I pull all privilege with the tag View/Inquire/Inquiry/Read
2. Then go permission level and update everything line by line to read only
While it seems to be working for me, I know it is prone to missing objects, human errors and not even easy to maintain.
I would be interested to see your position on this. Thank you!
Csaba,
You are correct that the method I demonstrate in the blog post does not automatically assign form controls.
The method you propose as far as utilizing out of box privileges absolutely would work, but as you mention adds additional maintenance and potential human error.
One option I can think of is that this could potentially be a feature of the D365FO Admin Toolkit (‘Create Read Only’ role) which would be dynamic for each client. Going this route would allow for creating a role that includes not only menu item displays but also any related form controls.
I agree, this is something we could create based on the standard Permission –> Privilege assignment.
I can imagine having the standard side bar when you use “Add references” function, we would have an additional checkbox below the permission list called “If you want to add all related form control”. Then the form controls could inherit the level of access from their parent-permissions. It is not too complex.
Actually, in most of the cases you need all hanging form controls, this could be a standard behavior.
I think there is a lot to improve on D365 Security, especially on UI side (Security Config, Users).
Is there a way to address new ideas to MS? Do you think it worth it? 🙂
Csaba,
I was actually thinking of adding something like this to the D365FO Admin Toolkit project I’m working on, have a button on the Security Configuration page to ‘Create a Read Only Role’ that would dynamically create a role with all of the menu item displays and form controls within a end users environment. We can use a combination of querying the AOT and the MetadataSupport class to get this data.
I think us handling it will be much faster than getting MSFT involved, although they do have an ‘ideas’ portal we could also submit this too.