
I have gotten the question of creating a ‘read only’ or ‘view only’ role many times in the past so I thought I would show the process of how I created one.
There are many reasons that a read only role would be needed:
- Executive/Upper Management users who need access to view information but should not be able to transact in the system
- Internal/External audit users who need to validate reports and policies/procedures
Now while I would recommend only granting access to the areas a users needs to perform their job function (taking a ‘least privilege’ approach to security) the risk for granting read only access is less than over provisioning on accesses that can transact with the system.
Goal
The goal with this is that we want to grant all menu item displays at a Read level to the user, this would give them access to every form in the system without the ability to transact at all.
Steps
1) Either create/find a security project in D365FO and be sure the model it is apart of references the correct packages (Dynamics 365 -> Model Management -> Update Model Parameters…)
– You can either go in a select every package like so: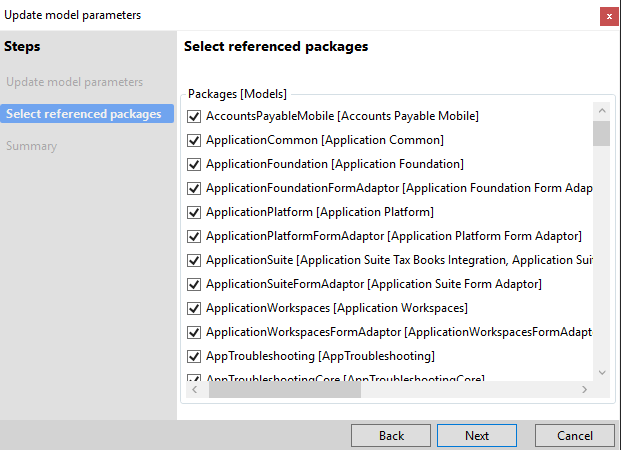
– Or from my analysis the default objects in the system would require you add the following modules:
- Accounts Payable Mobile
- Application Foundation
- Application Suite
- Application Suite Tax Engine Integration
- Application Workspaces
- AppTroubleshooting
- Asset Management Dynamics 365 for Operations
- BusinessProcess
- Calendar
- Case Management
- Contact Person Management
- Cost Accounting
- Cost Accounting Dynamics 365 for Operations
- Currency
- Custom Fields
- Data Feeds
- Dimensions
- Directory
- DOM
- Electronic Reporting
- Electronic Reporting Application Suite Integration
- ExpenseManagement
- Expense Mobile
- FiscalBooks
- Fleet Management
- Fleet Management Extension
- GeneralLedger
- Ledger
- Material Handling Equipment Interface
- Personnel Core
- PersonnelManagement
- Policy
- PublicSector
- ProjectMobile
- Regulatory Services
- Retail
- RetailEod
- Revenue Recognition
- SelfHealing
- SelfHealingRules
- Subledger
- SCM Mobile App
- Tax Engine
- Test Essentials
- Unit of Measure
- Warehouse Mobile App Task Validator
- WMSAdvancedMigration
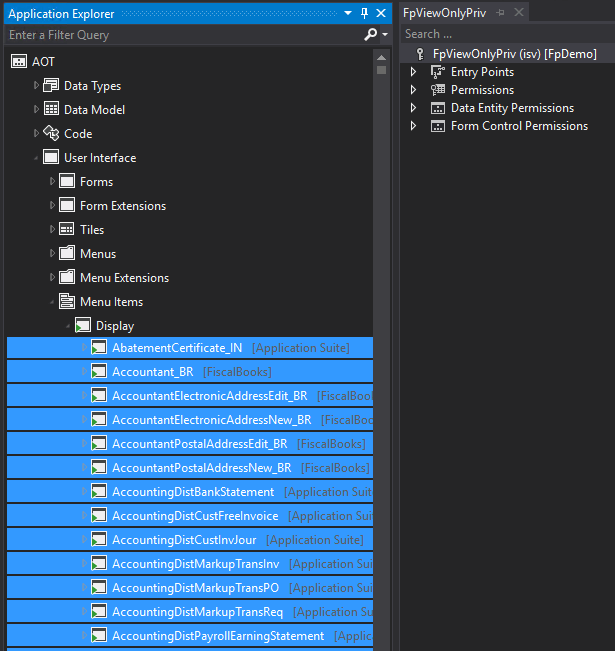
2) Now create a Privilege, and then go to your AOT -> Menu Items -> Displays and select the objects the user should have access to read (Shift click can work great to select all)
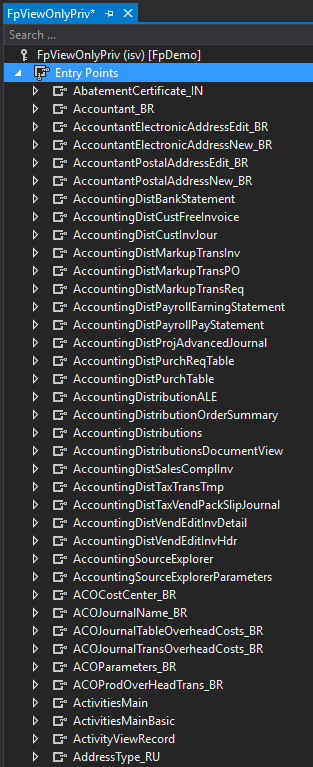
3) Now drag and drop these objects into the Entry Points section of your privilege (this process actually froze Visual Studio for a while so don’t get too impatient or it might crash).
4) Once all the objects are added to the privilege, save it. Now go to AosService -> PackagesLocalDirectory -> (Your Package Name) -> (Your Package Name) -> AxSecurityPrivilege -> Find the privilege you just created and copy the contents to a Notepad++ file.
5) By default, when adding an object to a security layer no access is assigned so we need to find a way to do a mass assignment of the Read permission. Luckily we can use a little regular expression magic within Notepad++ (or any other text editor that allows for complex Find/Replace)
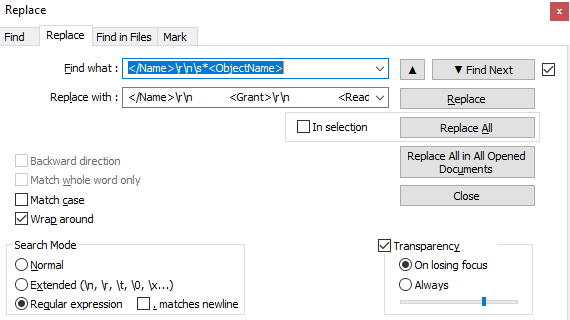
We are going to find this string: ‘</Name>\r\n\s*<ObjectName>’
And replace it with this string: ‘</Name>\r\n <Grant>\r\n <Read>Allow</Read>\r\n </Grant>\r\n <ObjectName>’
Note: Select between the apostrophes. The reason these strings look so unusual is to match the XML formatting.
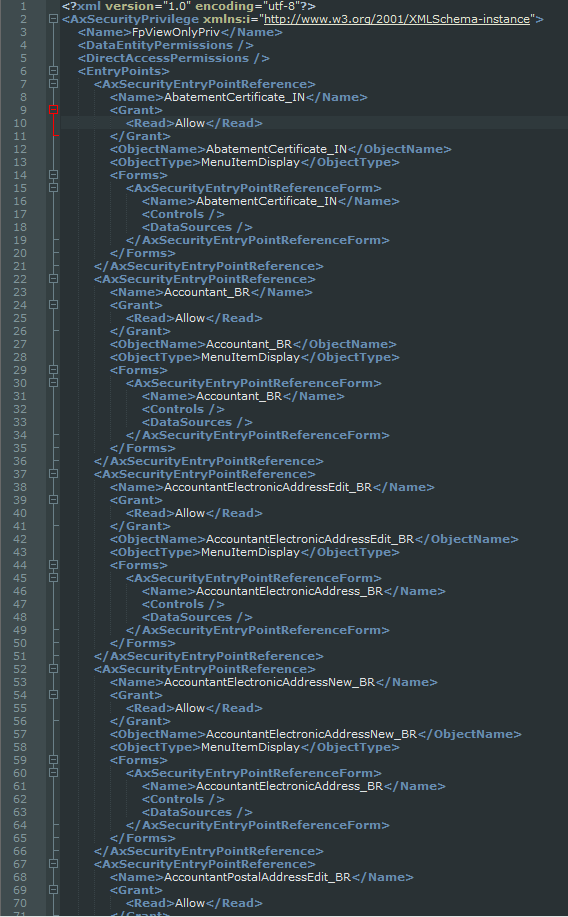
6) If done correctly, your resulting XML should something look like this:
7) Open a Notepad instance with Administrator privileges and navigate to your privilege XML file again, copy the contents you just created into it and Save it (if you do not run Notepad as an Administrator you will get an Access Denied error).
8) In Visual Studio, you will get a message saying that the file has been edited outside of the application and asking if you want to reload it. Click yes and now all of the objects assigned to that privilege are granted Read access. Now Build your project and then perform a database sync.
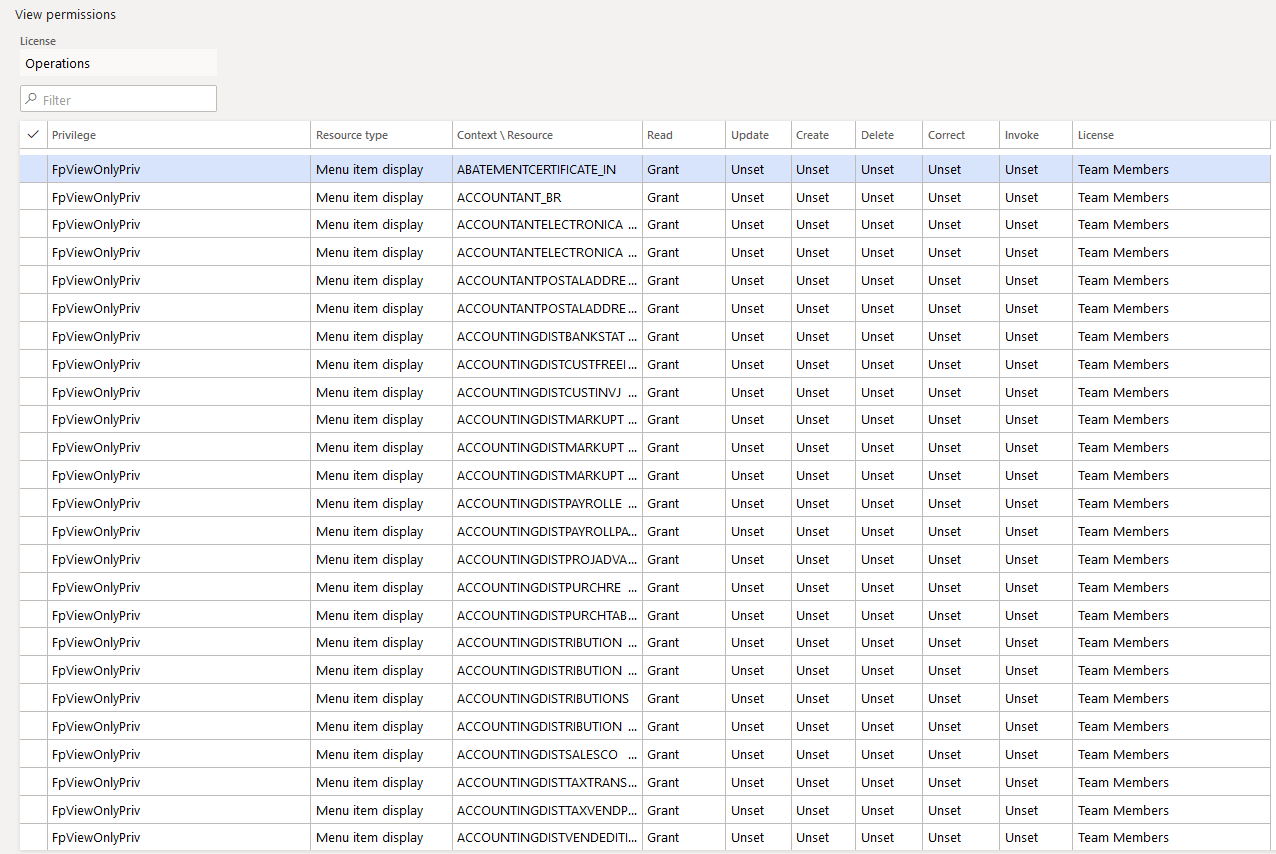
9) To validate if everything went correctly, you can go into the user interface -> System Administration -> Security Configuration -> Find the privilege you just created -> View Permissions
Now we can simply create a role and assign this privilege to it, and know that the user will only have read permission to objects in the system. To do some end user testing we can utilize the View with Role Set functionality, when assigned we can see the user has access to all areas of the system.
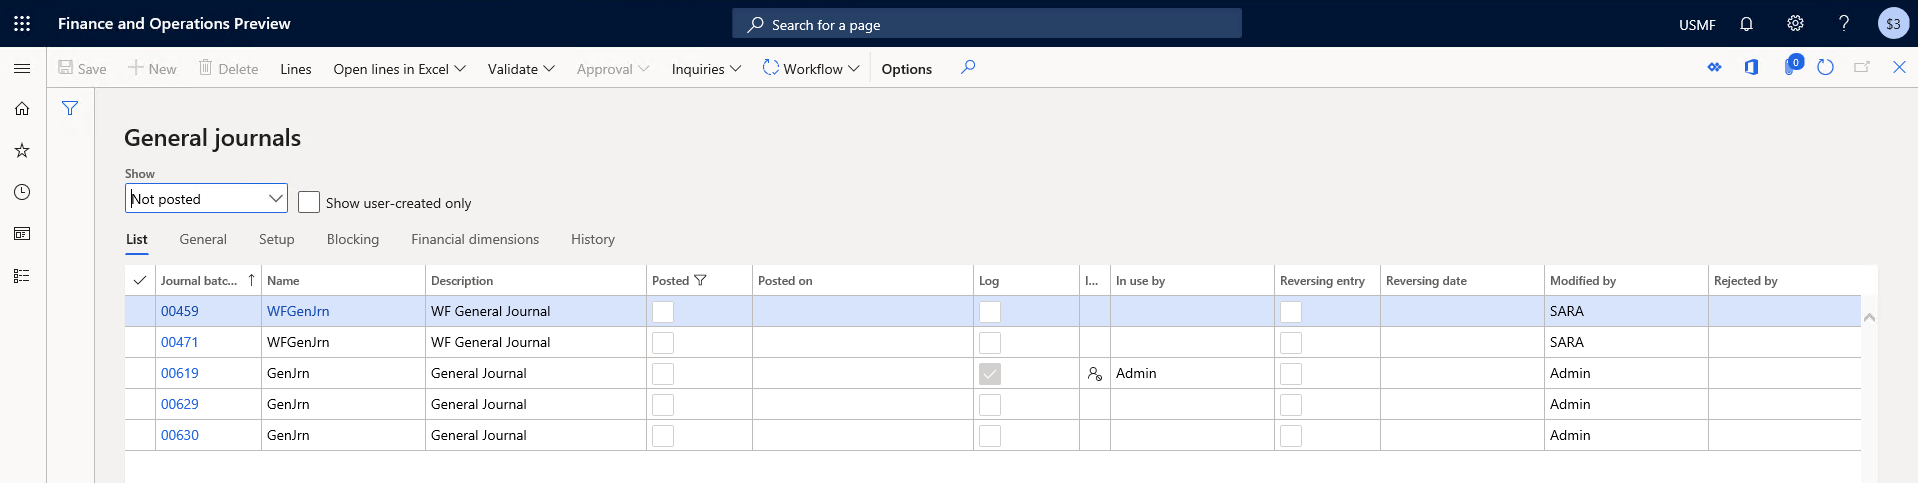
But if we click into any of these areas, (for example General Ledger) we can see that the user does not have access to Update, Create, or Delete any objects.
Resources
If the above process seems a little too complex for what you are after, I have created copied the security layer XML files that will create the role and privilege I used in the example above. If you would like a free copy of these please download them from here.
If you have any questions please feel free to reach out!
Amazing share! Almost a redundant request from all implementations!
Alex, can’t we just use all inquire duties and create a role. Will it serve a similar purpose?
Shakir, I am going to copy my response from LinkedIn here for others to see. You can absolutely do something like that but there are a few caveats though
– There is no guarantee you will get access to all objects at a Read level
– Unless inquiry/view duties were created for custom objects, they will be left out as well
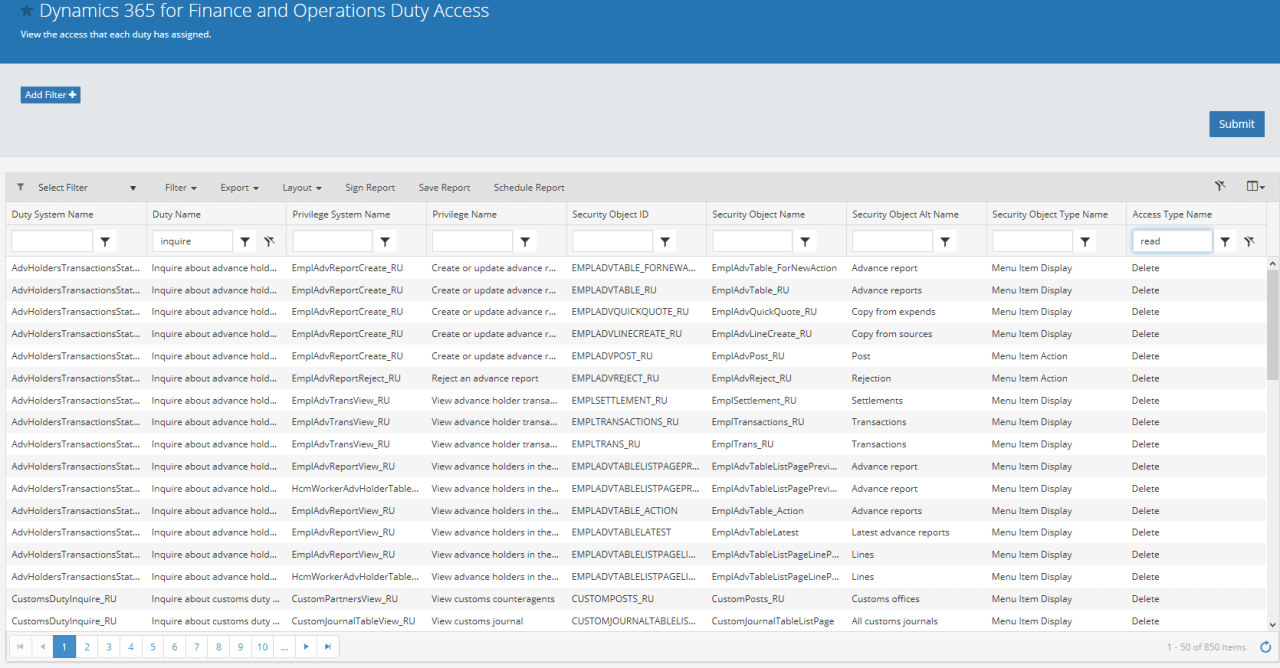
– Finally not all ‘inquiry’ duties are ‘read only’, the screenshot here is from our Fastpath product but there are at least 850 accesses in ‘inquire’ labeled duties that are above a Read level
HI Alex,
First of all i am big of your blogs. Thank you so much for sharing information.
I have one small doubt.
“I created a role (Assume the name Test) in AOT then after DB sync as expected the role appeared in User interface.
Then i thought of deleting the Test role which i deleted in the user interface and published in the user interface.
Nxt again i created the role with same name but this time whatever i do i could not get the role Test again in the user interface. Kindly explain why this happens?
And also if i created role Test_1 in AOT then the role appeared in user interface.
Kamesh,
This is because changes to security done in the user interface can override security in the AOT, in your example since you deleted the role in the user interface it doesn’t matter if you try and recreate it again in the AOT the user interface ‘delete’ action will override it. The only way to undo this would be to remove all user interface security customizations.
Thank you very much for this idea. We are going to use this in a project.
However in my opinion, there are some disadvantages of this solution. But I don’t know a better one neither.
– The new privilege needs to be maintained. Which is not easy. When new menu items are added by MS updates or third party code, these need to be added to the privilege.
– There is no guarantee, that a user with this role is really not able to create/edit any data. There could be a button on a form (non-menuitem-button) with code to edit a record. This may still be available to that user (it’s not how you should design your code, but I have seen such examples even in the standard system)
– You need to reference all other existing models. So I would recommend to create a new model for this privilege and not use your usual extension model (as having so many dependencies could be risky)
Beat,
I agree with your points above, to address your last point you can perform the same action from the Security Configuration form in the user interface which would remove the development dependency: https://alexdmeyer.com/2021/11/11/creating-a-read-only-role-for-d365fo-user-interface/
Thank you for writing this blog!
Quick question Alex. I created this a while back, and while regression testing, we noticed that we could still import people from the AAD, we could still add and remove security roles, etc.
Also, I noticed that the view role doesn’t allow the viewing of any reports. (invoices, etc.)
Since this was written, have you found a way to avoid these holes to ensure that a SysAdmin read-only can still see reports, but cannot get in and modify security?
(Fun note ,currently sitting in Summit 2024 and the speaker just touted how good your blog is! Props to you!)
Chris,
There are some pages/forms within D365FO that just having access to the page (even it is Read access) grants edit permissions. The Security Configuration page that controls security roles/duties/privileges is one of those pages. There is no way to grant access to the page without having the ability to also edit security. If you do not want a user with a ‘read only’ role to have this access, you would have to remove any access to the ‘SysSecConfiguration’ menu item display object.
As far as reports go, you would need to assign access to a different object type, namely menu item outputs which control the access to any reports that are generated within D365FO.