
One new piece of security functionality in D365FO is the idea of having an explicit deny access level available to assign. I’ve written about this access level permission in the past and how it overrides any other grants made to this object when assigned to the user. This functionality did not exist in AX 2012 so the question is ‘How do I utilize deny permissions when setting up security?’
When to use Deny?
It isn’t always straight forward when to use the deny permission. Even if you are using task recordings to help set up security, this process will not identify when to use the deny permission to achieve your end goal as it is only looking for menu items consumed during a recording and you cannot designate certain functionality to be denied.
The easiest way to determine if you should be using this deny functionality is if you think ‘I need this user to be able to access this form but not be able to do [this]’ then it might be a good candidate for using the deny permission.
Scenario
One scenario I hear often is that a company wants a user to be able to have full control (Delete permission) to the sales order lines but not be able to modify the actual sales order header record. So the first thing to do is to take a task recording of you performing the task of modifying, creating, and removing a sales order line from a sales order. When you analyze this task recording in D365FO you get the following menu items:
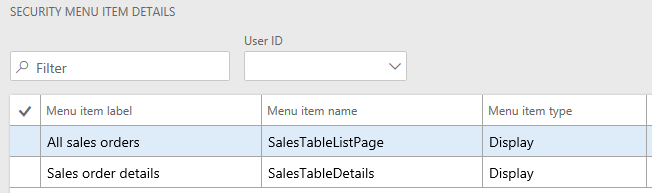
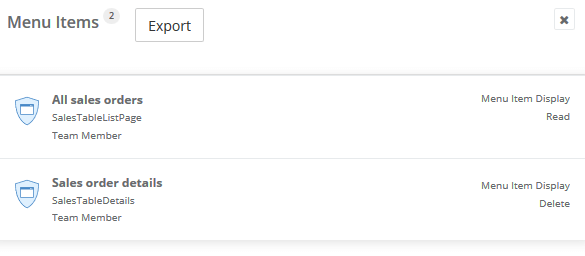
If you take this task recording to Fastpath Security Designer you will be able to see the access types and licenses required for each menu item:
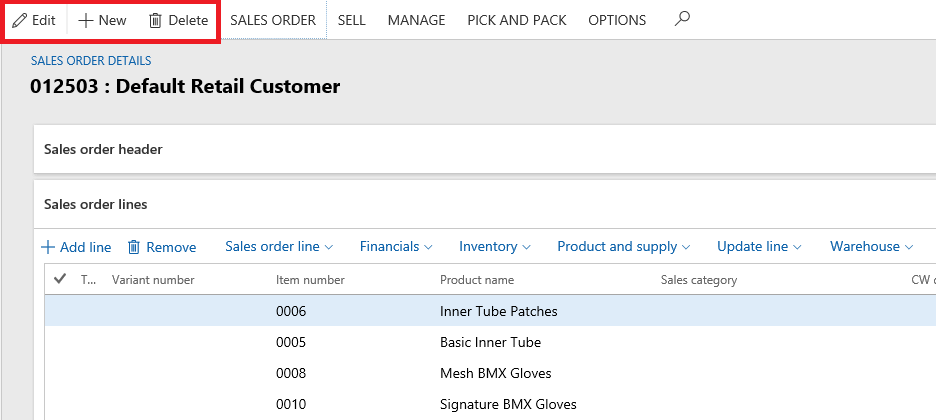
But when you launch a test workspace with this security, you will see that a user assigned these permissions will have the ability to create, modify, and delete the actual sales order as well:
So we need to find a way to lock down that part of the process.
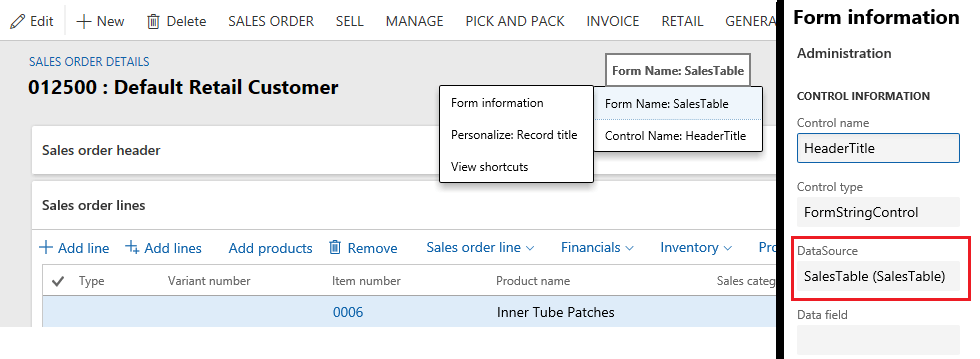
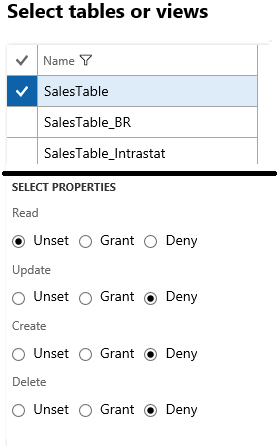
The first thing we need to do is determine the data source of the form we are trying to secure. By right clicking on the form, we can get the detailed information on the form and see that the SalesTable is the data source driving this form.
Then we need to determine which actions we want the user to not be able to perform. In this case, we don’t want to the user to be able to Update, Create, or Delete the actual sales order. This is where adding the Deny permission comes into play. We must first apply a Deny access level permission to the Update, Create, and Delete access type permissions to the SalesTable via the Security Configuration area within the user interface. This change must be done via the user interface as there is no way to Deny individual access types like this in the AOT.
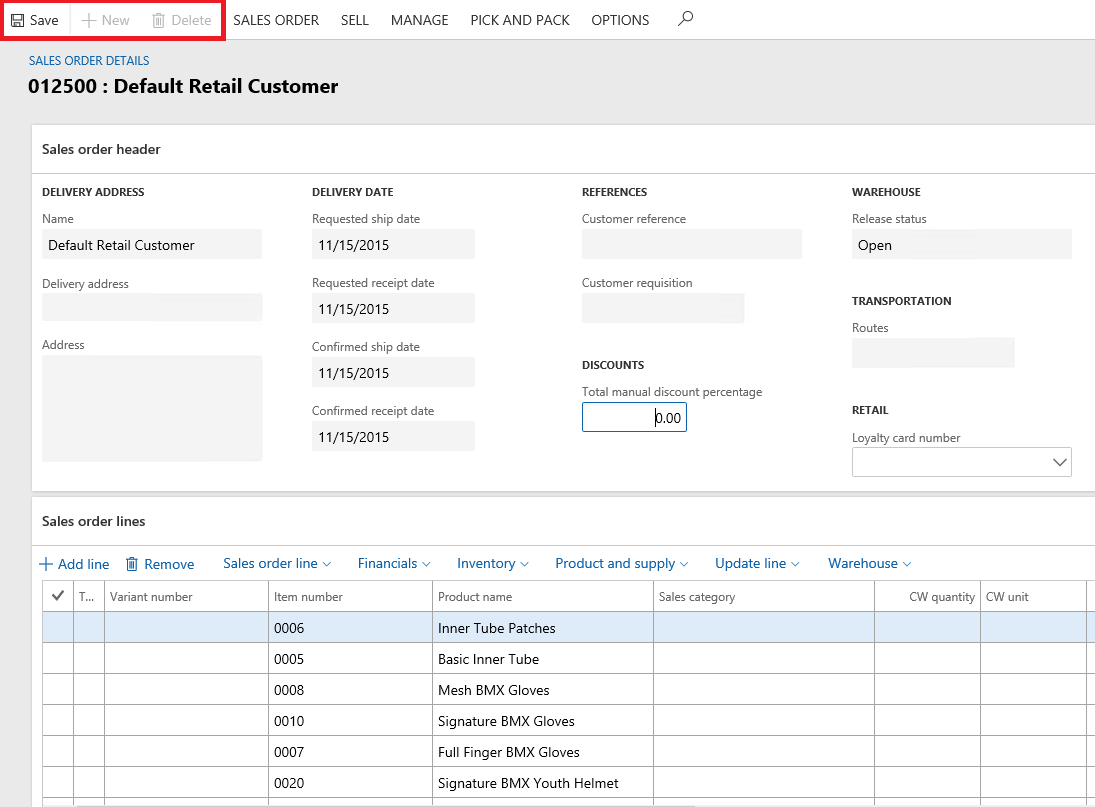
Now when we re-run the test from earlier we can see the user still has the ability to modify the Sales Order Lines but does not have the permissions necessary to modify the Sales Order Header.
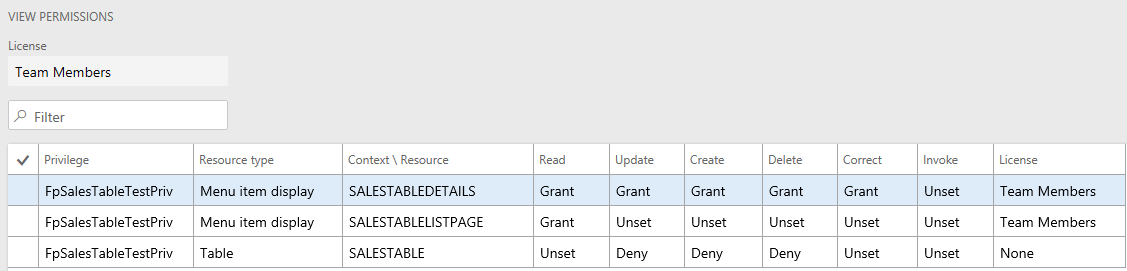
So the final resulting security to get this set up looks like the following:
Conclusion
The Deny security functionality is very powerful, and I recommend that all users upgrading from AX 2012 look at places where they could maybe simplify their security setup to use this new feature. Hopefully this walk through helped show how to use the Deny access level in your security design. As always if you have any questions feel free to reach out.
Hello,
Thanks for this interesting article,
I’m asking how can i add security roles, privilèges or duties by x++ code,
Adnan,
You cannot create security via X++, but you can set up security via the AOT: Setting Up Security in Dynamics 365 for Finance and Operations – Part II – From the AOT
Yes thank you again for all interesting informations.
I know we can’t add them as AOT objects, but we can pass by the data if we analyse the x++ logic of SysSecConfiguration form or by Security Data entities. my question is when the Following system security tables you mentionned before
(SecurityRoleObject – SecurityDutyObject – SecurityPrivilegeObject), when they are filled, is there any event trigger the insertion operation in SysSecConfiguration form, or is there any service which call them, seeing that we can’t access them via AOT
Hello, Thank you so much for this interesting article.
I’m asking how the call is done from D365FO to these tables that you mentionned, is there any event when these data are filled ?
SecurityRoleObject
SecurityDutyObject
SecurityPrivilegeObject
Adnan,
You can’t directly write to these tables, but you can use the Microsoft.Dynamics.AX.Ssecurity.Management.SecurityRepository library to achieve this
Hi Alex,
Thanks again for your reply,
SecurityRepository sr = new SecurityRepository(null, null);
Querying.RelatedSecurityRolesFinder rsrf = new Microsoft.Dynamics.AX.Security.Management.Querying.RelatedSecurityRolesFinder(sr);
I’ve just declatred this 2 variables, but still Don’t know which method can be used to get all SystemSecurityRoleObjects from The table
Adnan,
The SecurityRepository will not allow you to read directly from the database security tables, it is an enumeration of your entire security model. If you want to see all roles in your environment you can do something like this:
SecurityRepository sr = SysSecurity::GetSecurityRepository();
IReadOnlyRoleRepository rr = sr.Roles;
//Loop through rr to get roles, can also do the same thing for duties (sr.Duties) and privileges (sr.Privileges)
Thanks Alex,
Appreciate exchanging with you.
Is there any Insert or add roles object method, i can use, that maybe i forget.
Adnan,
Please review the ISecurityRepositoryTransaction interface along with the SecurityRepository class will allow for this.
Thanks again.
Can you please if you dont mind, help with just quick example: on how to add a role by using this interface + SecRepository, i can’t find any documentation about it.
In the interface i can find only ( Commit + CommitAndPublishChanges) methods.
Appreciate a lot your intercation
Thanks again
Adnan,
You are correct there is no documentation on this, unfortunately I can’t share an exact example as this is the same process that the Fastpath Security Designer I developed uses.
I will say that you should check out ISecurityRepositoryTransaction and look for a CreateNew method, the CommitAndPublishChanges call is required once you are done making security changes for those changes to go live in the system.
Hi Alex, Thank you for your reply.
The goal isn’t really to share business details.
There is really no documentation about this. and i found only your link. which analyze this subject.
In parallel i have just created the Following InsertNewRole Method.
Using Microsoft.Dynamics.AX.Security.Management;
public void insertRole()
{
Microsoft.Dynamics.AX.Security.Management.Interfaces.ISecurityRepositoryTransaction secRepTran;
Microsoft.Dynamics.AX.Metadata.MetaModel.AxSecurityRole axRole = new Microsoft.Dynamics.AX.Metadata.MetaModel.AxSecurityRole();
Microsoft.Dynamics.AX.Security.Management.Interfaces.ISecurityObjectRepository isecRepSec;
Microsoft.Dynamics.AX.Security.Management.Interfaces.ISecurityObjectRepositoryPlugin isecObjRepPlugin;
Microsoft.Dynamics.AX.Security.Management.SecurityIdentifiersBag secIdentiBag = new Microsoft.Dynamics.AX.Security.Management.SecurityIdentifiersBag();
Microsoft.Dynamics.AX.Security.Management.Interfaces.IRoleRepository roleRepo;
axRole.Name = “role 1”;
axRole.Label = “role 1 lbl”;
axRole.Enabled = NoYes::Yes;
axRole.Description = “role 1 description”;
isecRepSec.CreateNew(sr);
isecRepSec.CreateNew(axRole);
isecObjRepPlugin.CreateNew(sr);
isecObjRepPlugin.CreateNew(axRole);
secRepTran.Commit();
}
but i can’t check any updates 🙁
Adnan,
This code will create a new role in every version of D365FO from PU12 -> PU28:
//X++
SecurityRepository sr = SysSecurity::GetSecurityRepository();
//Now pass this security repository to a .NET method and use it in the below
//C#
using (ISecurityRepositoryTransaction trans = sr.StartTransaction())
{
Role newRole = trans.Roles.CreateNew(securityLayer.Name);
newRole.Description = securityLayer.Description;
SecurityIdentifiersBag _missingDependencies;
trans.CommitAndPublishChanges(out _missingDependencies);
}
Hi Alex, don’t know if this something new in a PU that came after your post here, but you can deny access to datasources from a certain form in the AOT.
When you add a display menu item to a privilege, then you can expand the entry point and there are 2 nodes: datasources/controls. There you can add the datasource you want to deny access on. If you specify the “No access” permission, you will be denied access to that datasource on that form.
REMARK: the controls you can add explicitely are only the controls that have Permission set to “Manual” on the form.
As far as I can tell, the “No access” in the AOT is the same as “Deny” in the GUI.
I did some tests and the “No access” has priority over “Delete”. (if you would have 2 privileges that had both the same entry point, one with “Delete” and one with “No access”, the result would be that you have no access).
Sven,
You are correct that there is a No Access option in the AOT, which completely denies access to an object.

What you can’t do from the AOT is to allow Read access to an object but deny access to Update, Create, and Delete access.
If you denied access like you mentioned to the SalesTable in the example in this post the user would not be able to access the Sales Order header form at all as they wouldn’t have access to the datasource.
Hi Alex,
Great blog, I have found it really useful.
I am trying to deny the on hold status on the supplier record but that is something I am struggling with, we have set the deny on the privilege ‘maintain on hold vendor status’ but it is still appearing.
Would this require XDS? Or is there another way?
Appreciate your feedback.
Thanks
Natalie,
Thanks for the kind words, I’m glad you found the blog helpful.
In your case, you may have to look at using field level security to deny the access to that particular field (I believe the ‘On Hold’ status is a field on the supplier record but I could be wrong).
Hi Alex
I can see some excellent discussion on the security roles/privileges. I have a problem on a similar lines, I have an ISV who have extended some standard privileges and ‘Deny’ some of the standard behavior. Is there a way to get a list of all such roles/privileges that are denying property set?
Baseer,
There is the ‘View Permissions‘ report in the user interface or the ‘View Related Objects and Licenses For All Roles‘ report in the AOT. Unfortunately there isn’t one centralized place to get this data. I will say that I have created Role Explicit Deny report that is included as part of the Fastpath cloud solution that I am the lead developer on.
If you have any questions on this feel free to reach out directly at meyer@gofastpath.com.
I’m in a bit of a pickle and wondered if you could help
I have a requirement where I wish to restrict access for the user to be able to ‘Edit’ vendor bank account information, but still hold the ability for the user to create new records and also delete current records. I have tried seemingly everything within the permissions of the ‘Maintain vendor bank account’ privilege. However, if I restrict access using ‘Deny’ to Edit the record, it also makes it impossible for the user to Create a ‘New’ vendor bank account – all the fields are blanked out.
Do you know how I could resolve this issue. It would be such a big help if you have any ideas?
Jacob,
There is no out of box way to do what you are asking for because of the hierarchy based structure of access types in D365FO (Read -> Update -> Create -> Delete). The Deny permission is an explicit deny so that will override all grant permissions assigned to an object. To be able to allow someone to Create and Delete vendor bank accounts but not edit you would either have to create a new form specifically for this purpose or add custom code to this form to validate if the user should be able to edit records based on some user parameter (assigned role, department, etc).
The final option I will put here is to just assign the Delete permission to the user and turn on some sort of audit tracking on vendor bank accounts. That way you can validate if a user has made an update to these records without having to rely on security. If you don’t want to use the out of box Database Log, I would recommend checking out the Fastpath Audit Trail solution which I am the lead developer on.
Hi Alex,
Can purchase orders be configured to allow deletion of lines while preventing deletion of the entire purchase order? Currently, setting “Deny” on PurchTableListPage results in both the purchase order header and PO lines being protected from deletion. The task recorder only provides information on the PurchTableListPage menu item, unlike with your sales order example.
Pushkar,
Since purchase orders follow a similar setup to sales orders with a header table (PurchTable) and a line table (PurchLines) where you would deny Update/Create/Delete permission to the PurchTable table object but grant full control to the PurchTableListPage menu item display. This would make it so the user would have full control to all other aspects of the purchase order but would not be able to create, update, or delete a purchase order header object.
Hi Alex, I might be silly here, but I didn’t find any documentation around and hopefully asking you is faster than testing it 🙂
Could “Deny” custom roles be used instead of creating full customized roles?
My idea is to use standard roles and aggregate them to obtain everything the specific user/group should be able to do in the system and then create a customized “Deny” role, with only “Deny” permissions.
In this way we would be able to use the standard roles with all the advantages still restricting them in a customized way. Does it make sense?
Marco,
This is an interesting concept, to answer your initial question is this technically possible? Yes! Is this something you should do from a best practice perspective, I think it depends on the situation.
If you have a role and want to remove a handful of permissions (ex: 5% of the role permissions), I think this is definitely a possible solution.
If you have a role and want to remove a majority of the permissions of the role (ex: 50%+ of role permissions), I think there is a better way to achieve this.
TL;DR version – The deny permission is a powerful new tool when configuring security but there is a time and place for utilizing it to achieve a maintainable security setup.
We did use Subroles with ‘deny’ access when adding out of box roles for end users. This was mostly done for segregation of duty risks. I also didn’t like the idea of creating custom roles, as the custom roles might not ‘know about’ new features/functionality as they are released.
Helpful article. Saved me a day. Thanks Alex.
Hi Alex,
Great article and thanks for sharing your knowledge. I have a scenario where I need to remove access from ‘setup’ related forms for all modules, from all security roles in D365 F&O.
Rather than going into each security role individually, and removing create/update/delete access (‘Read’ is fine to stay), I am thinking of creating a custom duty where all ‘setup’ related forms are bundled together with ‘deny’ permission sets. Then, simply assigning this duty to all security roles. This could save me a lot of effort in terms of modifying all duties/privileges separately for all security roles.
What’s your view of this approach? Can you see anything break?
Thanks in advance!
Cheers,
Yatri
Yatri,
Most items in the ‘Setup’ area of a module are menu item displays but there are some menu item outputs and actions mixed in there. I have not tested the scenario you provided but I do not see an initial issue with this approach.
I would recommend keeping an eye on future blog posts as I am in the process of creating one surrounding the menu items that are associated with user interface menu options (which would come in handy for a situation like yours).
If you do proceed with this option, please keep us updated on the final result!