
I recently posted a video of a new project I have been working on to help with security testing in D365FO. I am now ready to officially release the D365FO Security Test Workspace solution in a Beta state for testing and feedback so I wanted to give an overview of how it works, how to set it up, and the features it offers.
Microsoft’s Answers to Security Testing
In AX 2012, the Security Development Tool had to the ability to launch a test workspace for any role, duty, or privilege in the system. This functionality sat in the AOT and required a user be assigned the SysAdmin role to function. There were some limitations though in that you could not launch this for multiple security levels at once and there was no functionality to be able to pull in a user’s current access as a starting point.
Once the Security Development Tool is installed, in the AOT you can go to any role, duty, or privilege and go to Add-Ins -> Security Tools -> Security Development Tool: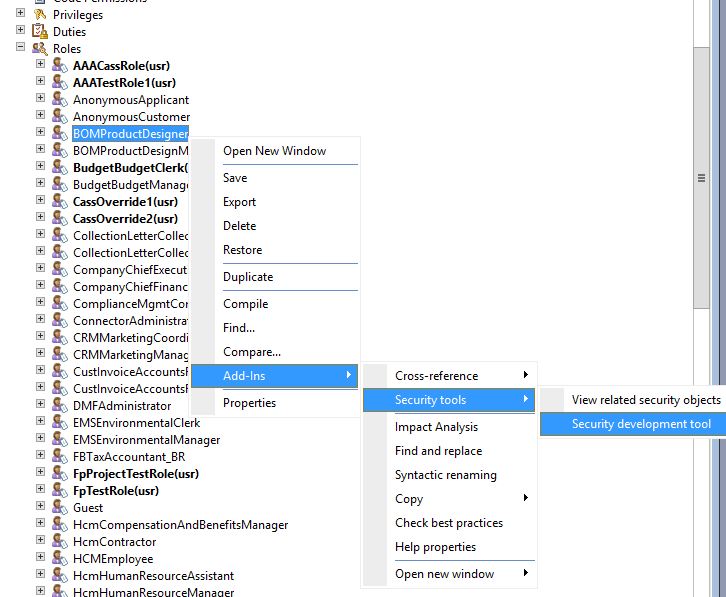
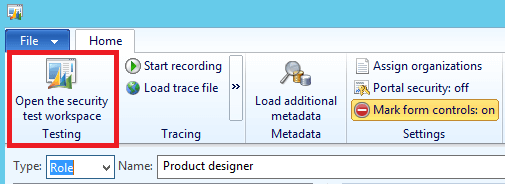
Then go to Open the Security Test Workspace menu button:
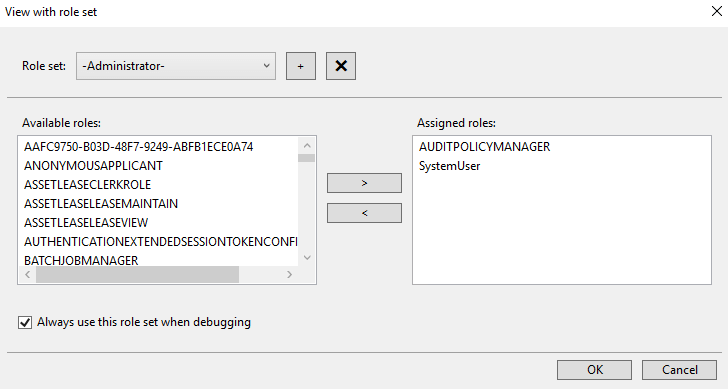
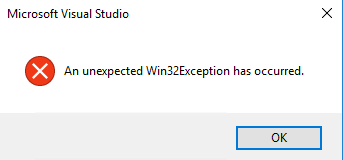
In D365FO, there was no official feature for this type of security testing however there was a hidden feature you could enable by installing a Visual Studio extension called ‘View with Role Set’. I’ve actually written about this feature before. This solution had the ability to launch a test workspace for any combination of roles you wanted, as well as had the ability to pull in a user’s current role assignments as a starting point where you could then modify them to see the result. However there were gaps in this solution as well as you could not launch a test workspace at a duty or privilege level. Also, Microsoft seems to have broken this functionality in recent versions where you will get this error message if you try and launch the application:
My Answer to Security Testing – D365FO Security Test Workspace
My idea was to combine the best of both the AX 2012 Security Development Tool and the D365FO View with Role Set solutions. The D365FO Security Test Workspace solution offers the following features:
- Can take any combination of roles, duties, and privileges and create a ‘mock’ security role out of it
- Can pull in current user role assignments and then assign additional roles, duties, or privileges to that or revoke any current user roles
- The user executing the tool does not need any access to D365FO (the deployable package comes with its own least privilege role to assign to your service user)
The setup process for the tool is as follows:
- Create an app registration for our external application to authenticate to your AAD -> D365FO instances
- Links to help
- Set up Azure Active Directory Applications in System Administrator -> Setup -> Azure Active Directory Applications
- Navigate to the D365FO Security Test Workspace GitHub page
- Either download the latest pre-built release or clone the entire project locally and build it yourself
- If not a current Fastpath customer, you need to download and install the deployable package into your D365FO environment
- Assign the AMSecurityRoleTest role to the service account user tied to the Azure Active Directory Applications
In the D365FO Security Role Test Workspace solution:
- Go to File -> Setup Connection
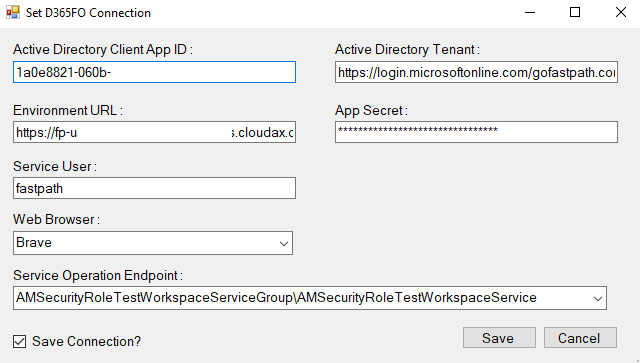
The following parameters are from the App Registration created in Azure:
- Active Directory Client App ID
- Active Directory Tenant
- Environment URL
- App Secret
The Service User is the user you want to assign the test security for.
The Web Browser drop down is what web browser you want to launch the test workspace in (I recommend having this be a separate browser from your normal browser so you can log in as your service user and save the credentials, this will make the security testing a much smoother process).
The Service Operation Endpoint allows you to select which endpoint you would like to utilize to create the mock security. If you are a current Fastpath customer that owns the Security Designer module you can utilize the FPSecurityDesignerServiceGroup\FpSecurityDesignerService. Otherwise you will need to set this as the AMSecurityRoleTestWorkspaceServiceGroup\AMSecurityRoleTestWorkspaceService.
Using the D365FO Security Test Workspace
Once the connection information is setup, to start using the application select either Role, Duty, or Privilege from the Security Layer Type area and then click the Load Security Layers button. This will make a live call to your D365FO environment and pull in the current security layers for that type. You can then select any security layers you would like and move them from the Available Security Layers side to the Assigned Security Layers side.
If you select the Role security layer type, the Load User Roles button will also be enabled. Using the Users drop down you can select any currently enabled user in your D365FO environment and click the Load User Roles button to pull in their currently assigned roles. You can then modify their access further by adding additional roles, duties, or privileges or removing any of their currently assigned roles.
Note: This process does not impact any current user access or user role assignment
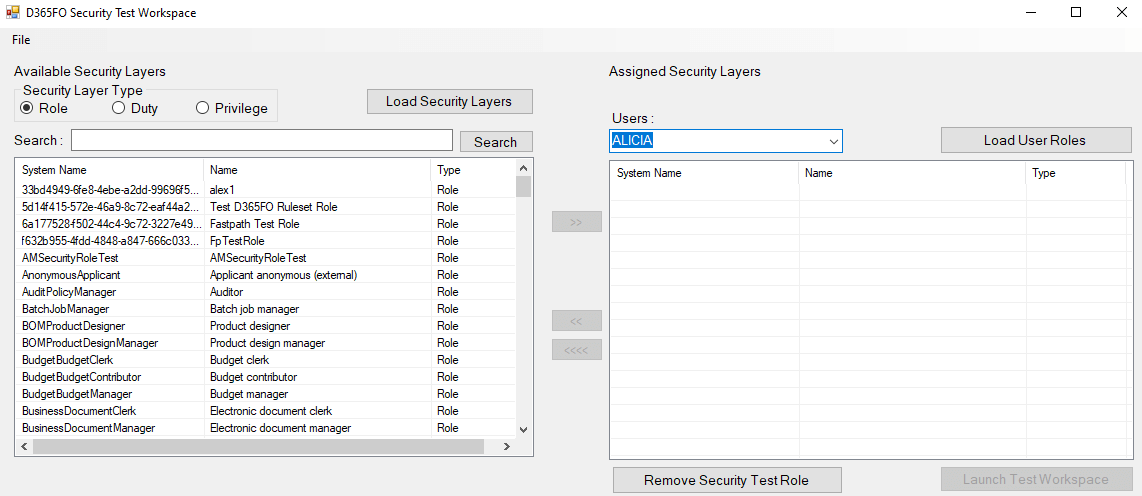
Once you are ready to test your combination of security, click on the Launch Test Workspace button. This button performs the following tasks:
- Removes any current role named ‘Security Role Test Workspace’
- Creates a new role named ‘Security Role Test Workspace’
- Assigns the roles, duties, and privileges listed in the Assigned Security Layers area to this ‘Security Role Test Workspace’ role
- Assigns the ‘Security Role Test Workspace’ role to the user designated in the Service User connection parameter
- Removes any other roles assigned to the Service User, except the following:
- SystemUser
- Any Fastpath role (Fastpath Assure, Fastpath Audit Trail, Fastpath Identity Manager, Fastpath Quantification, Fastpath Security Designer)
- Opens the browser you selected in your connection information and navigates to the following URL:
- <EnvironmentURL>?cmp=DAT&mi=DefaultDashboard&disable365shell=true
You can now test your security configuration in a live D365FO environment.
Once you are done testing you can come back into the D365FO Security Test Workspace application and ‘reset’ your environment by clicking on the Remove Security Test Role button. This will perform the following actions:
- Revoke the ‘Security Role Test Workspace’ role from your Service User
- Remove the ‘Security Role Test Workspace’ role from your environment
Conclusion
I hope this application makes testing your security in a live environment a slightly easier process. If you have questions, comments, or suggestions for the application feel free to reach out to me at any of the following:
Email: alex.itguy@gmail.com
Hi Alex,
First of all, thanks a lot for the tool. Looks really promising!
I am looking forward to testing it; however, I can’t find the AMSecurityRoleTest deployable package (specified as a requirement) in your GitHub project.
Kind regards,
Sergey
Sergey,
It is available in the Releases area of the GitHub project: https://github.com/ameyer505/D365FOSecurityTestWorkspace/releases/tag/v1.2
Hello Alex,
I am new to D365FO development, so my questions may seem incompetent.
1) Wy should we provide app-registration for this workspace? “View with role set” did not require any app-registration.
2) If I need to test security roles on dev-environment, deployed under not mine microsoft subscription, as far as I understand, I will not be able to provide app-registration for such an environment. Am I right?
Thank you for answers.
Nick,
1) The ‘View with Role Set’ feature was built into Visual Studio and therefore did not need any additional authentication. The D365FO Security Role Test Workspace is an external application so it requires an app registration just like every other external application to authenticate to D365FO.
2) If you want to use the D365FO Security Role Test Workspace, then you must have the ability to create an app registration in the same AAD tenant as your D365FO environment.
Hi Alex,
I can say this is wonderful tool. I am trying to use it but facing one issue. Do we need to create a service user separately in AAD to use with this tool. because I am not able to provide roles to my own existing user and use it. If we need to use two separate users then I believe we can directly login to application and provide roles to other user and test it. Please suggest.
Sumit,
There are two users needed for this solution to work, the ‘testing’ user that will be the user context that is used to log into the application, and the ‘service’ user that will be used to actually create the ‘mock’ role as well as add/remove roles from the ‘testing’ user before launching D365FO as that ‘testing’ user.
Hi Alex,
First of all thank you for your nice blog posts! I am just wondering what happened with this tool. The github link provided in this post and in the description of the youtube video seems broken.
John,
Thanks for reaching out, I recently started a new position and my previous employer has claimed ownership of a majority of my previous public GitHub works, so unfortunately I had to take them down. I have left up the blog posts for these for historical purposes. I apologize for the inconvenience.
If you would like assistance with what options are available with this process please feel free to reach out to alex.itguy@outlook.com.